In this tutorial we will go over transforming objects. Once you have created your shapes using the Drawing Tool it is time to manipulate them. In this tutorial you will learn how to change them using the Transform Path settings. These transformations are not limited to just the basic shapes and can be used to manipulate lines, text and other objects. Along the way we will show you important tips and tricks for the Transform Path. Let’s get started!
Currently we are using Windows XP and the Photoshop CS4 Extended version.
Knowledge You Need to Know:
If you are unfamiliar with certain areas that are not covered in this tutorial, feel free to visit us at: http:/Photoshopeducation.blogspot.com. We have many different types of tutorials that can be downloaded (Video, PDF) or viewed online that will train you for free! Once you have the knowledge, feel free to come back and go through this tutorial again.
Preparing To Transform:
Create a new canvas of 800 X 800 (pixels) and set the background to White. Once created, change your foreground color to anything you would like. Use the custom shapes tool and add a light bulb to your canvas.
Scaling:
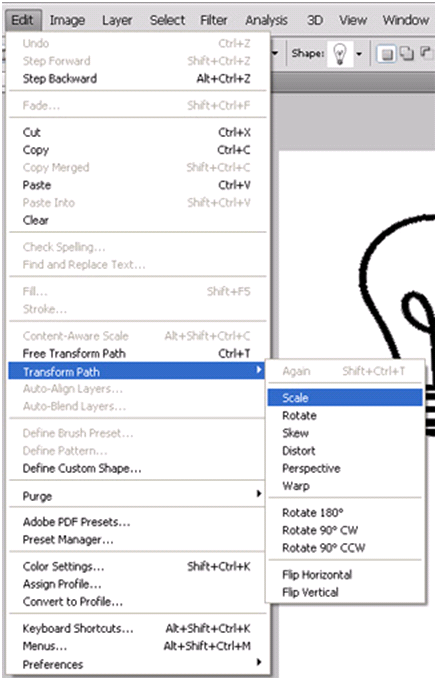
The “Scale” command allows you to change the width or height of the shape. All of the transforming tools commands are located in the Edit menu. Move your mouse to the “Transforming Path” and a sub-menu will be displayed. The options that we will be covering in this tutorial will be located in this menu. Left click on the “Scale” command.

You will notice 8 dots will be around your shape. These dots are “Points”. As you drag your these points, you will see the image scale in size, such as the screen shot below.
A) Use the center point (top or bottom in the middle) to increase or decrease the height of the image. Hold down the Left mouse button and drag the mouse up or down. Release your Left mouse button when you are finished. This point will not change the width of the shape. | |
B) If you want to change the width (either the left center point or the right center point) of the shape, drag your mouse over to the point and hold down the Left mouse button and drag it left or right to increase or decrease the width size. Release the Left mouse button when you are finished. | |
| C) To change the width and height at the same time click on any of the 4 corner points. Move your mouse to one of the 4 points and hold down the Left mouse button and drag it in any direction. Photoshop Tip – To constrain your width and height, hold down the “Shift” key while dragging the image. |

For the Scale, Rotate, Skew, Distort, Perspective, and Warp commands, you need to accept or cancel the changes you have made before continuing.
A) To cancel the scaling process, Left click on the circle with the line through it. | |
B) To commit (finish) the scaling, Left click on the Commit check box. |

Rotate:
To rotate an object, open the “Edit” menu and move your mouse to the “Transform Path” and Left click “Rotate” from the sub-menu.

You will notice a center floating point (A). This tells Photoshop what location is the center and to rotate from that point. Play around with this and you will notice the changes. On this example move this floating point (looks like a crosshairs) towards the top of the image by holding down the Left mouse button and dragging it upwards. Now release the Left mouse button.
To rotate, move your mouse over the top of one of the points. Your mouse pointer will change to a curved arrows pointer. Hold down the Left mouse button and drag to begin to rotate the shape. Release the Left mouse button. Now either cancel or commit (please see the scaling section of this document for more details).

Skew:
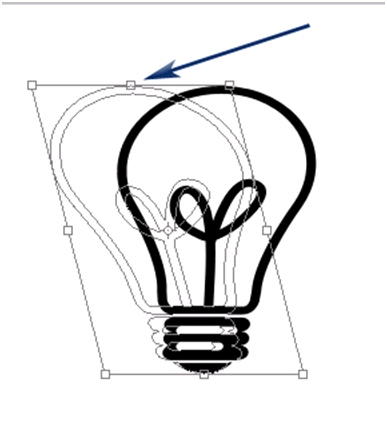
The skew option is very similar to applying italics to text. It slants the shape forward, which is a form of skewing. Left click on the “Edit” menu and move your cursor down to the “Transform Path” and you then Left click on the “Skew” command.

On this example we would like you to move the mouse to the top center point. Now drag your mouse by holding the Left mouse button and move the mouse Left or right. You will see the image shift, like the example below. When you are finished, release the Left mouse button. Use the cancel or commit option when you are finished (please see the scaling section of this document for details on cancelling and committing).

Distort:
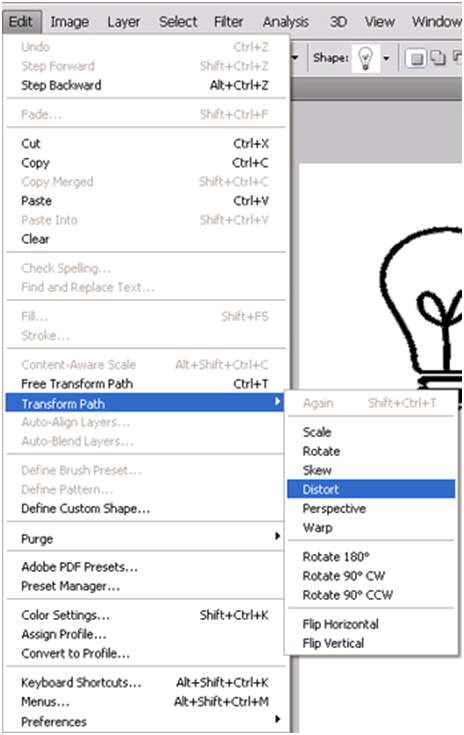
The distort feature allows you to change the dimension of the shape you would like to manipulate. Left click on the “Edit” menu and then move your mouse to “Transform Path”. Now Left click on the “Distort” command.

Move your mouse to one of the 8 points and hold down the Left mouse button and drag the mouse. Release the Left mouse button when you are finished. You can even flip the shape. Drag the top right point to the bottom left point. When you are close to the bottom left point, release the Left mouse button. Left click the “Cancel” or “Commit” buttons (see scaling section). You can also move the center position to distort it differently (See the scaling section for more details).

Perspective:
On this example, we would like you to add a new custom shape to the canvas. Select the “TM” shape which is located at the bottom of the preset box. Draw the custom shape. The reason why we had you use the “TM” is it is easier to explain perspective with letters.
Left click on the “Edit” menu and move your mouse to the “Transform Path” and Left click the “Perspective” command.

If you move your mouse to any of the 8 points, and hold the Left mouse button and drag, you will see the letters change to a perspective view. When you are done, release the Left mouse button. Now select the “Cancel” or “Commit” box (see scaling section for more details). If you drag the points in the corners up or down, you will notice it display a side perspective. If you use the center points (top and bottom) and move it left or right, you will see the perspective shift to the left or right.

Warp:
We will not be discussing all of the features of the “Warp” command in this document due to fact that the “Warp” command is very powerful. Left click the “Edit” menu and move your mouse to the “Transform Path” command and Left click on the “Warp” command.

On this example we will show you how to use the “Presets”.
A) Left click the drop-down box located under the “Layer” menu. | |
B) You will now see the presets. For this example, double Left click on “Arc”. | |
| C) You can move any of the 9 sections (12 points) to warp the image. |
Now select the “Cancel” or “Commit” box (see scaling section for more details). You will notice the text will be “Arc” shaped.

Rotate By Degrees:
Besides manually rotating an image, you can rotate an image by degrees. Use these commands from the “Transform Path” menu.
A) Rotate 180 degrees, will flip it upside down. | |
B) Rotate 90 degrees CW will rotate it clockwise. | |
| C) Rotate 90 degrees CCW will rotate it counter clockwise. |

Flip:
You can flip an image or a shape with either the “Flip Horizontal” (A), which means for the “TM” shape it will flip to “MT”. The other option is to “Flip Vertical” (B), which means for the “TM” shape it will flip it upside down. Both of these commands can be found in the “Transform Path” sub-menu.

This concludes the tutorial on transforming objects. By now you should have a basic understanding of some of the Transforming Path tools. We highly recommend that you take a minute and answer the 10 question quiz below.
Quiz
1). All of the transforming commands for custom shapes are located in what sub-menu?
A). “Transform Shapes”. | |
B). “Transform Image”. | |
| C). “Transform”. | |
| D). “Transform Path”. |
2). What command would you use to resize a shape?
A). “Resize”. | |
B). “Scaling”. | |
| C). “Width And Height”. | |
| D). “Image Scaling”. |
3). What are the dots called that are always displayed when using any transform command?
A). “Dots”. | |
B). “Adjustments”. | |
| C). “Points”. | |
| D). “Boxes”. |
4). For the Scaling command, how do you constrain the width and height of the shape?
A). Left click the “Constrain” checkbox. | |
B). While transforming, hold down the “Shift” key. | |
| C). While transforming, Right click and select “Constrain”. | |
| D). Use a corner point and drag it on an angle. |
5). On the Rotate command, what does the cross-hair point do?
A). It allows you to scale and rotate at the same time. | |
B). If double Left clicked, it will zoom in on the shape. | |
| C). If you move the cross-hairs it will rotate differently. | |
D). It allows you to rotate and change the perspective. |
6). If I wanted to use the preset of “Arc”, what tool would I use?
A). “Distort”. | |
B). “Preset”. | |
| C). “Skew”. | |
D). “Warp”. |
7). The rotate 90 degrees CCW means?
A). Image is rotated 90 degrees. | |
B). Image is rotated 90 degrees clockwise. | |
| C). Image is rotated 90 degrees counter clockwise. | |
D). Flip the image upside down. |
8). What button do you click to finalize any shape when you are finished transforming?
A). “Finish”. | |
B). “Commit”. | |
| C). “Done”. | |
D). “Save”. |
9). What happens when you drag the corners up or down when using Perspective?
A). It will show the shape as a side perspective. | |
B). It will bevel the edges to make it a 3D style. | |
| C). It will bring up a dialog box and ask you the degrees for the angle. | |
D). It makes one side of the image darker. |
10). The “Transform Path” option is located in what menu?
A). “Transform”. | |
B). “Select”. | |
| C). “Analysis”. | |
D). “Edit”. |
Answers: 1). D, 2). B, 3). C, 4). B, 5). C, 6). D, 7). C, 8). B, 9). A, 10). D
Scoring:
0 - 5 = Please review the video tutorial and re-read this document either offline (PDF) or online.
6 – 8 = We would recommend that you print this document off and read it at a later time.
9 – 10 = Congratulations you have passed the quiz. Go ahead and view another tutorial on our site.
We hope you enjoyed this detailed tutorial. Please visit us at: http://photoshopeducation.blogspot.com/ to expand you knowledge within Adobe Photoshop.

Click Picture To Download Video File To View Offline
Download Total Video Player, iTinySoft

Click Picture To Download PDF Tutorial
Download Adobe Reader, Adobe Corporation


After a long time I got something fresh and quality content on massage therapy services. I searched a lot for the related material but got almost replica work. Keep it up! It is really very informative.
ReplyDeleteclipping path
This comment has been removed by the author.
ReplyDeleteGreat entry. I was looking for that. You helped me a lot.
ReplyDeleteHolly