In this tutorial we will show you the basics of selecting image content. Photoshop offers a number of selection tools to copy or move a portion of the image. With good selections, you will be on your way to editing photos quickly. We will be discussing the Rectangular, Elliptical, Single Column/Row Marquee Tool, Lasso, Polygonal Lasso and the Magnetic Lasso tool. While we walk you through the common steps to select an image, we will show you some important tips and tricks such as how to add or subtract from your selection. Let’s get started!
Currently we are using Windows Vista Home Premium 64 Bit and the Photoshop CS4 Extended 64 Bit version.
Knowledge You Need to Know:
If you are unfamiliar with certain areas that are not covered in this tutorial, feel free check out other tutorials on our website. We have many different types of tutorials that can be downloaded (Video, PDF) or viewed online that will train you for free! Once you have the knowledge, feel free to come back and go through this tutorial again.
Preparing For This Tutorial:
You will be using the Sky image which we have used in past tutorials. If you do not have this image, please scroll down to the “Click Picture To Download Supporting Files” and download the image.
Please open the image DSC03562 in the Photoshop Program.
Rectangular Marquee Tool:
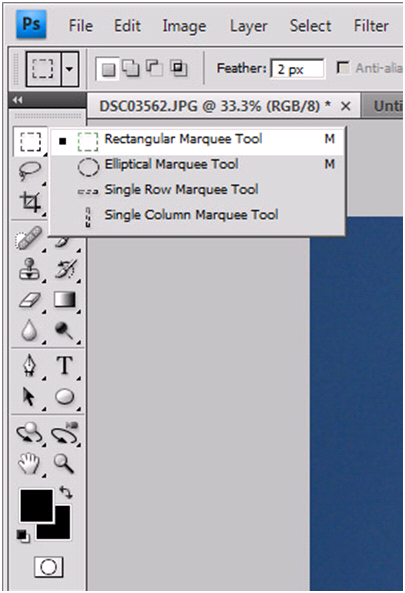
Use the Marquee tool to make selections that are regular in shape (rectangles/squares). On a 2 column tool bar, you will find the “Rectangular Marquee Tool” located on the top left hand side of the toolbox. Right click this tool and Left click “Rectangular Marquee Tool”.
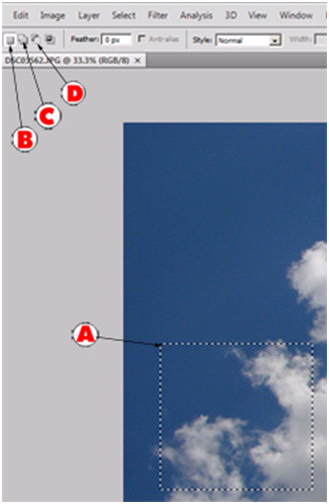
To use the “Rectangular Marquee Tool”, move your mouse pointer to the image and hold down the Left mouse button and drag the mouse A). Release the Left mouse button to make your selection. Photoshop Tip – To constrain you rectangle to a perfect square, hold down the “Shift” key when drawing the box.
B). This button tells Photoshop that the selection will be considered a “New Selection”. | |
C). After you have created your selection, you can Left click this button to add to your selection. Just follow the steps with A) to add to the selection. | |
D). After you have created your selection, you can Left click this button to subtract from the selection. Just follow the steps with A) to subtract from the selection. |
Photoshop Tip – Hold down the “Shift” key to add to a selection or “Alt” key to subtract from the selection.
You will notice we skipped over a few options and that is because most of the options you can do is located within the “Refine Edge” screen located in the Photoshop CS4 program. If you do not see this button, either you are using an older version of Photoshop or you have not made a selection with the “Rectangular Marquee Tool”. Left click on the “Refine Edge…” button.

There are many options in the “Refine Edge…” screen. We recommend that you play around with each setting. You can hold down the Left mouse button to move the slider (release the Left mouse button when you are finished) or you can Left click in the text boxes and enter a numeric value. Photoshop Tip – As you move your mouse to each slider, you will notice a description will be displayed at the bottom of the screen, explaining each option.
A). Left click these buttons to preview using a different background color (make sure the “Preview” checkbox is selected located under the “Default” button). | |
B). “Radius” – Increase this number to improve the edge in areas with soft transitions or fine details. | |
C). “Contrast” – This will allow you to make the edges more crisp. | |
| D). “Smooth” – Removes the jagged edges around the selection. | |
| E). “Feather” – This allows you to blur the edges. | |
| F). “Contract/Expand” – You can reduce or increase the selection size with this option. | |
| G). When you are finished Left click the “Ok” button and you will see your selection change. You can also “Cancel” which will not make any changes or use the “Default” button to reset your “Refine Edges..” back to the default settings. |

Cut, Copy, Paste, Move:
Now that you have selected the image, what can you do with it? From the “Edit” menu, Left click on the commands.
| A). “Cut” – Cut the selection. You can use CTRL-“X” as a keyboard shortcut. | |
| B). “Copy” – Copy the selection. You can use the keyboard shortcut of CTRL-“C”. | |
| C). “Paste” – Paste the selection. You can use the keyboard shortcut of CTRL-“V”. |
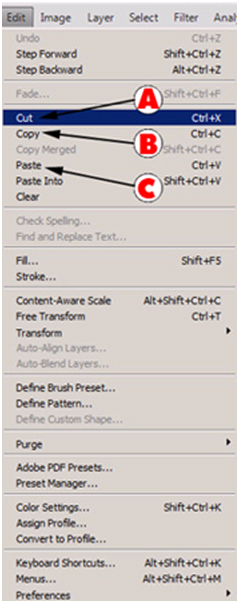
Now you might be wondering, wait a second, I pasted it and I do not see it. That is because Photoshop by default will paste right on top of the selection. You will have to move it to see the paste. The “Move” tool is located on the top right of the toolbox in a 2 column toolbox. Left click the “Move” tool to use it (looks like a cursor with a crosshairs button). Photoshop Tip – To deselect a selection, use the keyboard shortcut of CTRL-D.

On this example we held down the Left mouse button on where we selected the image and dragged the mouse up and to the right. Release the Left mouse button when you are finished. Instead of using the “Cut” command, you can go directly to the “Move” tool and as you move the selection, you will see that the original selection will be an empty space. You will notice when you “Paste” it will create a new layer in the layers palette. We will be discussing layers shortly in an up and coming tutorial. Don’t worry about layers right now.

Elliptical Marquee Tool:
You can select a portion of the image using the “Elliptical Marquee Tool” which will use a circle as your selection. We will not be covering all the options for this tool because they are the same as the “Rectangular Marquee Tool”. Please refer to that section for more information.
| A). Right click the Marquee Tool in tool box and Left click the “Elliptical Marquee Tool”. | |
| B). Now move your mouse cursor to the area that you would like to select and hold down the Left mouse button and move your mouse. Release the Left mouse button when you are finished. |
Photoshop Tip – To make a perfect circle, hold down the “Shift” key on your keyboard while dragging this tool.

Single Row Marquee Tool & Single Column Marquee Tool:
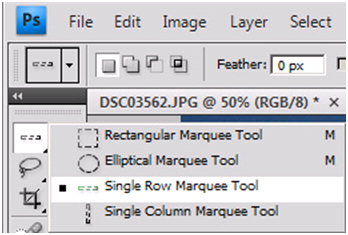
You will notice 2 more options when you Right click on the marquee tool in the toolbox. 1). “Single Row Marquee Tool” which means when you draw the selection it will select a line (left to right) that is 1 pixel in height. 2). “Single Column Marquee Tool” is used when you want to select (top to bottom) 1 pixel in width. We will not be discussing the options because they are the same as the “Rectangular Marquee Tool”. Please refer to that section of this tutorial for more details.
Photoshop Tip – To use the last active Marquee tool, use the keyboard shortcut of “M”.
Lasso Tool:
The next tool we will be discussing is the “Lasso Tool”. This is located right below the “Marquee Tools” on the left hand side of a 2 column toolbox. Right click this toolbox image and Left click the “Lasso Tool” command. The “Lasso Tool” is more of a freehand selection tool.

The “Lasso Tool” is very easy to use (we even showed how to use it in a previous tutorial when creating “Custom Brushes”). Hold down your Left mouse button and begin to move your mouse. On this example, we would like you to make a circle. When you get back to the starting point of the circle, release your Left mouse button. You should see the “Marching Ants” displayed around your selection. If you release your Left mouse button early, Photoshop will close the loop by going directly to the starting point. Please note, you can draw in any direction and it does not have to be a circle.
The options for the “Lasso Tool” is the same as the “Rectangular Marquee Tool”. Please review this section of this tutorial for more information.

Polygonal Lasso Tool:
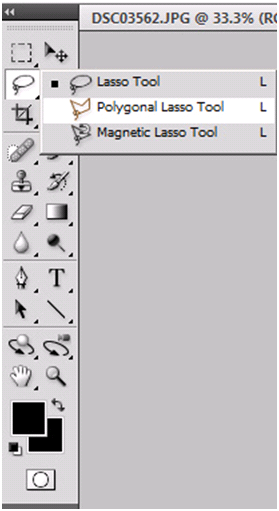
The “Polygonal Lasso Tool” is similar to the “Lasso Tool”, except you can be precise with your selection by making “Points” in the selection. This is an excellent tool to make a detailed selection. Right click the “Lasso Tool” in the toolbox and Left click the “Polygonal Lasso Tool”. The options for this tool are the same as the “Rectangular Marquee Tool”. Please refer to that section of this tutorial for more information.
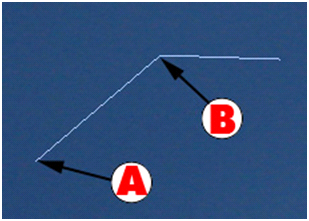
To use the “Polygonal Lasso Tool”, you want to move your cursor to the area of the image that you want to select and single Left click the first “Point”. Now drag your mouse to the second location and single Left click to create a second “Point”.
| A). On this example, this was our starting point which we single Left clicked. | |
| B). On this example, this was our second point which we single Left clicked. |
Photoshop Tip – To delete your last “Point” you created, use the “Delete” or “Del” key on your keyboard.
Just like the “Lasso Tool” you need to close the loop. When you get back to the starting point, you will notice your cursor pointer change and it will display a small 0 next to your pointer. That tells you that if you Left click on that point it will close the loop and will make your selection. Photoshop Tip – To close the loop at any point, you can Double Left click your next point. If you want to cancel while using the “Polygonal Lasso Tool” press <ESC> on your keyboard.

Magnetic Lasso Tool:
The final basic selection tool is the “Magnetic Lasso Tool”. This tool is very similar to the “Polygonal Lasso Tool” (that is the reason why we discussed the “Polygonal Lasso Tool” first). Right click the Lasso toolbox and Left click the “Magnetic Lasso Tool”.

Single Left click your first point and now drag your mouse around the area you would like to select. Photoshop will try to find the edges of the object. You will notice points will be added as you drag the mouse. Just like the “Polygonal Lasso Tool” you can use the “Delete” or “Del” key on your keyboard to delete the last point. You can even use the Photoshop Tip of Double Left clicking to close the loop. Photoshop Tip – You can force a point by single Left clicking.
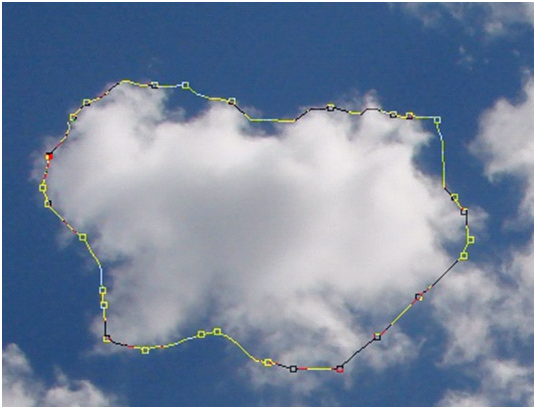
Besides the standard “Rectangular Lasso Tool” options, you will notice a few additional options. For all of these options, Left click in the text boxes to change the numeric value.
| A). “Width” - This is the distance beyond the pointer that it will consider as an edge. | |
| B). “Contrast” - This sets the amount of detail it uses to determine the edge of the object. | |
| C). “Frequency” – This is the frequency of how often the “Points” are added. |
Photoshop Tip – When you are using this tool it is better to move your mouse slower then faster.

This concludes the tutorial on selecting image content. You should now have a basic understanding of the Rectangular Marquee Tool, Elliptical Marquee Tool, Single Row Marquee Tool, Single Column Marquee Tool, Lasso Tool, Polygonal Lasso Tool, and the Magnetic Lasso Tool. You should also know now on some of the ways you can use a selection tool. As you can see there are some areas we did not cover in this tutorial such as how you can save or load a selection. At this time, we just want to get your feet wet with using the selection tools. Don’t worry, in future tutorials we will be discussing even more features with the selection tools.
We recommend that you take a minute and answer the 10 question quiz below to determine how well you know your selection material.
Quiz
1). When drawing a new selection how do you make a perfect shaped circle with a keyboard shortcut and what tool would you use?
| A). Elliptical Marquee Tool while holding the ALT key. | |
| B). Ellipse Tool while holding the ALT key. | |
| C). Elliptical Marquee Tool while holding the “Shift” Key. | |
| D). Ellipse Tool while holding the “Shift” key. |
2). What keyboard shortcut do you use to add to a selection once you already have a selection?
| A). While holding down the Left mouse and dragging, hold down the “Shift” key. | |
| B). While holding down the Left mouse and dragging, hold down the ALT key. | |
| C). While holding down the Left mouse and dragging, hold down the CTRL key. | |
| D). While holding down the Left mouse and dragging, hold down the “FN” key. |
3). How do you delete the last “Point” in the “Polygonal Lasso Tool”?
| A). Press <ESC> key to delete the last point. | |
| B). Double Left click the last point and select Delete in the options bar. | |
| C). Drag the point to the trash can. | |
| D). Press the “Delete” or “Del” key on your keyboard. |
4). In the “Refine Edges” window how to do you sharpen jagged edges?
| A). Use the “Smooth” option. | |
| B). Use the “Feather” option. | |
| C). Use the “Contact/Expand” option. | |
| D). Use the “Sharpen” option. |
5). What is the keyboard shortcut for “Paste”.
| A). CTRL-“P”. | |
| B). CTRL-“X”. | |
| C). CTRL-“V”. | |
D). CTRL-“Z”. |
6). The “Magnetic Lasso Tool” has an option called “Width”, what does this option do?
| A). This is the width contrast it will use. | |
| B). This is the distance beyond the pointer that it will consider as an edge. | |
| C). This is the frequency of how often the “Points” are added. | |
D). This sets the amount of detail it uses to determine the edge of the object. |
7). What is one way to deselect a selection?
| A). Hover over selection and select “Deselect” from a popup box. | |
| B). Use “D” to deselect. | |
| C). Use ALT-“D” to deselect. | |
D). Use CTRL-“D” to deselect. |
8). In either “Magnetic Lasso Tool” or “Polygonal Lasso Tool” what is one way to close the loop?
| A). Double Left click the next point. | |
| B). Hold down the CTRL-“Shift” key when Left clicking the next point. | |
| C). Turn on “Auto Close” loop in the preferences. | |
D). Left click the “Auto Close” option in the options bar. |
9). When using the “Magnetic Lasso Tool” how do you automatically create points?
| A). Double left click the next point and the auto feature will be turned on. | |
| B). After the first point, it automatically creates points when dragging your mouse. | |
| C). In the options bar, select (check box) “Auto Points”. | |
D). In the preferences, first select “Auto Points” and then it will be automatic. |
10). In either the “Single Row” or “Single Column” marquee tool, what is the default width or height?
| A). 1 Inch. | |
| B). 1 Centimeter. | |
| C). 1 Each. | |
D). 1 Pixel. |
Answers: 1). C, 2). A, 3). D, 4). A, 5). C, 6). B, 7). D, 8). A, 9). B, 10). D
Scoring:
0 - 5 = Please review the video tutorial and re-read this document either offline (PDF) or online.
6 – 8 = We would recommend that you print this document off and read it at a later time.
9 – 10 = Congratulations you have passed the quiz. Go ahead and view another tutorial on our site.
We hope you enjoyed this detailed tutorial. Please visit us at: http://www.photoshopeducation.blogspot.com/ to expand you knowledge within Adobe Photoshop.

Click Picture To Download Video File To View Offline
Download Total Video Player, iTinySoft

Click Picture To Download PDF Tutorial
Download Adobe Reader, Adobe Corporation
Click Picture To Download Supporting Files
(Brushes, Textures, Fonts, Images, Actions, .PSD, Etc.)
Download ZipGenius Standard Edition 6.0.3.1150, Dicono di ZipGenius


No comments:
Post a Comment