Summary:
The Dodge, Burn, and Sponge tools in Photoshop help you mimic a photographer’s tricks in correcting lighting in an image. We will be showing you the Dodge tool which will help you lighten an area and even the Burn tool which will darken an area. Finally we will show you the Sponge tool which can desaturate or saturate a color. These tools are a necessity for any amateur or professional photographer that is looking to enhance specific areas of a photo.
Currently we are using Windows Vista Home Premium 64 Bit and the Photoshop CS4 Extended 64 Bit version.
Knowledge You Need to Know:
If you are unfamiliar with certain areas that are not covered in this tutorial, feel free check out other tutorials on our website. We have many different types of tutorials that can be downloaded (Video, PDF) or viewed online that will train you for free! Once you have the knowledge, feel free to come back and go through this tutorial again.
Preparing For This Tutorial:
We will be using a picture of a Pixar character in this tutorial. If you do not have this image, please scroll down to the “Click Picture To Download Supporting Files” and Left click the picture to download the image. Please open the image PE-PIXAR in the Photoshop Program. Now duplicate the background layer and hide the background layer.
Overview:
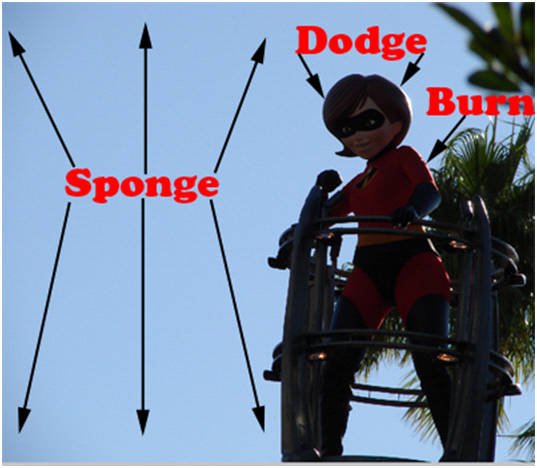
All the tools that we are about to go over are meant for small fixes (not the whole image). By now, you should have the image opened. Let’s point out the areas that we will be working on. We will be Dodging the head only. We will Burn the shoulder to make it darker. Finally, we will use the Sponge tool to make the sky more black and white.

Dodge Tool:
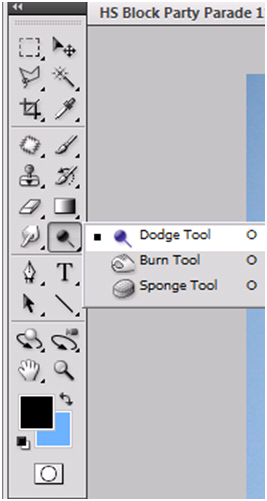
The first tool is the Dodge Tool. Think of this tool as the lighten tool. In a 2 column toolbox, you will find all 3 tools right below the Gradient Tool (located in the center on the right hand side). Right click this image and Left click the Dodge Tool. Photoshop Tip – To use the last Dodge, Burn, Sponge Tools, use the keyboard shortcut of “O”.

Once you activated this tool, you will notice at the top of the window an options bar will be displayed.
| A). We have talked about the paint brush before in the Colors And Painting Tools tutorial. | |
| B). Range specifies whether the Dodge tool affects shadows, midtones, or highlights in areas over which you drag. For this example, make sure the range is set to “Shadows”. Left click the down arrow and then Left click “Shadows”. | |
| C). The Exposure identifies how much of a change the Dodge tool makes as you drag. Basically you are telling Photoshop how strong you want it to lighten. For this example, make sure it is set to 50-60%. Left click the right arrow or Left click the percentage box to make the change. Photoshop Tip –It is always better to start with a lower exposure, because you can always go over the areas again if needed. For this example, we actually started with an Exposure of 30% and realized that we needed to go over it twice. | |
| D). This will simulate Airbrush strokes. If you Left click it, you will notice that it adds a gray box around the image. For this example, make sure this is turned off. | |
| E). Protect Tones tells Photoshop to minimize the clipping and makes sure the colors do not change. For this example, please make sure this is checked. |

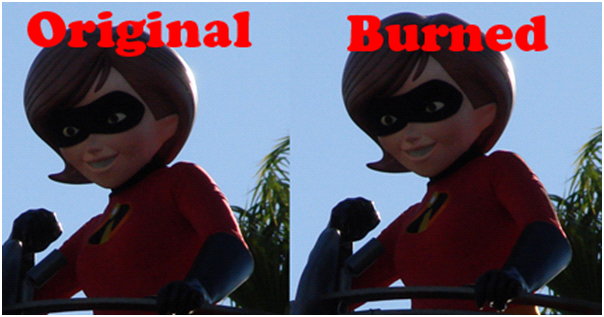
For this tutorial, we only want you to lighten up the characters face (excluding the black mask). Use any of the zooming or panning tools (navigator, magnifying glass, etc.) and make sure you zoom into the face area. Now move your mouse to the starting point. Hold down the Left mouse button and drag. It is recommended that you do small sections at a given time. When you are happy with that section, release the Left mouse button. As you go around the face, use the “[“ or “]” to decrease or increase the brush size. For this tutorial, we just barely lightened it, but you can see the difference between the original and dodged images below.
To make it perfect, use the selection tools and select the specific area that you would like to use the Dodge tool on. This allows you to only lighten a specific area. Also, keep playing with the Exposure setting. As you can see in the dodge portion of the image below, the face can still be lightened up a bit more.

Burn Tool:
If the Dodge tool lightens, then the Burn tool must darken. Right click the toolbox again and Left click the “Burn Tool” command. Our goal is not to eliminate the sun on the arm, but to darken it a bit.

The options are exactly the same as the Dodge Tool. Please refer to that section for more information about the options bar. Zoom into the arm area and change your range to “Midtones” and make the exposure around 60%. Remember to start with a small area and hold down the Left mouse button and drag a short distance. Now release the Left mouse button. If make an error, use CTRL-“Z” to undo your last change. Now change the range to “Highlights” and keep the exposure between 60%-70%. Repeat the steps to use the tool.
Here is our end result. As you can see the sunlight is not 100% gone, but it is darker. If you made a selection around the area first and fine tuned the exposures, you could make the light on the arm look perfect. Also, as you zoom out to a full screen, it will look even better.

Sponge Tool:
Now onto the Sponge Tool. The Sponge Tool allows you to desaturate or saturate the colors. Before we proceed with the tutorial, take the Magic Wand (set tolerance to 40) and Left click the blue sky on the Left hand side. Right click on the image in the toolbox and Left click the “Sponge Tool”.

You will notice the options bar is a little bit different, so let’s go over each of the options.
| A). Paint Brush. For this example, crank the size up over 2300+. Remember your sky should be selected, so even if you use a very large brush, it will not cause the rest to be desaturated. | |
| B). The mode specifies whether the Sponge tool saturates (adds more color intensity) or desaturates (decreases color intensity) in the area you drag over. | |
| C). The Flow identifies how much of a change the Sponge tool makes as you drag. For this example, make sure it is set to 100%. | |
| D). Airbrush effect. Make sure this is turned off for this example. | |
| E). The Vibrance option tells Photoshop to minimize Clipping. Make sure this is always checked! |

Remember as we use the Sponge tool, we have it set to desaturate (removes colors). This will make it more of a black and white sky once we are done with it. Feel free to play with the saturate mode and see how it enhances the sky. For now, leave it on the desaturate mode. Reminder, your sky should be selected! Single Left click the blue sky on the left hand side 5 times. Here is the completed image with all the changes done on it.

You might not see the changes, because these tools are meant to make small changes. Here is the comparison. Yes, not perfect, but with your knowledge, you should have no problem enhancing all the areas to make this image look perfect.

Conclusion:
Start thinking about the everyday use you can use these tools. We defiantly use the Sponge tool and desaturate to make certain areas of a picture be black and white. One example of a nice effect with the Sponge tool set on desaturate is to take a picture of an object (example: red rose) or a one colored object and create a selection around that object. Then inverse the selection (this makes it so everything but the object can be modified). Now desaturate everything else. Your end result is a black and white picture with an object in the middle (very cool effect). There are many ways to make a black and white picture and we will be creating tutorials on them in a future tutorial. For now, here is a 2 minute effect that looks good.

Think outside the box for the Burn tool. Yes you can fix bright areas with the tool, but you can also make shadows appear to be even darker than they were filmed.
That leaves the Dodge tool. Thinking outside the box again, why not use this tool to fake sunlight on an object. Sometimes, you are merging 2 pictures together and picture 1 which ends up being the background has some sunlight in it. Picture 2 has no sunlight in it. That is a great time to pull out the Dodge tool and add some specific light to the image.
More than likely if you are going to enhance an image, you will be using some of these tools.
As always with any tutorial, please take a few minutes and answer the 10 question quiz below.

1). What is the keyboard shortcut to Burn, Sponge, Dodge tools?
| A). “B”. | |
| B). “D”. | |
| C). “S”. | |
| D). “O”. |
2). The Dodge tool does what?
| A). It shifts the pixels either up or down. | |
| B). It makes the specific area darker. | |
| C). It makes the specific area lighter. | |
| D). It saturates the specific color. |
3). What are the 3 Ranges called in the options bar for the Dodge/Burn Tool?
| A). High Range, Mid Range, Low Range. | |
| B). Shadows, Mid Range, Highlights. | |
| C). Shadows, Mid Range, Extreme. | |
| D). Shadows, Midtones, Highlights. |
4). What does the Sponge Tool?
| A). It saturates or desaturates colors. | |
| B). It causes the image to darken. | |
| C). It causes the image to lighten. | |
| D). It absorbs the brightness of the image. |
5). Exposure is?
| A). The shade of gray that is used with either the Dodge/Burn tools. | |
| B). This is only used with the Sponge Tool and it tells Photoshop how strong to saturate the colors. | |
| C). This is only used with the Dodge/Burn Tool and it tells Photoshop how strong to lighten or darken a specific area. | |
| D). A tool used to slice an image into sections. |
6). We recommended what with the Exposure setting?
| A). Start the Exposure setting very high and turn the exposure rate down as you proceed. | |
| B). Start the Exposure setting low in the beginning. | |
| C). If you are working with a negative image, make sure the Exposure is turned off. | |
| D). Determine the correct Exposure rating by Left clicking the “Auto Exposure” setting. |
7). What should you do before you use the Sponge, Burn, or Dodge Tools?
| A). It is always good to make a selection of the area before using these tools. | |
| B). You should always duplicate the specific area of the layer. | |
| C). It is recommended that you turn the exposure up to 100%. | |
| D). It is recommended that you have your brush size always very large. |
8). The Vibrance option in the Sponge tool does what?
| A). It color shifts the colors to make it more vibrant. | |
| B). It reduces the thickness of the edge. | |
| C). It minimizes errors with any formatting problems. | |
| D). It minimizes the clipping. |
9). What should you do if your first pass with the Dodge Tool does not lighten the area enough?
| A). Change your Range in the options bar to “Extreme”. | |
| B). Change it to the Burn Tool and check the box “Inverse”. | |
| C). Modify the Exposure rate and go over the areas again. | |
| D). Change the Flow rate and go over the areas again. |
10). What happens when you use the Burn Tool?
| A). It causes the area to burn with a redish tint around the edges. | |
| B). It darkens the area. | |
| C). It lightens the area. | |
| D). It causes the area to fade. |
Answers: 1). D, 2). C, 3). D, 4). A, 5). C, 6). B, 7). A, 8). D, 9). C, 10). B
Scoring:
0 - 5 = Please review the video tutorial and re-read this document either offline (PDF) or online.
6 – 8 = We would recommend that you print this document off and read it at a later time.
9 – 10 = Congratulations you have passed the quiz. Go ahead and view another tutorial on our site.
We hope you enjoyed this detailed tutorial. Please visit us at: http://www.Photoshopeducation.blogspot.com to expand your knowledge within Adobe Photoshop.

Click Picture To Download Video File To View Offline
Download Total Video Player, iTinySoft

Click Picture To Download PDF Tutorial
Download Adobe Reader, Adobe Corporation
Click Picture To Download Supporting Files
(Brushes, Textures, Fonts, Images, Actions, .PSD, Etc.)
Download ZipGenius Standard Edition 6.0.3.1150, Dicono di ZipGenius


Great stuff! Thanks!!
ReplyDeleteRegards,
image clipping
Glad you liked.
ReplyDeleteThanks for sharing this such a nice blog you present front of us keep posting please
ReplyDeleteGeneric Viagra
Tadalis SX