In this course we will be going over the Brightness/Contrast adjustment and the Exposure adjustment in Photoshop. These are 2 additional tools in Photoshop that will allow you to enhance your images. We will also be explaining some basic terminology such as gamma correction or even what is it when someone says “that image looks overexposed”. Along the way we will give you additional tips and tricks on improving your photos.
Currently we are using Windows Vista Home Premium 64 Bit and the Photoshop CS4 Extended 64 Bit version.
Knowledge You Need to Know:
If you are unfamiliar with certain areas that are not covered in this tutorial, feel free check out other tutorials on our website. We have many different types of tutorials that can be downloaded (Video, PDF) or viewed online that will train you for free! Once you have the knowledge, feel free to come back and go through this tutorial again.
Preparing For This Tutorial:
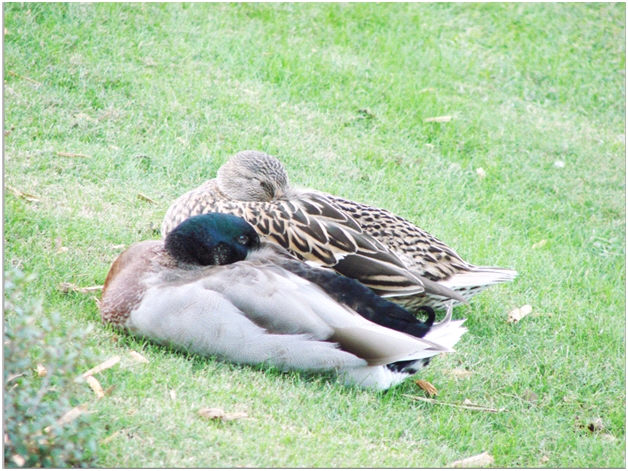
You will be using the Ducks image which we have used in past tutorials. If you do not have this image, please scroll down to the “Click Picture To Download Supporting Files” and download the image. Please open the image PE-DUCKS in the Photoshop Program.
Terminology:
Let’s start by talking about some basic terms. We will be trying to keep the terminology to a minimum and keep the definitions very basic. If you would like more detailed definitions, feel free to search the web and you can get very technical definitions to what these terms truly mean.
Overexposed:
An overexposed image means that the image is to light, such as the image below. This can happen when it is a bright day out or a flash on a camera is set to strong.

Underexposed:
An underexposed is the opposite, meaning the image is to dark. This happens when you forget to turn on the flash on your camera or if it is a cloudy day. The image below is an underexposed image.

Brightness:
The brightness of an image is how light or dark the picture is.
Contrast:
The contrast is how the brightness is distributed from black to white or from the lightest to darkest portions of the picture.
Exposure:
Without getting to technical, the exposure tries to determine the right amount of light needed for the image. For a camera, it does this by adjusting the shutter speed, aperture and other areas (do not worry about shutter speed, or aperture for this tutorial).
Now that you have a basic understanding of the terminology, let’s get going on fixing the Brightness/Contrast.
Brightness And Contrast:
The Brightness and Contrast adjustment is one of many tools in Photoshop to help you to enhance your image. As you can see, this image is overexposed.
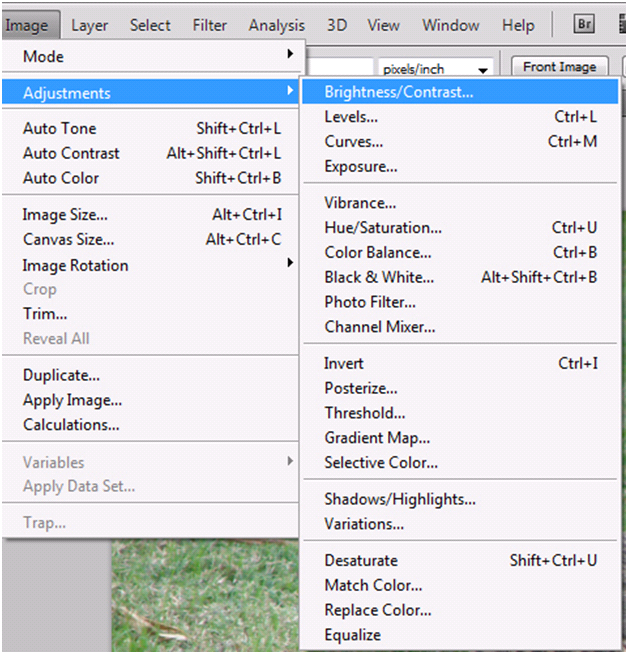
Left click the “Image” menu and move your mouse pointer to the “Adjustments” option. You will notice a sub-menu will be displayed. Left click the “Brightness/Contrast…” command.

You will now see a Brightness/Contrast dialog box. Let’s discuss the important options of the Brightness/Contrast.
| A). If you move your mouse pointer to the brightness up arrow and hold down the Left mouse button and drag it left or right, you will adjust well the brightness. Release the Left mouse button when you are happy with the changes. | |
| B). The contrast can be adjusted the same way as the brightness. | |
| C). You can also enter a numeric value in each text box. To follow along with our example, Left click the brightness text box and enter -25 (begin the value with a “-“ to tell Photoshop that it is a negative) and enter 100 for the contrast. | |
| D). If you have the “Preview” option checked, you will see the changes on your actual image as you move the sliders. | |
| E). If you are satisfied with the changes, Left click the “OK” button. If you are NOT happy with the changes, Left click the “Cancel” button. |

Before And After:
Here is our before and after images. As you can see it did a good job (not perfect) of adjusting the light of image. If you took your time and played around with the settings and used the other tools such as Levels, Curve Adjustments or even Auto Adjustments, (for more information about these tutorials, please use the following links: The Autos, Straight To Curves, Levels And Histogram) you would get better results.

**For the next section, please close and re-open (or use the history palette) the image again showing it washed out.
Exposure Adjustment:
You can fix the exposure in Photoshop CS4 (it was a new feature in CS3) by Left click the “Image” menu and moving the mouse pointer down to “Adjustments”. From the sub-menu Left click the “Exposure…” command.

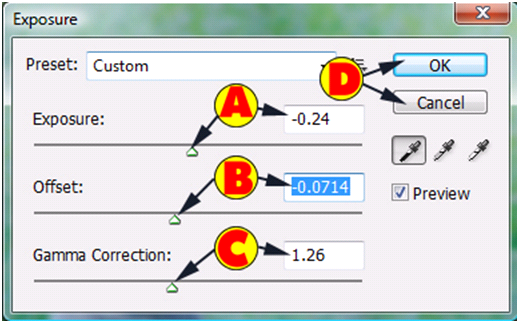
Let’s go over the basic functionality of the Exposure dialog box. For all adjustments, you can enter by Left clicking the text box and entering a value. To use the mouse, just move your mouse pointer over to the up arrow. Now hold down the Left mouse button and drag it right or left. Release the Left mouse button when you are happy with the changes.
| A). Exposure – This will lighten/darken your image. | |
| B). Offset – Will make adjustments to shadows/highlighted areas. | |
| C). Gama – Will fix your contrast. | |
| D). Left click the “OK” button when you are satisfied with the changes. Left click “Cancel” if you do NOT want to apply your changes. |
On our example, we used -.24 for the Exposure and -0.0714 for the offset and finally 1.26 for the Gama Correction.

Here are the last important features you should know in this dialog box.
| A). Preset – Left click the down arrow to select a pre-defined exposure. | |
| B). In the Straight To Curves tutorial we discussed the eye droppers. The far left will be for the dark areas and the far right will be for the light areas and the center is for the midtones. Photoshop Tip – We find it easier to manually adjust the photo in the exposure dialog box than it is to use the eye droppers. | |
| C). Make sure the “Preview” box is checked so you can see the results as you make the changes to any of the 3 options. |

Before And After:
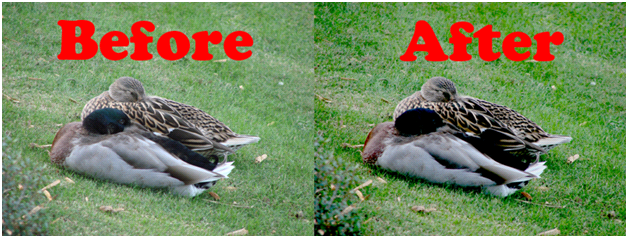
Here is the before and after examples. You will notice that it did a good job, but not a great job. If you took your time with the brightness/contrast and the exposure options, you would end up with excellent results.

Tips And Tricks On Enhancing Your Images:
We have given you a lot of tips and tricks from previous enhancement tutorials, so we are not going to go over all of them again. Please review those tutorials for more information. Here are just a few enhancement tips and tricks.
Within the Exposure dialog box, try to get your image correct first with the exposure option. This exposure option will enhance your photos usually better than the other 2 options. Start with exposure and proceed to the gama correction and than offset.
When correcting images, we like to correct all images in similar light. For us, we try to make sure that the same light source is in the room. Why? You will adjust the image differently if you have a different light source in the room. For us, we make sure the sunlight is NOT beaming in through the window and we stay away from editing images when it is very dark in the room.
We also stick to enhancing images from the same monitor, which allows us to get the exact same results (certain monitors do a better job at displaying an image). Example, we have a few laptops and none of the laptops monitors can compare to the quality of our desktop monitor, so we primarily improve images on our desktop.
Remember, most of the time, 1 tool in Photoshop will NOT make a perfect enhancement. You need to play around with the tools. In time, you will learn what tools do a better job than others for specific problems. Sometimes you will look at a photo and realize if the brightness could be fixed than that would solve your problem. Well instead of going into curves/levels adjustments, it is better just to fix it in the brightness/contrast tool.
Conclusion:
While proceeding through this course, you now have a basic understanding of the terminology used, such as what is an overexposed image. We have shown you how to use the brightness/contrast tools in the Adobe Photoshop CS4 Extended. We have also shown you how to use the Exposure adjustment within this graphics program. Along the way, we even gave you more tips and tricks on how to enhance your images.
We hope you enjoyed this tutorial about the brightness/contrast and the exposure adjustments in Photoshop. We recommend that you take a few minutes and answer the 10 question quiz below. When you are finished with the quiz, Left click on “All Tutorials” option in the menu and we are sure you can find another tutorial to help you enhance your knowledge with the Photoshop program.

1). What is an underexposed image?
| A). The overall image is to light. | |
| B). The overall image is to dark. | |
| C). The overall image has too much contrast in certain areas. | |
| D). The image looks very good. |
2). What is one way to adjust the brightness in the brightness/contrast command?
| A). Right click the brightness command and Left click the “Adjustment” command. | |
| B). Drag the down arrow left or right. | |
| C). Left click the text box and enter a value. | |
| D). Left click the “Brightness Adjustment” button and then Right click the “Adjustment Control” command. |
3). In the Exposure dialog box, we told you to do what with the eye droppers?
| A). We recommended that you not use the eye droppers and to manually to fix the image with the 3 options. | |
| B). Use only the dark (far left) eye dropper. | |
| C). Use only the light (far right) eye dropper. | |
| D). Always use all 3 eye droppers to get the best results on enhancing your brightness/contrast and never manually adjust the image. |
4). In the Exposure dialog box, what does the Exposure slider bar do?
| A). It creates a hue tint to the image. | |
| B). It allows you to adjust the contrast only. | |
| C). It allows you to darken/lighten the image. | |
| D). It allows you to preview the image as you change the offset/gamma correction. |
5). What is the keyboard shortcut for the Brightness/Contrast command?
| A). CTRL-“B”. | |
| B). ALT-“B”. | |
| C). “B”. | |
| D). We did not give you a keyboard shortcut for this adjustment. |
6). Which of the following is a good definition of what is Contrast?
| A). It the brightness of an image. | |
| B). It is the darkness of an image. | |
| C). It is how the brightness is distributed from black to white. | |
| D). It is the hue tint of an image. |
7). You make a change in the Brightness/Contrast dialog box and you do not see a change happen before you click apply. What option should be checked before you can see the changes and before you Left click the “OK” button?
| A). Check the “Preview” option. | |
| B). Check the “Auto Preview” option. | |
| C). Check the “Preview Engaged” option. | |
| D). Check the “Auto Enhancement Preview” option. |
8). What sub-menu is the Exposure located in?
| A). Image. | |
| B). Adjustments. | |
| C). Enhancements. | |
| D). Correction. |
9). An overexposed image is?
| A). An image that is to light. | |
| B). An image that is to dark. | |
| C). An image that is blurred in the background. | |
| D). An image that looks perfect. |
10). How do you enter a negative in the text box for brightness.
| A). Enter a “<” after the numeric value. | |
| B). Enter a “>” after the numeric value. | |
| C). All values will be a + and there is no such value in Photoshop Brightness as a negative value. | |
| D). Enter a “-“ before you enter the numeric value. |
Answers: 1). B, 2). C, 3). A, 4). C, 5). D, 6). C, 7). A, 8). B, 9). A, 10). D
Scoring:
0 - 5 = Please review the video tutorial and re-read this document either offline (PDF) or online.
6 – 8 = We would recommend that you print this document off and read it at a later time.
9 – 10 = Congratulations you have passed the quiz. Go ahead and view another tutorial on our site.
We hope you enjoyed this detailed tutorial. Please visit us at: http://www.Photoshopeducation.blogspot.com to expand your knowledge within Adobe Photoshop.

Click Picture To Download Video File To View Offline
Download Total Video Player, iTinySoft

Click Picture To Download PDF Tutorial
Download Adobe Reader, Adobe Corporation
Click Picture To Download Supporting Files
(Brushes, Textures, Fonts, Images, Actions, .PSD, Etc.)
Download ZipGenius Standard Edition 6.0.3.1150, Dicono di ZipGenius


Very nice alternatives to photoshop thanks for sharing this awesome post. Outsource Images to India|Real Estate Photo Editing Service
ReplyDeleteI often use this type of advice.
ReplyDeleteBlanche