In this tutorial, we will be showing you the last sharpening technique and it is called the High Pass technique. High Pass filter is one of the obscure Photoshop filters that tries to determine the edges in an image. When you blend the High Pass layer with the original unsharpened image, you get a great looking image. Throughout this course we will show you different blend modes and give you tips and tricks to improving the image quality.
Currently we are using Windows Vista Home Premium 64 Bit and the Photoshop CS4 Extended 64 Bit version.
Knowledge You Need to Know:
If you are unfamiliar with certain areas that are not covered in this tutorial, feel free check out other tutorials on our website. We have many different types of tutorials that can be downloaded (Video, PDF) or viewed online that will train you for free! Once you have the knowledge, feel free to come back and go through this tutorial again.
Preparing For This Tutorial:
You will be using a picture of this colored crocodile. If you do not have this image (if you have a black and white image of the crocodile, that will NOT work for this tutorial), please scroll down to the image of “Click Picture To Download Supporting Files” and download the image. Please open the image PE-CRO1 in the Photoshop Program.
Final Sharpening:
There are a lot more sharpening techniques in the Photoshop bag of tricks, but either they are too advanced for a beginner/intermediate Photoshop user or they are hybrids of existing sharpening techniques that we already discussed. Between the Sharpen, Sharpen Edges, Sharpen More, Smart Sharpen, Unsharp Mask, and today’s tutorial on the High Pass Sharpening, you will be able to sharpen most blurred images.
In the future (after we get through the beginner tutorials), we will revisit sharpening again and teach you a few more techniques. For now, if you understand the 6 different sharpening techniques, you will be able to make most images look awesome.
High Pass Sharpening:
So what is a High Pass filter? The main goal of this filter is to determine the edges of an object. The first step for this tutorial is you MUST duplicate the background layer. If you do not do this step, you will ruin your original image (do not worry, you can always undo if you forget this step).
Now make sure your top layer is selected. In this tutorial, we named the layer “High Pass”. 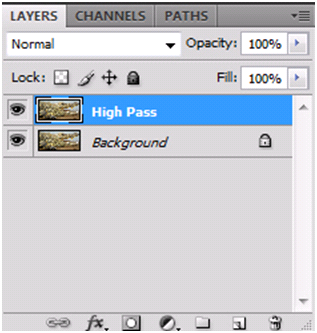
Left click the “Filter” menu and move your mouse pointer down to the “Other” option. From the sub-menu, Left click the “High Pass…” filter.

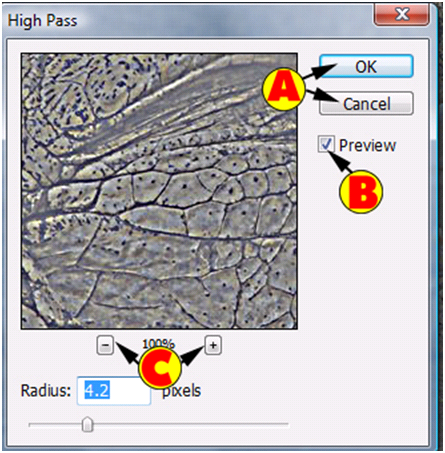
First, do not get worried when you see the preview below. Remember we are working on another layer than the original. What you are seeing in the preview is Photoshop trying to determine the edges of the objects.
| A). If you are satisfied with the changes, Left click the “OK” button. If you want to disregard the changes, than Left click the “Cancel” button. | |
| B). Make sure the “Preview” button has a check in it. This way you will see the changes in the actual image as you adjust the radius setting. | |
| C). Left click the “-“ to zoom out of the preview. Left click the “+” button to zoom into the preview. |
Photoshop Tip – For the High Pass sharpening technique, it is easier to look at the actual image, than the preview window.
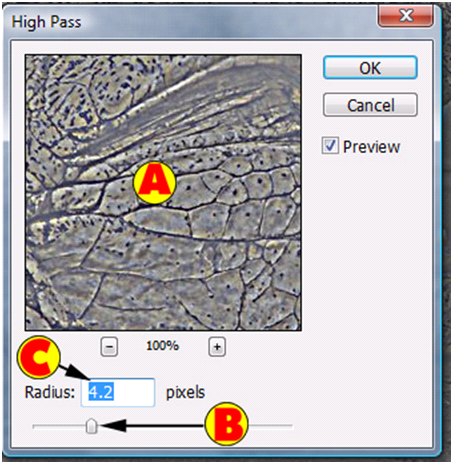
Here are the rest of the options of the High Pass filter dialog box.
| A). Move the mouse pointer to the preview box. Hold down the Left mouse button and drag the mouse. Release the Left mouse button when you are satisfied with the new position. Photoshop Tip – To jump to a specific location of the image, Left click the actual image. You will notice that the preview box will position to that specific spot. | |
| B). The High Pass filter tries to determine the edges. Anything gray will NOT be sharpened. Once it determines the edges, the Radius setting sets how far beyond that location it will try to sharpen. Move the mouse pointer to the up arrow for the slider bar and HOLD down the Left mouse button and drag the slider left or right. | |
| C). If you know the numeric value for the Radius, Left click the text box and enter the value. For this tutorial, set the radius at 4.2. The common radius is from 1.0 to 5.0. |
Left click “OK” to apply the changes.
Your top layer should now look like the following image. Remember, you still have a copy of the original layer!

Understanding Blending Modes:
Back in the Smudge, Sharpen, Blur Tools tutorial, we explained that we will be explaining modes in the future. Modes are blending modes. What is a blending mode? When you have more than 1 layer, you can add a blending mode. It tells Photoshop what type of information should bleed through from the layer below.
There are many blending modes to Photoshop and in a tutorial coming very soon; we will show you what each blending mode does! For now, we will be showing you 5 different blending modes. In this future tutorial, we will be explaining the details of each blending mode. For now, it is important for you to understand which blending modes will give you the best results.
Blending Modes:
Here is the true magic for the High Pass Filter.
| A). In the Layers palette, you will see a drop down box above the word “Lock”. Left click this drop down box to display all the blending modes. | |
| B). For this tutorial, Left click the Overlay blending mode. Other sharpening blending modes are Soft Light, Hard Light, Vivid Light, and Linear Light. **Please note, there will be more blending modes above this section. |

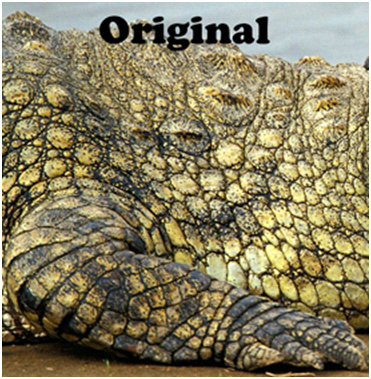
Because we shrunk down the image, the true sharpening is harder to see, but you can tell there is a difference. Remember, the key to making it sharp is the radius option in the High Pass Filter (that determines the edges) and the blending modes. If you want to make it stronger without going back into the High Pass Filter, try the blending mode of “Hard Light”. Here is the “Overlay” blending mode compared to the original.

Blending Modes Comparison:
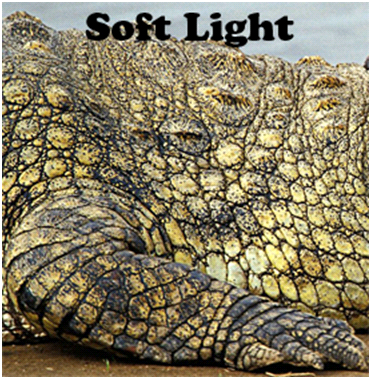
Here is a quick comparison on the blending modes.



Reducing Sharpness:
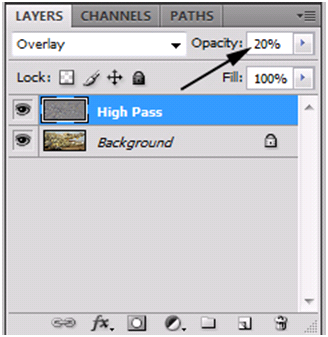
Sometimes after you used the High Pass Filter, you realize that the sharpness is to strong. Instead of starting over, you can just change the opacity on the layer. By changing the opacity, it will reduce the sharpness of that blending mode.
Make sure the High Pass layer is selected in the Layers palette and Left click inside the text box for opacity. To show a dramatic reduction in sharpness, enter a value of 20.
Tips And Tricks:
We have given you many tips and tricks in the last few tutorials on sharpening. Here are a few more new tips to make your image look awesome.
We usually will over sharpen the image in the High Pass Filter and then use the opacity trick that we explained on the previous page. Why not fix it exactly right the first time? You can always decrease the sharpness with the opacity, but because you can’t increase the opacity more than 100%, you are stuck with that sharpness. Always go over a bit with the High Pass Filter and reduce if needed.
Each blending mode will give you different results. Because it is easy to change the blending mode, we recommend that you try all 5 blending modes. Most of the time the Overlay blending mode will give you good results. The Soft Light blending mode will reduce the sharpness and the Hard Light blending mode will increase the sharpness.
Yes, we know this is not a new trick, but it is important to repeat. There is NOT one sharpening technique in Photoshop that will make all different types of blurs look great. It is important that you try different techniques. If you find a specific technique works well with a certain area, than have multiple layers and just use a layer mask to remove portions of sharpening from that layer so it bleeds through to the other sharpened layer below.
Sometimes after you applied the sharpening, you can’t tell a difference. We recommend that you use the history palette and go back to the open state of the image and look at the original compared to the modified. You can jump to different steps using the history palette. Please refer to the All About The History Palette for more information about the history palette.
When comparing the changes, try using the magnifying glass (see Zoom And Panning tutorial) and zoom into a specific area of the image. This will allow you to see the exact sharpening the technique did to the image.
Conclusion:
In the last few tutorials, we showed you all of the beginner/intermediate sharpening techniques. In this tutorial, we showed you how to sharpen your image with the High Pass filter. We also exposed you to a few blending modes. We will be having a full tutorial on all blending modes shortly.
You should know by now that you should over sharpen your image with the High Pass Filter and then reduce the sharpness using the Opacity option in the layers palette.
Please take a few minutes and take the 10 question quiz below to determine how much knowledge you have learned from this course.

1). The High Pass Filter is located in what sub-menu in the Filter menu?
| A). Sharpen. | |
| B). Miscellaneous. | |
| C). Other. | |
| D). Correction. |
2). What is the first step after you open the image to begin using the High Pass Filter technique?
| A). Duplicate the background layer and hide the background layer and create a mask in between the layers. | |
| B). Duplicate the background layer and select the top layer. | |
| C). Change the blending mode type to “Overlay”. | |
| D). Create a Layer Mask and correct the image. |
3). When you use the blending mode “Hard Light”, does what?
| A). It usually makes the sharpening stronger. | |
| B). It usually makes the sharpening weaker. | |
| C). It creates a beam of light from a specific angle, such as from the sky. | |
| D). It usually does nothing to sharpening. |
4). Name 3 of the 5 common blending modes that is used with the High Pass Filter?
| A). Lighten, Overlay, Hard Light. | |
| B). Overlay, Hard Light, Normal. | |
| C). Soft Light, Lighter Color, Overlay. | |
| D). Soft Light, Hard Light, Overlay. |
5). What option in the Layers palette do you use to decrease the sharpening after you applied the blend mode and the
High Pass Filter?
| A). Opacity. | |
| B). Blend Reduction. | |
| C). Lighten Blend. | |
| D). Blend Correction. |
6). When using the High Pass Filter, we recommended what?
| A). Start with lower settings and work your up and find the perfect setting. | |
| B). Increase the settings a little bit over what you feel is right and then use the option from #5 question and decrease the value. | |
| C). That you never start with a duplicated layer. | |
| D). That the blend mode MUST be changed before you use the High Pass Filter. |
7). When you are in the dialog box of the High Pass filter, what does the standard gray mean in the preview box?
| A). It means those areas will be sharpened. | |
| B). It means that the image in those areas will automatically be set to the correct blend mode | |
| C). It means those area will not be sharpened. | |
| D). By default it shows gray, but we recommended that you turn on the “Preview” option to view the changes in color, so you can see High Pass Filter as color. |
8). What is the common radius range we recommended in the High Pass Filter dialog box?
| A). 1.0 to 8.0. | |
| B). 2.0 to 20.0. | |
| C). 1.0 to 50.0. | |
| D). 1.0 to 5.0. |
9). How do you jump to a specific spot of the image in the preview box in the High Pass Filter?
| A). Left click the actual image area (not preview) and the preview will jump to that specific spot. | |
| B). The only way to jump to that spot is by moving the mouse pointer to the preview box and holding down the Left mouse button and dragging it to that spot. Release the Left mouse button to make the jump. | |
| C). Left click the “Goto” button and enter the image coordinates that you want to jump to in the preview dialog box. | |
| D). Use the slider bars to adjust the position to jump to a specific spot quickly. |
10). What does the High Pass Filter do?
| A). It tries to determine the engraved spots of the image. | |
| B). It tries to increase the brightness of the image. | |
| C). It tries to locate the edges. | |
| D). It tries to increase the density and the weakness of the pixel size. |
Answers: 1). C, 2). B, 3). A, 4). D, 5). A, 6). B, 7). C, 8). D, 9). A, 10). C
Scoring:
0 - 5 = Please review the video tutorial and re-read this document either offline (PDF) or online.
6 – 8 = We would recommend that you print this document off and read it at a later time.
9 – 10 = Congratulations you have passed the quiz. Go ahead and view another tutorial on our site.
We hope you enjoyed this detailed tutorial. Please visit us at: http://www.Photoshopeducation.blogspot.com to expand your knowledge within Adobe Photoshop.

Click Picture To Download Video File To View Offline
Download Total Video Player, iTinySoft

Click Picture To Download PDF Tutorial
Download Adobe Reader, Adobe Corporation
Click Picture To Download Supporting Files
(Brushes, Textures, Fonts, Images, Actions, .PSD, Etc.)
Download ZipGenius Standard Edition 6.0.3.1150, Dicono di ZipGenius


No comments:
Post a Comment