Summary:
In this tutorial will get the file ready by changing and setting the file information and we will be showing you different ways on how to compress the image to make it a smaller file size so it can be viewed on the web or shared with friends. The beauty of compressing an image in Photoshop is it reduces the file size with very little quality loss to the picture. If you are going to share images, then this is a must tutorial to read! Let’s get started!
Currently we are using Windows XP and the Photoshop CS4 Extended version.
Important Information:
In this tutorial we will be using a raw image that was supplied by Photoshop Education. To download this image, please proceed to the bottom of the blog post and click on the supporting image next to:
Click Picture To Download Supporting Files
Detail:
Ready, Prepare Image:
Even though this section is not required to compress an image, we recommend that you fill in at least some of the file information. This information will be stored within the image behind the scenes. What is file information? The basic information is who created the image (author), a description, plus more information. It is stored within the file and it is called “Metadata”.
First open your image and Left click on the “File” menu and Left click on the “File Info” command towards the bottom of the menu.

You will now see the dialog box. You will notice tabs at the top. Feel free to Left click on the tabs. For most people, the most important tab is the “Description” tab which is shown below. When you are done, Left click the “OK” button. None of the fields are mandatory.
A). Document Title – Enter a name for the document. | |
| B). Author – Enter the name of the person that captured this image. | |
C). Author Title – Similar to the Document Title. | |
D). Description – Description of the picture such as: “Taken In backyard”. | |
E). Rating – Some programs you can sort by the rating (1 star = lowest score) |

Your image will need to be saved! Go ahead and save the picture now. Please note some image files will not store the metadata. Now close this picture in Photoshop and now reopen the image again. Once opened, Left click on the “File Info” and you will see your information has been saved.
Setting Your Image To Be Saved:
In our previous tutorial we explained how to save an image. This is good if you are going to be keeping your image on your local machine. If you are going to be uploading the image to a website or sharing your image over the Internet, we highly recommend that you compress your image. Photoshop does an excellent job at reducing the file size, and keeping the image quality very good. Just remember, the more you compress the more quality you will lose in the image. If you compress it too far, you will notice the colors will not be as bright and will look bland.
So how do you compress an image in Photoshop? You will NOT be using the “Save” or “Save-As” commands. You will need to first open your image. Next, Left click on the “File” menu and then Left click on the “Save for Web & Devices…” command.

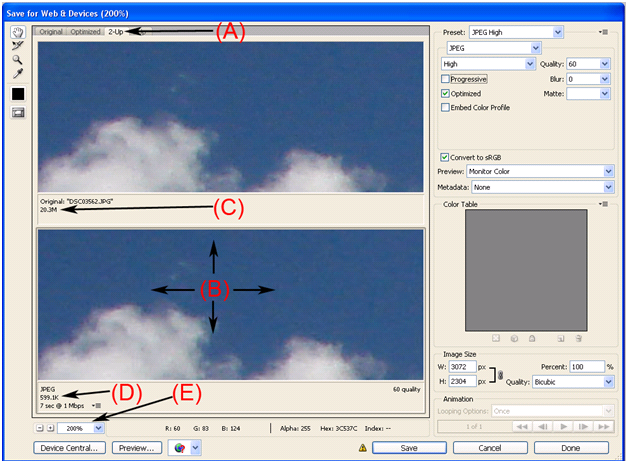
There is a lot to cover on this screen, so we will be breaking this into sections. This first section we will discuss the basic layout of the Save for Web & Devices dialog box.
A). Left click “2-Up”. Your original picture will be displayed at the top and the compressed version will be displayed on the bottom. This way you can do a side-by-side comparison. | |
| B). By default the “Hand Tool” (located in the top left hand side of the screen) will be selected. This allows you to move the image around. Left click in the image on this screen and drag it (hold down Left click) around. You will see both images now move. Find a spot in the image that you would like to compare. | |
C). This shows you the starting image size. You will notice this example is a very large image. | |
D). This image size will show you the compressed file size. With a few changes we can reduce the file size. | |
E). We recommend that you change the Zoom percentage to 200% to view the image even closer. Left click the drop-down box and Left click “200%”. If you zoom it in any further, it becomes too distorted. |
The first area is to reduce the physical size by changing the “Image Size”. Most images on the web will be less than 1000 wide. You can either change the width to 1000 or change the percentage. On this image, you can change the percentage to 32.55%. Remember, we are using 1000 as an example, and you can always change it to any number you would like.
A) Because it locks in the ratio on width and height, you will notice both numbers will change once you enter either the “W” or “H”. Locking the ratio is the standard default, but that also can be changed. On this example, change the “W” (width) by Left clicking the field and enter 1000. | |
B) Sometimes you just want to change the image size by a percentage. Left click the “Percentage” field and enter a percentage to reduce your image by. On this example you could enter 32.55% and you will get the same results as (A). |

You will now see your file size reduced. On this example, we want you to select the “Preset” “JPEG High”. See A) for more details on how to set this preset.
A) Left click the “Preset” drop-down box and select your predefined settings. On this example, we have selected “JPEG High” which will give you very good quality. If you changed it to “JPEG Low”, you will notice the file size will be smaller but the colors and the quality will be greatly reduced. | |
| B) If you wanted to manually adjust the file format and the quality preset, use these 2 drop-down boxes. When you change to a different “Preset” (A), it will change the settings in (B) & (C). With this quality preset, you will have more flexibility, such as options for “Very High” or “Maximum”. | |
C) To manually select your quality, use the quality drop-down box or enter a numeric value. Use this setting to find a compression that is in between presets. Example: If you wanted the quality between “High” and “Very High” you could change this setting to 70. To enter a number, Left click the “Quality” field and enter the numeric value. A higher number represents better quality. |
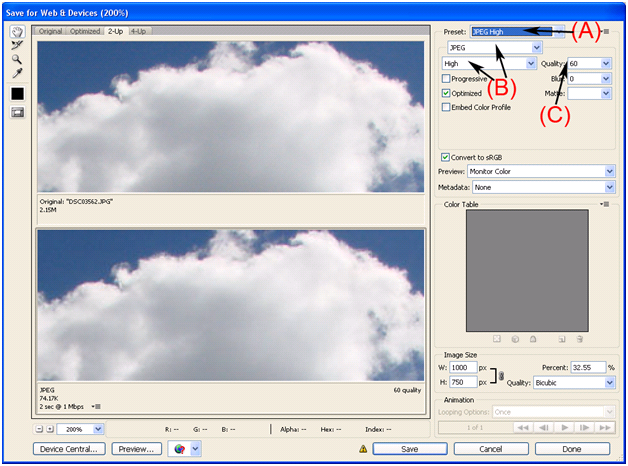
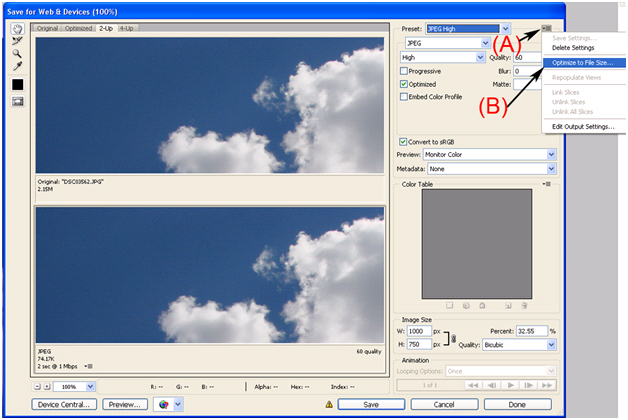
When you change the preset to “JPEG High” you should see the lower displayed image (compressed version) change to a much lower file size number then the original image. Sometimes it is easier if you tell Photoshop what file size you want and it will create your settings to match the file size.
A) Left click the arrow to the right of the “Preset” drop-down box. | |
B) Now Left click the “Optimize to File Size…” command. |
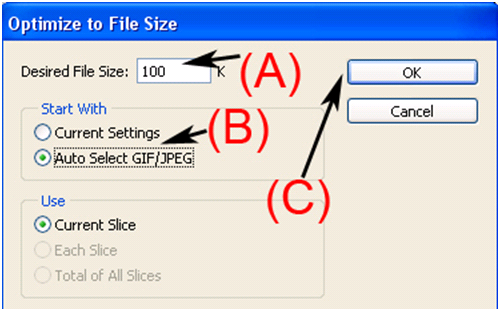
On this dialog box screen there are a few important areas, we would like to cover.
A) Enter the “Desired File Size” by Left clicking this field. K = Kilobytes. | |
| B) If you already adjusted the compression through the previous screen, you can set the start with to “Current Settings” or “Auto Select GIF/JPEG”. On this example, Left click the “Auto Select GIF/JPEG” radio button. | |
C) Left click “OK” to continue. |
You will now be taken back to the previous screen. You will notice that Photoshop made the correct changes to keep the image file less than 100K in size.
A) Instead of a large file size it is now at 96.6 K. That is a huge change, with very little loss of quality in the image. | |
| B) You will notice it adjusted your settings automatically for you. | |
C) If you look closely you will notice the top has shades of darker blue, then the one that is compressed. That is ok, because we are viewing this image at 200% and will look better when you are viewing it online. | |
D) When you are finished, Left click the “Save” button. |
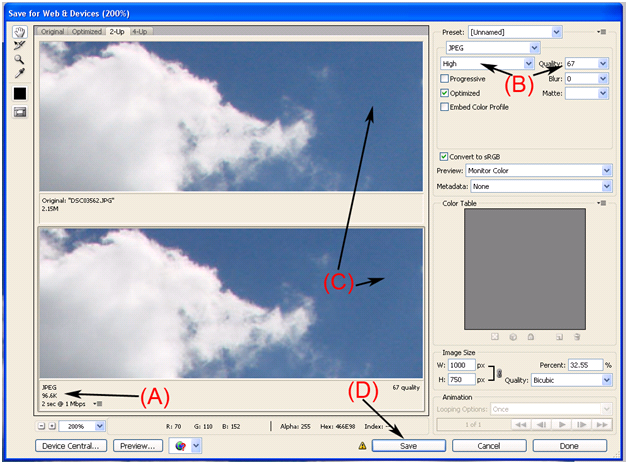
We have just shown you a few ways to compress a file down in size without too much loss of quality. It is up to you if you want to manually tweak the settings or use a preset or even let Photoshop determine the best setting by entering the file size. Whatever way you decide to compress the file, you will find that the size will be more then acceptable to share with friends via email or the web. As you can see, we did not cover all the options within the “Web & Devices” screen. We do not want overwhelm you with all the details and we just wanted to show you the important areas of compressing a file.
Quiz
1). How do you add a description to a file?
A). Through the “File Info” command for any file format. | |
B). This can’t be accomplished through the Photoshop program. | |
| C). If you click on “File” menu and click on Information you can add it. | |
D). Through the “File Info” command for certain formats. |
2). “File Info” is located in what menu?
A). The “Edit” menu. | |
B). The “Information” menu. | |
| C). The “Help” menu. | |
D). The “File” menu. |
3). What command do you click on to compress a file?
A). “Compress File”. | |
B). “Save As Compressed”. | |
| C). “Save for Web & Devices”. | |
D). “Save for Web”. |
4). If you want to change the image size within “Save for Web & Devices”, how do you do this?
A). Bottom right you can either change the percentage or the dimensions of the image. | |
B). Top right you can either change the percentage or the dimensions of the image. | |
| C). Left click the arrow in the top right hand corner and change the dimensions. | |
D). When you set a preset, it will automatically change your dimensions. |
5). The lower the number in the quality field in the “Save for Web & Devices” screen means?
A). The lower the number, the better image quality will be saved. | |
B). The higher the number, the better image quality will be saved. | |
| C). The higher the number, the lower the image quality will be saved. | |
D). The number represents a percentage of the image size. |
6). To easily save to a specific file size in “Save for Web & Devices” you?
A).Change the presets and look for the file size and once your happy click “Save”. | |
B). Left click the preset drop-down box and select “Optimize To File Size…”. | |
C).Next to the preset button, click the arrow and then click “Optimize To File Size…”. | |
D). This can’t be done in Photoshop. |
7). On the “Optimize To File Size…” screen what type of size format do you use?
A). TB (Terabyte). | |
B). MB (Megabyte). | |
C). GB (Gigabyte). | |
D). K (Kilobyte). |
8). When you are satisfied with the compression, you click this button?
A). “OK”. | |
B). “Save”. | |
C). “Done”. | |
D). “Compress”. |
9). The Zoom by percentage feature is located were in the “Save for Web & Devices…” screen?
A). Top right hand corner of the screen. | |
B). Middle of the screen. | |
C). Center, top of the screen. | |
D). Bottom left of the screen. |
10). To move both images around in “Save for Web & Devices…” screen, how do you do this?
A). Make sure you have the hand tool selected and Left click one of the images and drag. | |
B). Make sure you have the hand tool selected and Left click both images and drag. | |
C). Left click the “Eye Dropper” tool and Left click and drag on either picture. | |
D). Left click the image and drag while holding the “Shift” key. |
Answers: 1). D, 2). D, 3). C, 4). A, 5). B, 6). C, 7). D, 8). B, 9). D, 10). A
Scoring:
0 - 5 = Please review the video tutorial and re-read this document either offline (PDF) or online.
6 – 8 = We would recommend that you print this document off and read it at a later time.
9 – 10 = Congratulations you have passed the quiz. Go ahead and view another tutorial on our site.
We hope you enjoyed this detailed tutorial. Please visit us at: http://photoshopeducation.blogspot.com/ to expand you knowledge within Adobe Photoshop.

Click Picture To Download Video File To View Offline
Download Total Video Player, iTinySoft
Click Picture To Download PDF Tutorial
Download Adobe Reader, Adobe Corporation
Click Picture To Download Supporting Files
(Brushes, Textures, Fonts, Images, Actions, .PSD, Etc.)
Download ZipGenius Standard Edition 6.0.3.1150, Dicono di ZipGenius


That looks great. Good job.
ReplyDeletefind a prostitute Aussie