Summary:
In this tutorial we will walk you through even more of the Layer options. In the first tutorial called Learning Layers With Ease we showed you the basics of Layers and now it is time to expand your knowledge by explaining how to create a new blank layer (2 different methods) to attaching a color identifier to a layer. We will even explain how to copy a layer from one image and add it to another image. Finally we will discuss how to group layers and what is the “Flatten Image” option.
Currently we are using Windows Vista Home Premium 64 Bit and the Photoshop CS4 Extended 64 Bit version.
Knowledge You Need to Know:
If you are unfamiliar with certain areas that are not covered in this tutorial, feel free check out other tutorials on our website. We have many different types of tutorials that can be downloaded (Video, PDF) or viewed online that will train you for free! Once you have the knowledge, feel free to come back and go through this tutorial again.
Preparing For This Tutorial:
You will be using the Sky image which we have used in past tutorials. If you do not have this image, please scroll down to the “Click Picture To Download Supporting Files” and download the image.
Creating A New Layer:
Before we begin with the tutorial, please create an 800X800 new document. In the Learning Layers With Ease tutorial we used the ellipse tool to create new layers, but what if you wanted to create a new blank layer? We will be showing you 2 ways to create a new blank layer. The first method is to Left click the “Layer” menu and move your cursor to “New” and then Left click the “Layer…” command.

This first method allows you to customize your layer, while the second method just creates a new layer.
| A). Left click in the “Name” text box and type a name for the Layer. | |
| B). If you would like to identify the layer with a color, Left click the drop down box and Left click a color. | |
| C). In the previous tutorial we explained about Opacity. Left click the box to change the opacity. | |
| D). If your happy with the creation, Left click the “OK” button and if you want to back out of the screen without creating a new layer, Left click the “Cancel” button. |
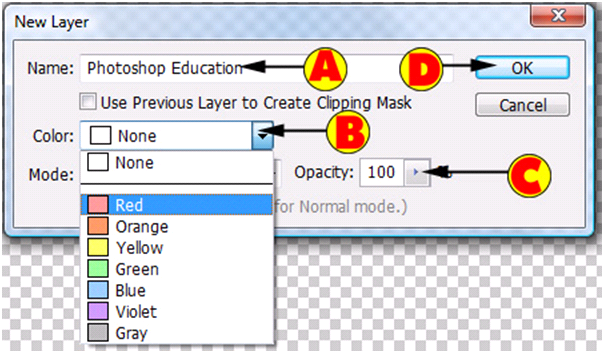
On our example you will notice the “Red” over the eye because we changed the color identifier for the layer to red in the previous screen. You will also notice it used the “Name” for the name of the layer.

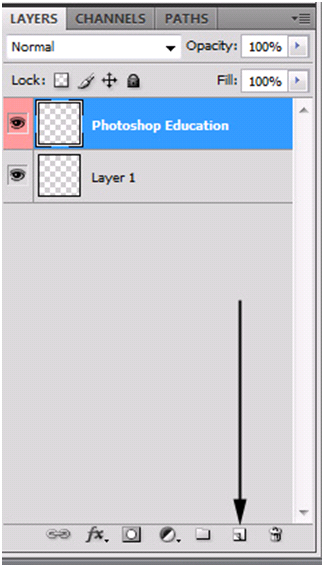
Another method to create a new layer is to Left click the new layer button which is located to the left of the trashcan icon in the layers palette. You will see this only creates a layer and does not allow you to change the opacity, color identifier, or even the name when you are creating the layer.
Change Color Of A Layer:
As we showed you, you can have a color identifier when you use method 1 of creating a new layer, but what if you wanted to add a color identifier or change a color after the fact.
| A). Right click (do not Left click) the “Eye” image that you want to change. | |
| B). Now Left click the color name. |
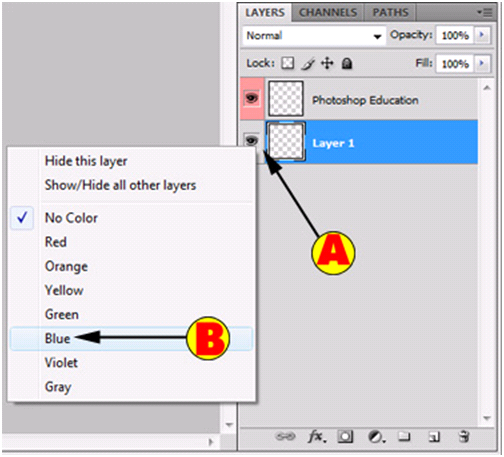
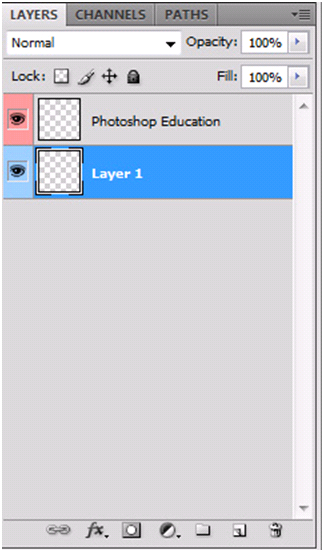
As you can see we changed “Layer 1” to be a blue identifier. Photoshop Tip – If you would like to change an existing color identifier, Right click on the “Eye” and Left click a new color name.
Copying Layers From One Image Into A New Image:
Sometimes you want to copy a layer from one image and add it to a second image. There are a few ways to copy layers from other images, but at this time we would like to show you an easy way to copy a layer into a different image layer. Create a new document that is 3000X2000 in size. Now add a layer of text. Make the text very large 200+ font size and make the color a red or something that will stand out (not blue or white). Now open the sky image (if you do not have this image, please scroll to the bottom of the post and Left click the download supporting files option).
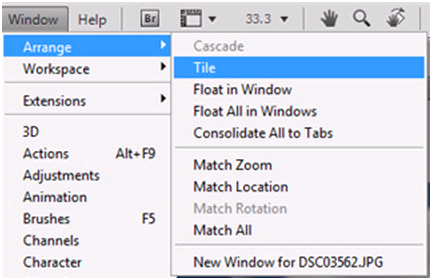
Now Left click the “Window” menu and move your cursor to the “Arrange” option and you will see a new sub-menu displayed. Left click the “Tile” command.
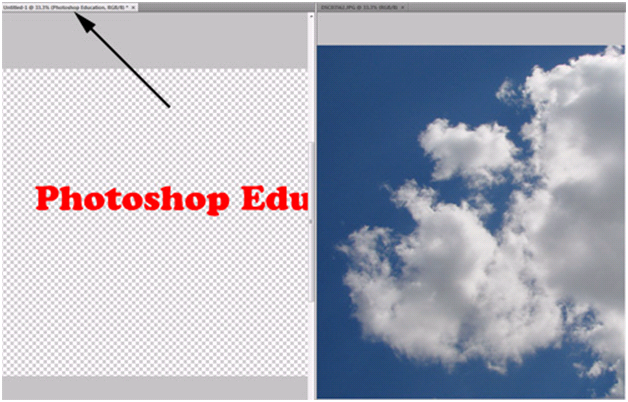
You should see a similar screen to the one below (please note, yours could be reversed meaning that the text is on the right hand side). We would like you to Left click the tab in the window of the text. You will notice your palette will show the “T” for text displayed (you should not be seeing the image of the cloud in the palette).
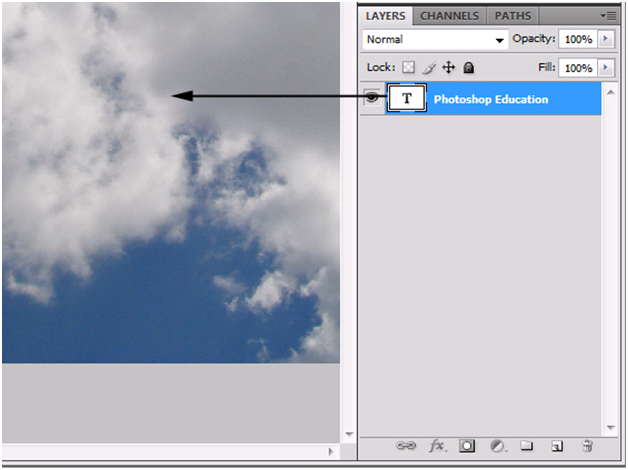
First, Left click the text in the layers palette to select the layer. Now hold down the Left mouse button and drag it to the sky picture. Release the Left mouse when you are happy with your placement on the image. Congratulation, you just copied from one image layer to another image layer on a different file. Photoshop Tip – You can also copy layers by CTRL clicking the image box in the layer and then using CTRL-“C” to copy and then switch to the second image and do a CTRL-“V” to paste.
Grouping Layers:
If you are working with a large amount of Layers you can create groups to store your Layers. Let’s say you have an image of a person and 10 of the layers are strictly with the face, then we would recommend that you create a group for the face. When you need to use the group you can expand it to see all the layers and when you are not using it, you can collapse the group.
To create a new group, Left click the New Group button located to the Left of the New Layer button in the Layers palette.
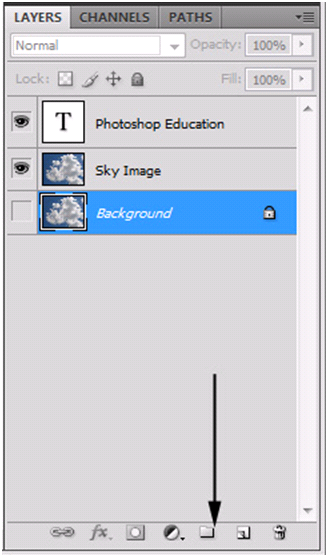
You should now see a folder image and the word “Group 1”. To add to the group, Left click the layer to select it and hold down the Left mouse button and drag it to “Group 1”. Release your Left mouse button when you are hovered over the “Group 1”.

To expand or collapse the group, Left click either the right arrow (shown in image below) to expand or the down arrow to collapse. To remove Layers from the group, first expand the group and Left click on the Layer and hold down the Left mouse button and drag the Layer outside the group. Release the Left mouse button when you are happy with your placement.

Renaming Groups:
Just like layers, you can DOUBLE Left click the group text name to change the name of the group.
Deleting Groups:
If you no longer need the group, you should delete the group by following these steps.
| A). Right click the text of the group. | |
| B). Left click the “Delete Group” command from the menu. |

You will now see the following dialog box.
| A). You must be very careful with “Group and Contents” because if you have layers inside this group it will remove them. Left click this button to delete the “Group and Contents”. | |
| B). On this example, please Left click the “Group Only” button. | |
| C). If you do not want to delete the group, Left click the “Cancel” button. |

Flatten Image:
When you are 100% done with your image, you then can flatten the image. By flattening an image, it makes it 1 layer and it will be considered the “Background” Layer and if you are working with transparent layers, it will make it a white background.. Left click the “Layer” menu and Left click the “Flatten Image” command.

If you have hidden layers, you will get the following dialog box displayed. This is telling you that if you flatten the image, you will lose any hidden layers. Left click the “OK” button to discard the hidden layers. If you would like to turn on the hidden layers or you do not want to flatten the image, Left click the “Cancel” button.

Conclusion:
Over the last 2 tutorials we have discussed most of the basic features of “Layers”. The first tutorial was to get your feet wet and this tutorial was to add on to your knowledge. In this tutorial you should have learned how to change the color identifier, copy from one image layer into another image, 2 different methods on creating new layers, grouping layers, and even how to flatten the image.
We recommend that you a take a minute and answer the 10 question quiz below to see how much knowledge you have learned in this tutorial.

1). What is one way to create a blank new layer?
| A). From the “Edit” menu, move your mouse to the “Layer” command and then select “New Layer”. | |
| B). Left click the”Create a new layer” icon located to the left of the trashcan in the layers palette. | |
| C). Left click the “Blank Layer” command located in the Layers menu. | |
| D). If it is a text layer, Left click the “T” and then use CTRL-“J” to create a blank layer. |
2). How do you change a color identifier in the Layers palette?
| A). You only can create a color identifier when you create a new layer. | |
| B). Left click the Layer and then Left click the color palette and select a color. | |
| C). Left click the Layer and the in the “Layer” menu, Left click “Change Color”. | |
| D). Right click the image of the Eye in the layer palette and then Left click the color. |
3). How do you add to a Layer Group?
| A). Hold down the Left mouse button and drag the layer into the group name. | |
| B). Right click the layer and select “Add to group layer”. | |
| C). Right click the group layer and select “Add to group layer” option. | |
| D). Left click the group layer and a dialog box will give you an option to add to the group. |
4). What is one way to delete a Group in the Layers Palette?
| A). Use the “Delete Group” icon in the layer palette. | |
| B). Left click the group name and from the “Layers” menu, select “Delete Group Only”. | |
| C). Right click the group name and Left click “Delete Group”. | |
| D). Drag the group to the “Delete Group” option in the layers palette. |
5). What happens when you use the command “Flatten Image”.
| A). It compresses the file image size down so you can view it on the web easily. | |
| B). It only compresses the one layer when selected. | |
| C). It allows you to change the layers perspective to flatten the image so it sits flat. | |
| D). It converts all layers into 1 background layer and converts a transparent layer into a white background. |
6). How do you expand the Groups to be able to see the Layers in that group?
| A). Left click the down arrow next to the image of the folder of the layer group. | |
| B). It only compresses the one layer when selected. | |
| C). Left click the layer group and then use CTRL-“+” to expand the group. | |
| D). Left click the layer group and then Left click the “+” button. |
7). What is one way to rename the group name in the layers palette?
| A). Left click the group and Left click the “Rename Group” button. | |
| B). Left click the group name and use the “Rename Groups” in the Layers menu. | |
| C). Left click the group name and use CTRL-“R” to rename the group. | |
| D). Double Left click the group name. |
8). There are 2 methods we showed you on how to create a new blank layer, which method allows you to change the opacity of a layer when creating it?
| A). Left click the “Create a new layer” icon in the Layers palette. | |
| B). In the Layers menu, move your cursor to “New” and then Left click the “Layer” command. | |
| C). Use “Shift”-CTRL-“L” to create a new layer with an opacity. | |
| D). You only can change the opacity after you created a new layer. |
9). How do you get 2 different image files side by side in 2 different windows?
| A). Open the 2 files and Left click the “Window” menu and move to the “Arrange” option and then Left click the “Side by Side” command. | |
| B). Open the 2 files and Left click the “Window” menu and move to the “Arrange” option and then Left click the “Tile” command. | |
| C). Open the 2 files and Left click the “Window” menu and then Left click the “Tile” command. | |
| D). Open the 2 files and Left click the “Window” menu and then Left click the “Side by Side”. |
10). What will happen if you try to use the “Flatten Image” command if you have a hidden layer?
| A). It will flatten the hidden layer with the rest of the layers. | |
| B). It will disregard the hidden layer and only flatten the visible layers. | |
| C). The visible layers will be flattened and the hidden layer will remain on its own layer. | |
| D). A dialog box will be displayed asking you to “Discard Hidden Layers?” |
Answers: 1). B, 2). D, 3). A, 4). C, 5). D, 6). B, 7). D, 8). B, 9). B, 10). D
Scoring:
0 - 5 = Please review the video tutorial and re-read this document either offline (PDF) or online.
6 – 8 = We would recommend that you print this document off and read it at a later time.
9 – 10 = Congratulations you have passed the quiz. Go ahead and view another tutorial on our site.
We hope you enjoyed this detailed tutorial. Please visit us at: http://www.Photoshopeducation.blogspot.com to expand your knowledge within Adobe Photoshop.

Click Picture To Download Video File To View Offline
Download Total Video Player, iTinySoft

Click Picture To Download PDF Tutorial
Download Adobe Reader, Adobe Corporation
Click Picture To Download Supporting Files
(Brushes, Textures, Fonts, Images, Actions, .PSD, Etc.)
Download ZipGenius Standard Edition 6.0.3.1150, Dicono di ZipGenius


Great stuff! This is absolutely useful. Thanks for sharing.
ReplyDeleteWe are glad you enjoyed. This is the reason why we spend so much time on this site is to help people like you!
ReplyDeleteYour blog is very exciting.
ReplyDeleteEscort London Girls
I certainly enjoyed reading it, you would be a great author. Thanks for your great posting! Clipping Path Associate, is one of the best clipping path service
ReplyDeleteprovider around the world.