One of the key components of Photoshop is layers. Layers allow you to stack images, shapes, text, etc. If you take 2 pieces of paper and you put one on top of the other and partially cover the bottom piece of paper, that is similar to a layer in Photoshop. We will show you not only how to create layers, but also how to rename the layer and even how to change the layer order. As we proceed with this course, we will also explaining how to delete a layer, hide layers or even change the opacity of a layer. Before we are finished, we will also explain terminology such as what happens when you “Rasterize Layer”.
Currently we are using Windows Vista Home Premium 64 Bit and the Photoshop CS4 Extended 64 Bit version.
Knowledge You Need to Know:
If you are unfamiliar with certain areas that are not covered in this tutorial, feel free check out other tutorials on our website. We have many different types of tutorials that can be downloaded (Video, PDF) or viewed online that will train you for free! Once you have the knowledge, feel free to come back and go through this tutorial again.
Layers:
Finally, we get to “Layers”! A lot of other Photoshop sites, might start with the initial training of Photoshop with Layers, but we felt it was very important for you to understand certain areas such as palettes or even selection tools before we dived into Layers. Many of the past tutorials we have been getting you prepared for layers.
First let’s get you to understand what a layer is. A layer allows you stack images, text, shapes, etc. on top of other images, text, etc. Let’s look at the example below. The bottom layer is the “Red Layer”. See how both the Green and Blue Layer are covering up the “Red Layer”? Now you need to determine what the middle layer is. If you look, the “Green Layer” is partially covering up the “Blue Layer”, so that would make the “Blue Layer” the middle layer. That leaves the “Green Layer” which is the top layer. On the example below, our top layer is actually the text. Remember, not only images, but text, shapes, etc. can be a layer. You will notice the text is actually on top of the Green circle.

Now that we explained what should be the top, middle, and the bottom layer, let’s look at the palette called “Layers”. The palette is usually located in the bottom right hand corner of the screen.
| A). We explained the top layer is actually the text layer. On this example the words “Red Layer” is actually the top layer. We also explained that because the red circle was covered up by the blue/green circles, that would make the “Red Layer” the bottom layer (B). |

Creating Layers:
Now create an 800 X 800 new document. Please refer to Working With Image Files tutorial for more information on creating new documents. Because we already have talked about the Ellipse tool (see Drawing Tools tutorial), go ahead and create a Red circle anywhere on the empty canvas. Photoshop Tip – There is no limit on how many layers you can create, besides the system resources it uses).
In the Layers palette you will see a red color box and “Shape 1” to the right of a gray box. What does this mean? Certain items can be edited after you have created them. One example is text. If you create text you will see a “T” for the image. This tells you if you select the text with the type tool you can edit it.
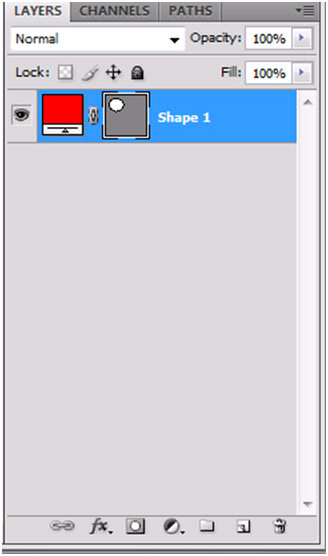
To make it so you can’t edit the item, you will need to rasterize the layer. What the heck is rasterize? One example is let’s say you had a text layer, and you wanted to run different filters and before you can run the filters, you need to rasterize the layer from either text, shape, etc. into an image. Once an item is rasterized, you can no longer edit the item.
| A). If you Right click the word “Shape 1”, (do not right click the red image, etc. or you may get a different menu), you will see a new menu displayed. | |
| B). Left click “Rasterize Layer”. |
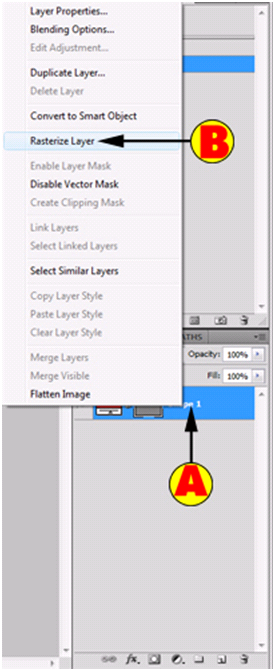
You will see the Layer change. Instead of have the 2 boxes, you will see 1 box with your now formed image and then the word “Shape 1”.

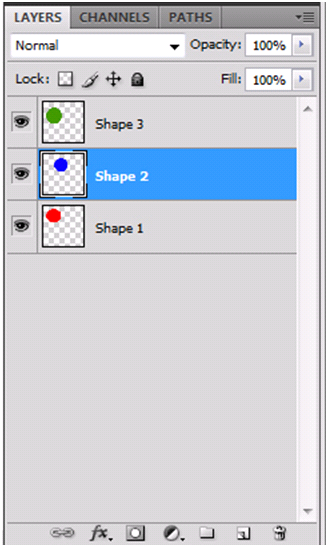
Now follow the above instructions and add a “Blue” eclipse (it does not matter where you put it, but we would recommend that you draw it over a portion of the “Red” circle. Now rasterize and create the 3rd layer with the ellipse tool and make this one a “Green” circle. This last circle should overlay a portion of the “Blue” and “Red” circle. Now your layers should look similar to the following image.
Moving Layers:
You already know by now what is the top and bottom layer, let’s now move them around. First, Left click the “Shape 2” which is the “Blue” circle. You should see it is now highlighted. Now move your pointer over the word “Shape 2” and hold down the Left mouse button. Now drag your mouse up. Move it above the image of “Shape 3”. Now your layer palette should look like the image below.

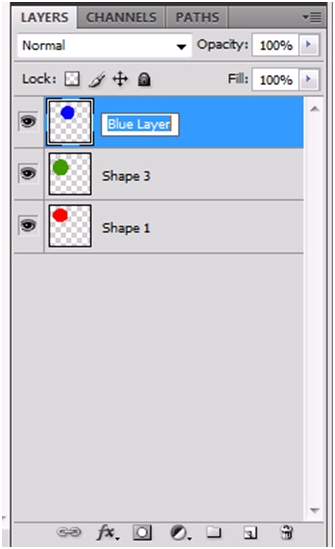
So what did you just do with the layer? You moved it to the top and told Photoshop that that the blue circle is now the top layer. If you look at your image, you will see the “Blue” circle is on the top of the other images. If you did it correctly, you should see the “Blue” circle covering the “Green” and “Red” circle. You will also notice that the “Green” circle which use to be the top layer is shifted down to the middle layer.

Renaming Layers:
You will be spending a lot of time in the Layers palette and we would highly recommend that you change the layers name to something that you will remember. To rename a layer, DOUBLE Left click the word such as “Shape 2”. You will then be able to rename the layer. Change it to “Blue Layer”. Now proceed and change “Shape 3” to “Green Layer” and “Shape 1” to “Red Layer”.
Deleting Layers:
If you would like to remove a layer, you can delete a layer by one of two methods. Method 1 is listed below. Let’s delete “Shape 3” or “Green Layer”.
| A). Right click on the text of the layer (Do not Left click or click on the picture or you may get a different menu). | |
| B). Now Left click “Delete Layer”. |

Now you will see a dialog box asking you if you really want to delete this layer? Left click “Yes” to delete the layer.

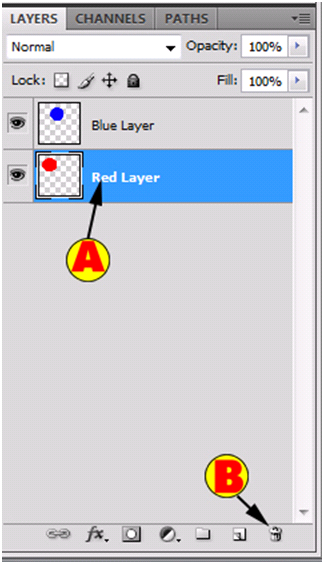
Method 2 of deleting a layer is to drop it in the trashcan. We are not a big fan of this way of deleting the layer because it does not confirm you truly want to delete it as the other method asks you to confirm deletion. One way to get back the deleted layer for both methods is use the “Undo” command which is keyboard shortcut CTRL-“Z”.
| A). First Left click the “Red Layer” and once it is highlighted, hold down the Left mouse button and drag it to the trashcan (B). | |
| B). Release the Left mouse button to delete the layer. |
We need at least 2 layers to show you the rest of the areas of “Layers” so please use the keyboard shortcut of CTRL-“Z” to undo the changes.
Hiding Layers:
Sometimes you get to many layers and it becomes confusing or maybe you no longer want to see a certain layer, but you do not want to delete the layer. Well then it is time to hide the layer. On all layers you will see a picture of an “Eye” next to the image in the Layers palette. To hide a layer, Left click the eye image. Photoshop Tip – If you would like to see the layer displayed again, Left click this box (it toggles on and off).

Opacity Of A Layer:
Sometimes you want the lower layers to bleed through. An easy way for it to bleed through to the lower layer is to change the opacity of the layer. By default a layer when created is at 100% opacity (no transparency). On this example, Left click the “Blue Layer” and once it is highlighted, Left click the “Opacity:” box and use the slider to change the opacity. Left click on a spot on the slider bar (left or right).
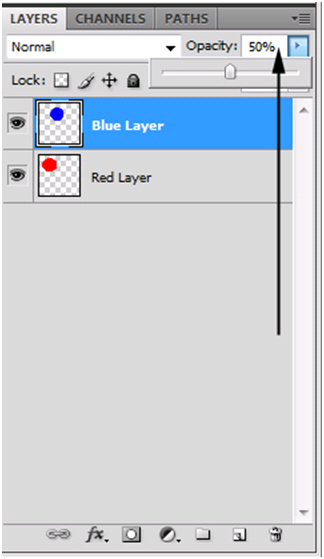
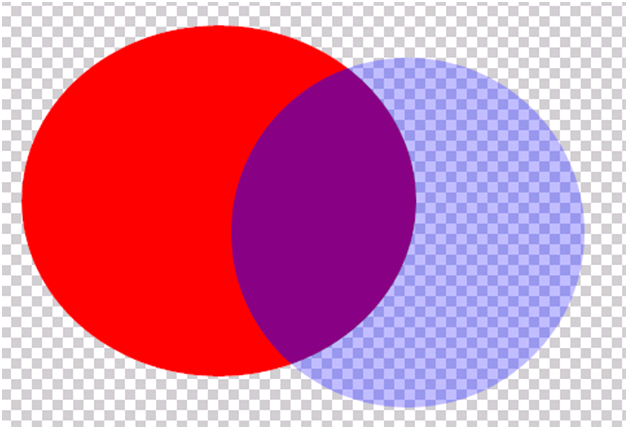
With 50% opacity, you can now see some of the “Red Layer”.
Merging Layers:
As you begin working with layers, you will find yourself wanting to merge multiple layers together (you can merge as many layers as you would like together, but on this example we will be merging the 2 layers.
| A). First you need to select both layers. Left click the first layer and hold down the CTRL key and Left click the second layer. Photoshop Tip – If you would like to select a block (layers that are together), use the “Shift” key instead of the CTRL key. Now Right click on either text (not the images) and you will see the following menu. | |
| B). Left click “Merge Layers”. |

By default the name of the layer is the top layers name. By now you should know how to change the name of the layer. You should see 1 layer in the layers palette.

Miscellaneous Information:
In a previous tutorial called Selecting Image Content, we discussed how to use the “Move Tool” and in a previous tutorial called Patterns we discussed that if you used CTRL-“J” you can duplicate a layer.
By now you should know the true basics of Photoshop layers. In future tutorials we will be discussing Adjustment Layers and other Layer options. For now, you should have a good understanding what is a layer and how to rename, hide, change the order of the layer or even how to delete a layer.
Please take a few minutes and answer the 10 question quiz below to determine how well you have learned this subject.
Quiz
1). How do you change the layer name?
| A). Left click the layer, and then Left click the “Rename” button. | |
| B). Double Left click the image in the layer. | |
| C). Double Left click the word of the layer. | |
| D). Left click the word of the Layer and use the “Rename” option in the “Edit” menu. |
2). What does Rasterize Layer do?
| A). It converts your text, shape, etc. into an image. | |
| B). It converts your text, shape, etc. into a smart layer. | |
| C). It allows you to edit the text, shape, etc. | |
| D). It configures the color settings for the layer. |
3). What is one method of deleting a layer?
| A). Left click the layer and then hold down the Left mouse button and drag it to the words “Delete Layer” option in the palette. | |
| B). Left click the word in the image and select “Delete Layer” option. | |
| C). Left click the “Delete Layer” checkbox and Left click the layer. | |
| D). Left click the layer and then hold down the Left mouse button and drag it to the trashcan. |
4). How do you change the layer level (position of the layer)?
| A). Hold down the Left mouse button and drag it to the “Arrange Layers” button to change the layer level. | |
| B). Hold down the Left mouse button and drag it up or down (above or below a layer). | |
| C). Use the “Move Tool” and drag the actual image to a different layer on the canvas. | |
| D). Select the layer in the palette and then use the “Layer Level…” command in the “Layers” menu. |
5). How do you hide a layer?
| A). Right click the image in the layer and Left click “Hide Layer”. | |
| B). Left click the layer and select the “Hide Layer” button in the palette. | |
| C). Drag the layer to the “Hide Layer” button in the palette. | |
| D). Left click the “Eye” next to the image in the layer. |
6). If you would like to have a layer bleed through another layer, what option would you set?
| A). Use the “Transparency” option in the layers palette. | |
| B). Use the “Opacity” option in the layers palette. | |
| C). Right click the layer and select the “Transparency” command. | |
| D). Right click the layer and select the “Opacity” command. |
7). What is the keyboard shortcut to duplicate a layer?
| A). CTRL-“J”. | |
| B). ALT-“J”. | |
| C). CTRL-“L”. | |
| D). ALT-“L”. |
8). When you merge layers, what layer name does it use when it is merged?
| A). It uses the last known layer name. | |
| B). It uses the bottom layer name. | |
| C). It uses the top layer name. | |
| D). It asks you the name you would like to create when merging the layers. |
9). What key do you hold down when selecting a block of layers?
| A). CTRL. | |
| B). ALT. | |
| C). You need to hold down the Left mouse button. | |
| D). “Shift”. |
10). What is the maximum number of layers you can have?
| A). 100. | |
| B).Unlimited and is based on your system resources. | |
| C).50. | |
| D). 200. |
Answers: 1). C, 2). A, 3). D, 4). B, 5). D, 6). B, 7). A, 8). C, 9). D, 10). B
Scoring:
0 - 5 = Please review the video tutorial and re-read this document either offline (PDF) or online.
6 – 8 = We would recommend that you print this document off and read it at a later time.
9 – 10 = Congratulations you have passed the quiz. Go ahead and view another tutorial on our site.
We hope you enjoyed this detailed tutorial. Please visit us at: http://www.Photoshopeducation.blogspot.com to expand your knowledge within Adobe Photoshop.

Click Picture To Download Video File To View Offline
Download Total Video Player, iTinySoft

Click Picture To Download PDF Tutorial
Download Adobe Reader, Adobe Corporation


Such blogs are great to read.
ReplyDeleteEscorts London Agencies
Great and excellent tutorial. You can use clipping path service
ReplyDeletefor beauty enhancement of images Thanks for sharing your photos and nice info.