Summary:
We have now gone over the basics of masking, let’s take this tutorial and add on to your knowledge and learn more basic functions of Layer Masks. In this tutorial we will be showing you another way to copy from one image to another image. We will show you a quicker way to create a Layer Mask and how to disable/enable the Layer Mask. In the past, we have explained how to crop a full image and in today’s course we will show you how you can crop a layer. Finally the reveal all versus hide all will be explained.
Currently we are using Windows Vista Home Premium 64 Bit and the Photoshop CS4 Extended 64 Bit version.
Knowledge You Need to Know:
If you are unfamiliar with certain areas that are not covered in this tutorial, feel free check out other tutorials on our website. We have many different types of tutorials that can be downloaded (Video, PDF) or viewed online that will train you for free! Once you have the knowledge, feel free to come back and go through this tutorial again.
Preparing For This Tutorial:
You will be using 2 images in this tutorial (a picture of a sky and a Disney sign) If you do not have these images, please scroll down to the “Click Picture To Download Supporting Files” and download the images. Please open the image DSC03562 and PE-DISNEY in the Photoshop Program. **Even though every layer palette screen shot does not show it, we highly recommend that you always duplicate the background layer when you begin a project.
Before We Begin:
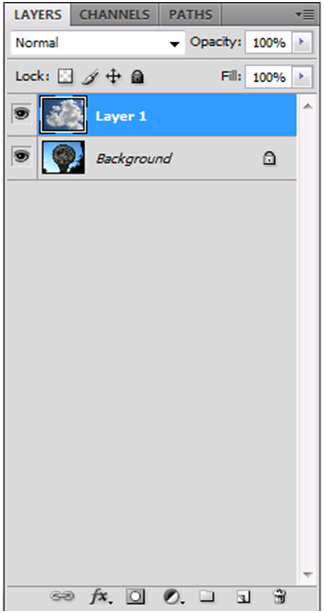
Before we begin, you will need to shrink the image size of the sky picture to a width of 1680. If you are unfamiliar how to shrink images, please review the Canvas Size, Cropping, Image Size tutorial. We have shown you how to copy from one image file to another image file, but here is even a quicker way to get both the sky photo and the sign image within the same file. Within the Sky image, use CTRL-“A” to select all and then use CTRL-“C” to copy. Now Left click on the sign image file tab and use CTRL-“V” to paste. Your layers should look like the following:

The Easy Way To Layer Mask:
Sometimes it is easier to look at the layer below and determine what you would like to reveal then it is trying to guess what is underneath the layer. The following is an excellent trick to do layer masking! We would like to replace the current sky with the sky image and make it look like it was part of the image. Yes, the perspective will not be perfect and if you searched the web you could find a perfect perspective of a sky photo, but for now this example is to show you an easy way to mask.
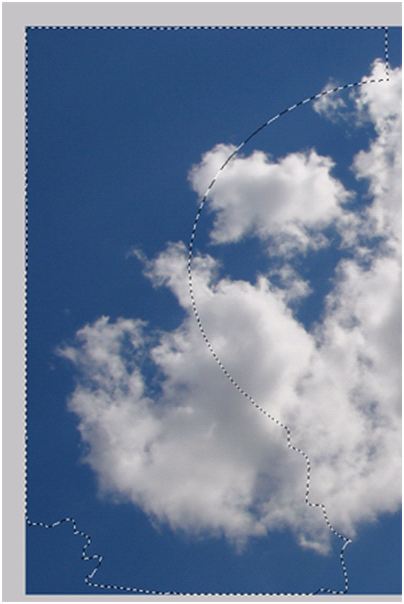
First start off by hiding the sky layer. Next, Left click the Disney layer. Now it is time to use all of your selection knowledge which you learned in the Selecting Image Content tutorial and select the current sky. On this example we did a quick selection with the magnetic lasso tool and selected only the left hand side of the sky.

Now unhide the sky layer and Left click the layer to make it active. You should see something similar to the following.

In the last tutorial we talked about one way to create a Layer Mask, let’s show you even a quicker way. First, select (Left click) the sky layer. In the layers palette, Left click the 3rd button on the bottom from the left hand side. The icon has a white circle and a gray box around it.

You will notice it created the layer mask and the beauty of doing the process this way is you can do a quick rough draft and even if you make errors with the selection tool, you can still use the brush with the black and white colors to fine tune it. Example: We would use the black and hide the tree in the bottom left hand corner because you can see the rough edges.

Disable/Enable Layer Masks:
Sometimes you may want to see what the original looks like without the layer mask. You can disable the layer (does not delete it and will show you it unmasked).
| A). Right click the Layer Mask image box. | |
| B). Left click the Layer Mask. |

You will now notice a red X through the Layer Mask and the actual image will show you the unmasked version of that layer.

To enable the mask, Right click on the layer mask image and Left click the “Enable Layer Mask” command.

Cropping A Layer Only With Masks:
We have shown you how to crop a total image, now it is time to crop only the layer with a Layer Mask. **Close down both images (sky and Disney). Now open the sky image again. Duplicate the background layer (CTRL-“J”). Even though we did not duplicate the background layer above, we want you to get into a habit on duplicating the layer because you will always then have an original. Ok, create a new blank layer and move that layer in between the background layer and the sky photo. Finally, hide the background layer. Your layer palette should look like this (ignore the layer names, but pay attention to the order and that the background layer is hidden).

Now use any of the selection tools (we used the Marquee Tool) make your selection. In this example you are telling Photoshop that you want to hide anything outside the selection.

Now add a Layer Mask to the sky photo (top layer). End result, you just cropped the layer (not the total image).

Reveal All Versus Hide All :
**Delete the current Layer Mask. If you need information how to delete the Layer Mask, please review the Masking And Transform Information tutorial. So what is the difference between the reveal all and hide all. Every time you have created a Layer Mask (including the previous tutorial), you have directly or indirectly did a Reveal All. This means it will start off the layer by showing you all the contents of the Layer and to mask you hide by using the black color. If you select Hide All, it will hide all of the image content and you would have to use a white color to unhide the image content. Most people will only use the reveal all!
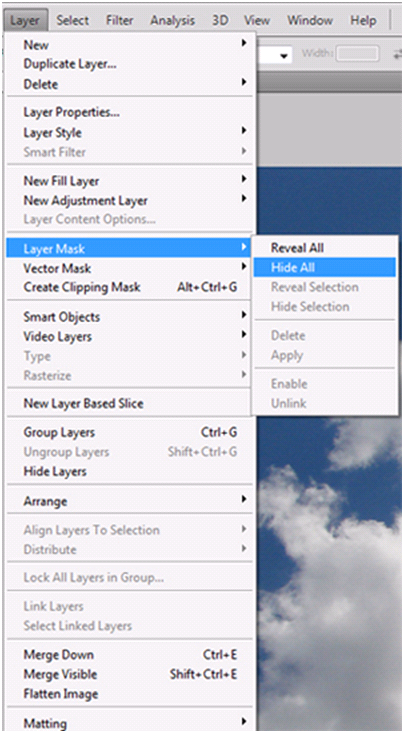
On the example below to show you what Hide All does, we first selected (Left clicked) the sky layer (top layer) and then went into the Layer menu and then moved our mouse to the Layer Mask and then selected the Hide All command.

You will notice that the sky image is no longer displayed. To reveal the sky image, you would need to use the white paintbrush on the canvas. The second area you should notice is the Layer Mask image in the layer palette is all black, meaning that the whole image hidden.

So now you know how to hide all through the Layer menu, how do you use the “Add Layer Mask” icon in the layers palette to hide all? Hold down the ALT key while Left clicking the icon in the layers palette. If you have forgotten what the icon looked like, please refer to the section called “The Easy Way To Layer Mask”.
Conclusion:
Between the 2 tutorials on masking you should have more than enough knowledge to use the basics of masking. In this tutorial, you should of learned how to easily layer mask, what is a reveal all, how to disable a layer mask, how to crop a layer with layer mask and we showed you a quick trick to copy from one image to another image.
Please take a few minutes and answer the 10 question quiz below to see how well you remember your new knowledge you have learned from this course.
1). What is the other way we showed you how to copy one image to another image?
| A). Select the first image and use keyboard shortcuts, CTRL-“B”, CTRL-“C”, change to the target image and use CTRL-“V”. | |
| B). Select the first image and use keyboard shortcuts, CTRL-“C”, CTRL-“A”, change to the target image and use CTRL-“V”. | |
| C). Select the first image and use keyboard shortcuts, CTRL-“A”, CTRL-“C”, change to the target image and use CTRL-“V”. | |
| D). ). Select the first image and use keyboard shortcuts, CTRL-“V”, CTRL-“C”, change the to target image and use CTRL-“A”. |
2). How do you disable a Layer Mask?
| A). Right click the layer mask in the layer palette and Left click “Disregard Layer Mask”. | |
| B). Right click the layer mask in the layer palette and Left click “Disable Layer Mask”. | |
| C). Left click the layer mask in the layer palette and then click the “Disable Layer Mask” button. | |
| D). Left click the layer mask in the layer palette and Left click the “Disable Layer Mask” command. |
3). Using the Add Layer Mask icon in the layers palette, how do you make it to “Hide All”?
| A). Hold down the “Shift” key and Left click the icon. | |
| B). Hold down the CTRL key and Left click the icon. | |
| C). Drag the icon to the “Hide All” button. | |
| D). Hold down the ALT key and Left click the icon. |
4). How do you crop only a portion of a layer?
| A). Make your selection and add a Layer Mask. | |
| B). From the “Edit” menu select “Crop” and then select “Only Layer”. | |
| C). Left click the Layer Mask and then Left click the “Crop” icon. | |
| D). You can only crop the complete image and not the layer. |
5). What habit should you get use to when you open an image and before you begin modifying?
| A). Change the actual image size, so it is smaller in size. | |
| B). Duplicate the background layer and hide the background layer. | |
| C). You should always do your color corrections before using layer masks. | |
| D). When you open either a JPG or a GIF file, you should always make sure you have the layers in order from top to bottom. |
6). The button to “Add a layer mask” is on the bottom of the layers palette, but what location?
| A). It is the 3rd icon from the right hand side. | |
| B). It is the 2nd icon from the right hand side. | |
| C). It is the 2nd icon from the left hand side. | |
| D). It is the 3rd icon from the left hand side. |
7). If you see the layer mask image is filled with the color black, what does that mean?
| A). It means the complete layer image is hidden. | |
| B). It means the complete layer image is revealed. | |
| C). It means the layer mask is disabled. | |
| D). It means the layer mask is locked. |
8). How can you tell a layer mask is disabled?
| A). In the layers palette it will gray out the layer mask. | |
| B). From the “Layer” menu, the layer mask command will show “Disabled”. | |
| C). A red X will be in the layer mask image. | |
| D). The layer mask image will change to the word “Disabled”. |
9). When you use a color black on a layer mask, what does that do?
| A). It will paint black on the image. | |
| B). It allows you to unhide that portion of the image. | |
| C). It allows you to hide that portion of the image. | |
| D). When you are done painting it in black, Left click the layer mask to apply the layer mask. |
10). From the menu (not the layer palette), how do you get to the “Hide All” command for the Layer?
| A). From the Layer menu, hover over masking and then select “Hide All” command. | |
| B). From the Layer menu, hover over layer mask and then select “Hide All” command. | |
| C). From the Layer menu, Left click the “Hide All” command. | |
| D). From the Layer menu, Left click “Masking” and then from the dialog box, Left click the “Hide All” command. |
Answers: 1). C, 2). B, 3). D, 4). A, 5). B, 6). D, 7). A, 8). C, 9). C, 10). B
Scoring:
0 - 5 = Please review the video tutorial and re-read this document either offline (PDF) or online.
6 – 8 = We would recommend that you print this document off and read it at a later time.
9 – 10 = Congratulations you have passed the quiz. Go ahead and view another tutorial on our site.
We hope you enjoyed this detailed tutorial. Please visit us at: http://www.Photoshopeducation.blogspot.com to expand your knowledge within Adobe Photoshop.

Click Picture To Download Video File To View Offline
Download Total Video Player, iTinySoft

Click Picture To Download PDF Tutorial
Download Adobe Reader, Adobe Corporation
Click Picture To Download Supporting Files
(Brushes, Textures, Fonts, Images, Actions, .PSD, Etc.)
Download ZipGenius Standard Edition 6.0.3.1150, Dicono di ZipGenius


No comments:
Post a Comment