Have you ever tapped off portions of a room before you painted it? Well then you have already masked before. In Photoshop you paint on a mask and in this tutorial we will be showing you how to do a Quick Mask to select an area and what a Layer mask is. We stated back in the Eraser tool tutorial that once you learn how to mask an image; you will never want to go back to the eraser tool. We will also be showing that the Transform Path which we explained in a previous tutorial is exactly the same as the Transform option.
Currently we are using Windows Vista Home Premium 64 Bit and the Photoshop CS4 Extended 64 Bit version.
Knowledge You Need to Know:
If you are unfamiliar with certain areas that are not covered in this tutorial, feel free check out other tutorials on our website. We have many different types of tutorials that can be downloaded (Video, PDF) or viewed online that will train you for free! Once you have the knowledge, feel free to come back and go through this tutorial again.
Preparing For This Tutorial:
You will be using the Sky image which we have used in past tutorials. If you do not have this image, please scroll down to the “Click Picture To Download Supporting Files” and download the image. Please open the image DSC03562 in the Photoshop Program.
Transform Vs. Transform Path:
Back in the Transforming Objects tutorial we explained how to use all of the Transform Path features. In that tutorial we discussed scale, rotate, skew, distort, perspective, warp, etc. We wanted to show you that if you make a selection first, you can use these options under the “Transform” menu. No difference on these tools.

Quick Mask:
In this tutorial we will show a quick way to make a selection. Even though there are other uses for quick masks, let’s show you the basics.
Please make sure you have opened the “Sky” image (if you do not have it, scroll to the bottom of the post and Left click on download supporting files. On the bottom of the toolbox you will see a circle with a rectangle around it. First to change the options of the Quick Mask, DOUBLE Left click this button.

Let’s show you the options you can change for the Quick Mask.
| A). Color Indicates - If you selected Masked Areas it means as you use the brush then the color area will be blocked out and it will not allow you to make the changes to this area. If you Left click the radio button for “Selected Areas” it will mask the outside area. | |
| B). Color – Left click this box to change the color of the Mask. As you use the brush this color will be used to identify what areas are masked. | |
| C). If you want to blend a portion of the background, change the opacity. On this example we will leave it at 100%, which means any area that we use the brush on will be masked. | |
| D). When you are done with the options, Left click the “OK” button or if you are not happy with the options, Left click the “Cancel” button. |
**On this example make sure the “Masked Areas” is selected and the color is Red and the Opacity is 100%.

How do you know if the quick mask is on or off? You will notice the toolbox image changes when you single Left click it. See example below to determine if the quick mask is on or off. Photoshop Tip – The easiest way to turn on/off the quick mask is by using the keyboard shortcut of “Q”.

Turn on the quick mask and then Left click the Brush Tool. You will notice the background/foreground color will switch to black and white. This is important because black means it will mask the item and white will unmask. Photoshop Tip – If you make an error then use the keyboard shortcut “X” to flip the background color to the foreground color and begin painting with the white as the foreground.
So how do you use the mask? Once you have the brush selected, draw the certain areas you want to mask (remember think of a mask as masking off a room you are going to paint). Photoshop Tip – Feel free to change the brush size, hardness, etc. If you need more information about the brush, feel free to review the Colors And Painting Tools tutorial.
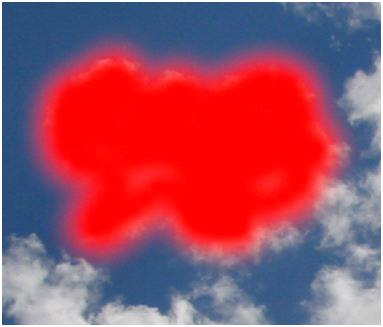
On the example below we have used the brush to draw around the small cloud on the left hand side towards the top of the image. Remember we are NOT painting this image in red and the red is ONLY identifying the area that will be masked.

As we stated, if you make an error such as masking to much of an area, then use the “X” key (this makes white as the foreground color) and now draw over the area that you would like to correct. Here is example of a correction we made.

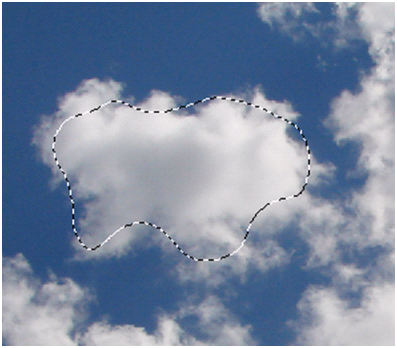
Now press the “Q” key to exit the quick mask or Left click the quick mask tool again. You will notice a selection will be made.

Remember we selected “Masked Areas”, meaning the red areas will be blocked out and you will not be able to make modifications in that area. In the example below we tried to use a black paint brush and draw inside the masked area and as you can see it only drew outside the masked area.

Layer Masks:
To start everyone on the same page, let’s close this sky photo. Now re-open the original photo. We will be spending the rest of the tutorial really getting your feet wet with the layer mask.
We stated the Layers option in Photoshop is a very important area of the program, well Layer Masks are also considered very important to understand. We will walk you through most of the options. Once you learn how to use Layer Masks, you will never go back to the Eraser tool.
The advantages of Layer Masks is you hide (not erase) contents of a layer, you can always un-hide them if you decide to use them later. Nothing is permanent! When you are all done, you just apply the layer mask and those adjustments will be changed for good.
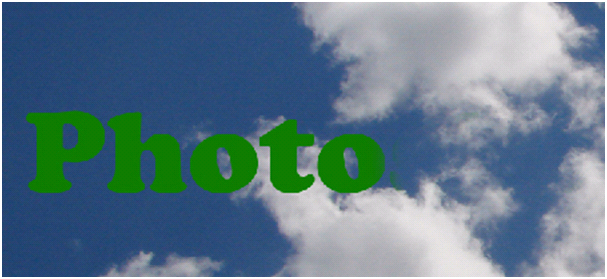
First, duplicate the background layer and hide the background layer. For more details please review the Learning Layers With Ease tutorial. On this example we are going to use text as another layer, but you can use anything such as a shape, texture or even an image. Create your text (see Text Features tutorial for more details on how to use the text) using a very large font and make the color Green for the font color. Here is the example we created.

Then we rasterized the Text layer. See Learning Layers With Ease tutorial for more details on rasterizing this type. Left click on your rasterized text layer. Your Layer palette should look like this:

Now you need to tell Photoshop that you want to create a Layer Mask for this specific layer. Left click the “Layer” menu and move your mouse to the “Layer Mask” option. Now Left click the “Reveal All” command.

You will see the Layer palette will change and a white box will be added to the right of the image (left of the layer text). It is very important to understand that if you Left click this white box (by default it will be selected when you reveal all), that you are not editing the layer, but you are editing the Layer Mask. If you Left click the image to the left of the Layer Mask, you would be editing the actual layer contents. You will notice on the example below that there is a rectangle around the Layer Mask which tells us that the mask is currently selected.

Now use the Brush tool. Remember you can change the hardness, size, etc. to the brush. There are two different colors you will be using on this example. Black = To hide (not erase) the pixels. White = Unhide the pixels. Any shades of gray will blend both layers. On this example, let’s make sure we use black to start off with. Use “D” to reset your foreground/background colors. Now use the “X” to make the black the foreground color. Remember we are layer masking the text, not the sky. On this example we hide the characters “shop”. Remember we are NOT erasing the letters; we are only hiding the letters.

Ok, now use the “X” to flip the foreground color to white. Remember white = unhide. On this example we wanted to unhide the “ho” in the word “shop”.

Remember you can blend both layers by using a shade of black. We switched the black color back to the foreground with the “X” key. Then we changed the color to a shade of gray (numeric value: 909090) and then we used the brush and painted over the word “Photoshop”. You will notice some of the clouds or background is now bleeding through into the text. Remember the darker you make it, the more it will hide the pixels.
Photoshop Tip – You can always come back to a layer mask and work on it later. If you add/change another layer, you can always Left click on the layer mask box inside the layer (to the left of the layer text).

Applying Layer Masks:
When you are satisfied with the Layer Mask, you will need to apply the layer mask to permanently change the actual layer. When you are finished applying the layer mask, you will see the layer mask image disappear in the layers palette.
| A). Right click the Layer mask that you want to apply. | |
| B). You will now see a sub-menu. Left click on the “Apply Layer Mask” command. |

Deleting Layer Masks:
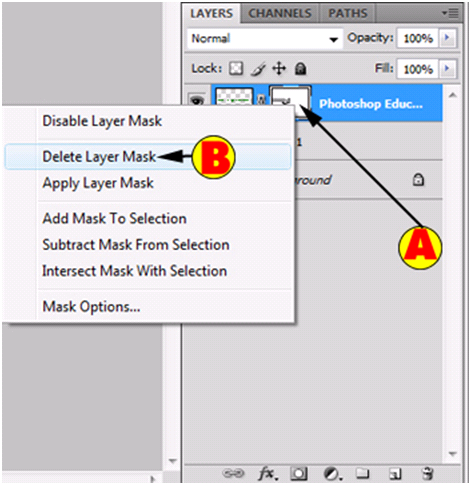
Sometimes you no longer need a layer mask. If you no longer need the layer mask, then delete the layer mask. Photoshop Tip – Sometimes we use a layer mask to try a “what would this look like if we blend, hide the following pixels”.
| A). Right click the layer mask. | |
| B). Now a sub-menu will be displayed and Left click the “Delete Layer Mask” command. |

Conclusion
You can have as many layer masks as you would like, except for that you cannot create a Layer Mask on the “Background” layer.. Layer masks are a better option than the eraser tool because layer masks are only hiding the pixels, not erasing the pixels.
By now you should know that the Transform vs. Transform Path commands are exactly the same and how to use the quick mask feature to select either your mask or even selected areas. We also showed you the layer mask features.
Make sure you understand this tutorial because we will be not only having a Pop Quiz on this in the future, but we will be having a Photoshop Challenge that uses these options within the software. Please take a few minutes to test your knowledge of masking and transform.

1). What are the different commands for Transform Path versus Transform?
| A). There are no different commands versus these 2 options. | |
| B). Only the Rotate command. | |
| C). The Skew and Distort commands. | |
| D). Only the Warp command. |
2). What is the keyboard shortcut to use the Quick Mask?
| A). CTRL-“Q”. | |
| B). ALT-“Q”. | |
| C). “Q”. | |
| D). “Shift”-CTRL-“Q”. |
3). How do you change the options for the Quick Mask?
| A). Right click the Quick Mask button. | |
| B). In the “Edit” menu, Left click the “Quick Mask Preferences”. | |
| C). When you turn on the Quick Mask, Left click the “Quick Mask Preferences” button. | |
| D). Double Left click the Quick Mask tool. |
4). What does the “Masked Areas” option do in the Quick Mask options?
| A). When you are complete with the Quick Mask tool it will allow you to change the pixels in the colored area. | |
| B). You will see a grid displayed when you exit the Quick Mask tool. | |
| C). When you exit the Quick Mask tool it will blend the background color with the foreground color. | |
| D). When you are complete with the Quick Mask tool it will block the area that was colored, so you cannot make changes to that area. |
5). How many different Layer Masks can you have in an image?
| A). 20. | |
| B). 1. | |
| C). As many layers you have in the layers palette, except for the background layer. | |
| D). 10. |
6). With Layer Masks, if you paint using the brush with a “Black” color, what happens to those pixels?
| A). Those pixels are erased. | |
| B). Those pixels are hidden. | |
| C). Those pixels will unhide. | |
| D). Those pixels will change to the color “Black”. |
7). With Layer Masks how do allow that layer to bleed through to the layer below?
| A). Change the “Transparency” setting in the options bar. | |
| B). Change the background color to a shade of gray and paint with the brush. | |
| C). Right click on the Brush tool and Left click “Transparency” to change it. | |
| D). Change the foreground color to a shade of gray and paint with the brush. |
8). How can you tell if you are working on the Layer mask or the Layer of the image?
| A). When working on the Layer Mask it will highlight it with a yellow background color. | |
| B). If using a Layer Mask, the Layer Mask will flash on and off. | |
| C). If the Layer Mask is selected, you will see a rectangle box around the mask in the layer palette. | |
| D). When the Layer Mask is selected, the letters “LM” will be displayed to the right of the “Help” menu. |
9). How do you add the Layer Mask to the Layer?
| A). Right click on the Layer Mask and then Left click the “Apply Layer Mask” command. | |
| B). Left click on the Layer Mask and then Right click the “Apply Layer Mask” command. | |
| C). Left click the Layer Mask and Left click on the “Apply Layer Mask” command. | |
| D). Once the Layer Mask is selected, drag the Layer to the “Apply” button on the Layers Palette. |
10). How do you first reset the foreground/background colors and then how do you flip the black and white colors?
| A). Use the “X” key to reset the color and then use the “D” key to flip the colors. | |
| B). Use the “D” key to reset the color and then use the “X” key to flip the colors. | |
| C). Use CTRL-“R” to reset and flip the colors. | |
| D). Use CTRL-“F” to reset and flip the colors. |
Answers: 1). A, 2). C, 3). D, 4). D, 5). C, 6). B, 7). D, 8). C, 9). A, 10). B
Scoring:
0 - 5 = Please review the video tutorial and re-read this document either offline (PDF) or online.
6 – 8 = We would recommend that you print this document off and read it at a later time.
9 – 10 = Congratulations you have passed the quiz. Go ahead and view another tutorial on our site.
We hope you enjoyed this detailed tutorial. Please visit us at: http://www.Photoshopeducation.blogspot.com to expand your knowledge within Adobe Photoshop.

Click Picture To Download Video File To View Offline
Download Total Video Player, iTinySoft

Click Picture To Download PDF Tutorial
Download Adobe Reader, Adobe Corporation
Click Picture To Download Supporting Files
(Brushes, Textures, Fonts, Images, Actions, .PSD, Etc.)
Download ZipGenius Standard Edition 6.0.3.1150, Dicono di ZipGenius


I love the amount of details you gave in your instructions through this tutorial. Looking forward to more from you.
ReplyDeleteRegards,
photoshop masking
Very informative and useful tutorial. Thanks for sharing such a great post.
ReplyDeleteRegards,
image masking services
We are happy you enjoyed the tutorial.
ReplyDeletenice tutorial,,
ReplyDelete...easy to follow..
im looking for a good site that will
help me on my projects and i found your site,
tnx and more powers!
Thanks beta-pix!
ReplyDeleteSuch posts should be published more often!
ReplyDeleteLondon Escorts