Summary:
In the first quick tips list for Photoshop we will be covering mostly new tips (ok 1 tip from a previous tutorial). There are 10 tips in this tutorial and they are all related to previous tutorials. We want to either show you an easier or even a different way to accomplish a certain task in this graphics program. We felt that 10 tips are enough for you to chew on for now. In the future, we will be releasing more tricks! These are NOT full tutorials and are only quick tips and tricks to this confusing program. These tips will cover from course #1 to course #26.
Currently we are using Windows Vista Home Premium 64 Bit and the Photoshop CS4 Extended 64 Bit version.
Knowledge You Need to Know:
If you are unfamiliar with certain areas that are not covered in these quick tips and tricks, feel free check out other tutorials on our website. We have many different types of tutorials that can be downloaded (Video, PDF) or viewed online that will train you for free! Once you have the knowledge, feel free to come back and go through this list of quick tips.
Preparing For This Tutorial:
You will be using the Sky image which we have used in past tutorials. If you do not have this image, please scroll down to the “Click Picture To Download Supporting Files” and download the image. Please open the image DSC03562 in the Photoshop Program.
Tip #1 – Resetting Photoshop:
Have you ever wanted to reset everything (palettes, patterns, custom brushes, etc.) within the Photoshop program? You might be thinking that you need to uninstall the program and re-install it again, but there is a way to reset everything all at once. Hold down the ALT+CTRL+”Shift” key and launch the Photoshop Program. By the way for a bonus tip, that would be Cmd + Option + Shift on the Mac. Photoshop will stop loading and display the following dialog box. **Please note, there is no going back, once you Left click the “Yes” button it will reset EVERYTHING as if you just installed the program!

Tip #2 – Making Straight Lines:
It is worth repeating, but many of the tools such as the Line tool, if you hold the “Shift” key while dragging the line tool; it will force Photoshop to create a straight line.
Tip #3 – Hiding Marching Ants:
Annoyed seeing always the marching ants when you select an area? Use CTRL-“H” to hide the marching ants. Use CTRL-“H” again to unhide the marching ants.
Tip #4 – Reposition Selection:
Sometimes after you make a selection, the size is right but the positioning is incorrect. After you made a selection (you see the marching ants), move your mouse inside the selection and hold down the Left mouse button and drag. Release the Left mouse button when you are happy with the new positioning.
Tip #5 – Hide/Unhide Multiple Layers:
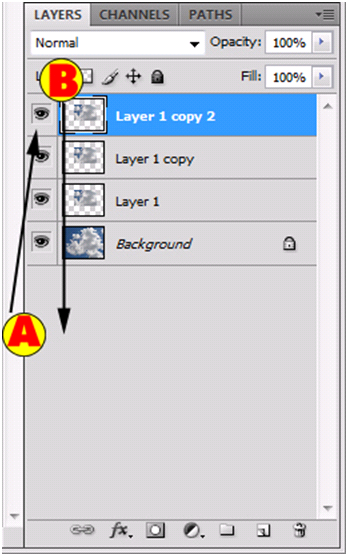
So you want to hide or unhide multiple layers at once? We showed you can single Left click the eye next to the image layer in the Layers Palette, but here is a trick to hide or unhide multiple layers at one time. The current process we will show you how is to hide multiple layers, but if you start with a layer that is hidden than the rest will be unhidden. Ok, for this example, just make duplicate layers with CTRL-“J”.
| A). Let’s start with the top layer. Move your mouse to that layer. Hold down the Left mouse button | |
| B). Drag the mouse down past the bottom layer (you could stop anytime you want and you do not need to go to the bottom). Release the Left mouse button. |

Tip #6 – Hide All Layers Except For 1 Layer:
Sometimes you only want to see one layer. You could hide all the other layers by manually clicking on the eyes next to the layer image in the Layers palette or you could hold down the ALT key and click on the eye that you want to view only. Photoshop will hide the rest of the layers.
Tip #7 – Hide Toolbox, Palettes, Options:
Have you ever wanted to hide the toolbox and the palettes or other areas to view your image at a larger size? Use the <TAB> key to toggle to display only the image.
Tip #8 – Copy Multiple Layer Contents At Once:
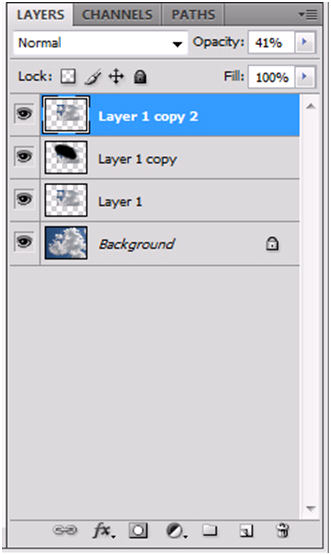
Do you need to copy a selection and you want all the layers to be copied at once? On this example, on the second layer, use the paint brush and paint anything on it. Now Left click the top layer and change the opacity to 40%. See below on how we have our Layer palette setup.

Tip #9 – Lost Brush Size View:
Here is the golden tip. This is one of the most asked about questions. Usually the question comes in a form of “I no longer can see my brush size when I move it to the canvas. It shows a plus sign, how do I get it back so I can see the circle for the size of my brush?”. There are 2 types of brush views. 1). The precise brush view and 2). The brush size view. Use the CAPS LOCK key on your keyboard to toggle the different views.
Tip #10 – Quick Open:
Here is a quick way to open a document once you open the Photoshop program. After launching the program (or on a blank canvas), DOUBLE Left click the canvas. It takes you to the Open dialog box.
Conclusion:
In the future, we will be creating more quick tip & trick tutorials for the Photoshop program. For now, we feel that 10 tips are good enough to get you going. Remember, we are not giving you tips on areas you have not learned in the Photoshop program.
By now you should have learned a few tips and tricks to make your Photoshop experience easier or quicker. We hope you enjoyed these 10 tips and tricks. Feel free to scroll down and review the Quick Tips #1 streaming video. Don’t forget you can download the video and the PDF file from the links below.
We hope you enjoyed this list of quick tips and tricks. Please visit us at: http://www.Photoshopeducation.blogspot.com to expand your knowledge within Adobe Photoshop.

Click Picture To Download Video File To View Offline
Download Total Video Player, iTinySoft

Click Picture To Download PDF Tutorial
Download Adobe Reader, Adobe Corporation
Click Picture To Download Supporting Files
(Brushes, Textures, Fonts, Images, Actions, .PSD, Etc.)
Download ZipGenius Standard Edition 6.0.3.1150, Dicono di ZipGenius


This comment has been removed by the author.
ReplyDelete