It is time to put on your artistic hat and learn how to use the Art History Brush to make some very interesting styles that look similar to a painting effect. Both the Art/History Brush allow you to restore a portion of the image back to a previous snapshot of history. In this tutorial, we will also be showing you how to create a Radial Blur effect by using a Filter. Along the way we will also be giving you tips and tricks, such as how to add more detail when using the Art History Brush.
Currently we are using Windows Vista Home Premium 64 Bit and the Photoshop CS4 Extended 64 Bit version.
Knowledge You Need to Know:
If you are unfamiliar with certain areas that are not covered in this tutorial, feel free check out other tutorials on our website. We have many different types of tutorials that can be downloaded (Video, PDF) or viewed online that will train you for free! Once you have the knowledge, feel free to come back and go through this tutorial again.
Preparing For This Tutorial:
You will be using an image of a Disney (The Seas) sign. If you do not have this image, please scroll down to the “Click Picture To Download Supporting Files” and download the image. Please open the image PE-SEAS in the Photoshop Program and duplicate the background layer and hide the background layer.
History Brush:
The History brush is used to go back to a previous history snapshot. On this example, we will be blurring the whole image, but we will tell Photoshop that on a certain area (the sign) that we want it to restore it to the original (non-blurred).
Snapshot:
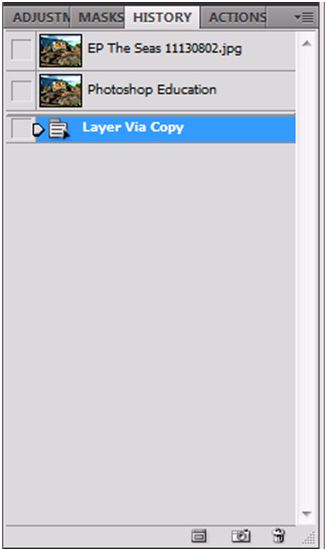
The last tutorial (All About The History Palette tutorial) we talked about how you can take a snapshot of the history palette. To be able to use the History or Art History brush, take a snapshot of the image on a history step that you would like to restore in the future. On this example, please take a snapshot of it after you have duplicated the background layer and hidden the layer. You can see we have a new snapshot called “Photoshop Education”.
Blur Before Proceeding:
It is time to use one of the Filters. What is a Filter in Photoshop? It is a pre-programmed effect. On this example, we will be using the “Radial Blur” Filter. Left click the “Filter” menu and position your mouse down on the “Blur” option and now position your mouse on the “Radial Blur….” command and Left click this command.

We want to make a strong blur, so we are going to change some of the settings.
| A). Either use the slider bar (hold down the Left mouse button and drag it left or right and release the Left mouse button) or Left click the text box and enter a value of “10”. | |
| B). For this example we want to blur it with a “Zoom”. Left click this radio box. | |
| C). For quality, change it to “Best” by Left clicking the radio box. | |
| D). When you are happy with the changes, Left click the “OK” button and if you want to back out without any changes, Left click the “Cancel” button. On this example, Left click the “OK” button. |

History Brush:
Your image should look similar to the picture below. Our goal is to bring back the original picture of the sign only.

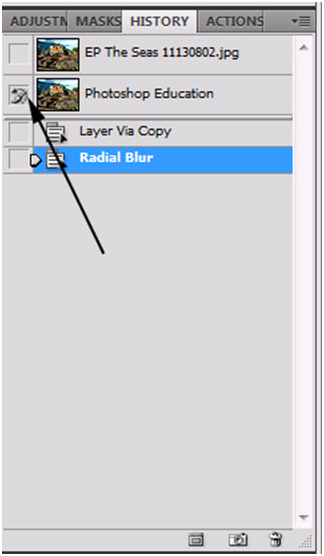
Single Left click the empty square box to the left of the image of your snapshot. You will see a picture of a brush will be displayed. Now you are telling Photoshop that this is the snapshot that you want to use with the History Brush. Photoshop Tip – You can have as many snapshots as you like and change it to a different snapshot when using this tool.
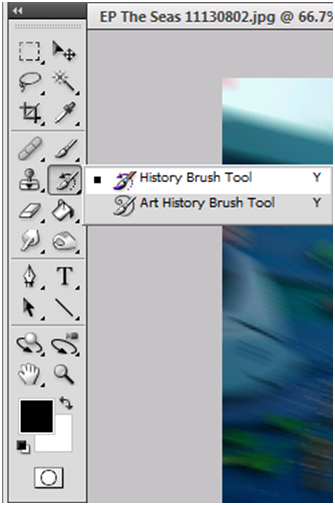
Right underneath the Brush tool on a 2 column toolbox on the right hand side, Right click the History Brush Tools image. Now Left click the “History Brush Tool” command. Photoshop Tip – You can go to the last active History Brush by using the keyboard shortcut of “Y”.
Even though these are basic options (we have talked about them in previous tutorials), let’s go over them.
| A). We have talked about the brush characteristics in the past in the Colors And Painting Tools tutorial. | |
| B). Mode is a pre-programmed feature. We will be discussing all of them in an up and coming tutorial. | |
| C). Opacity is how much you want the image below to bleed through. On this example, make sure you Left click on the text box and change it to 100%. | |
| D). Think of flow as the amount of pressure you want to push down on the brush. On this example, Left click the text box and change the value to 100%. | |
| E). If you want an airbrush effect, Left click this option. For this tutorial, please make sure the Airbrush option is off. |

Now move your mouse to the sign area and begin painting (hold down the Left mouse button and drag the mouse and release the Left mouse button when you are finished with a section) to reveal the original image. You will need to change the master diameter of the brush to get to all of the areas. As you can see, everything is blurred, except for the sign. You have used the brush to tell Photoshop in that area to go back to the original state. The snapshot tells Photoshop the step to restore it to.

Art History Brush:
Know that you know how to use the History Brush; the Art History Brush is very similar on how you use it. The difference between the AHB (Art History Brush) and the History Brush is that the AHB restores it to the original, but adds an artistic feel when you use the brush.
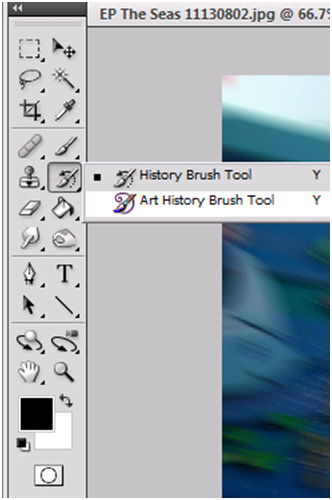
To use the AHB, Right click on the same image in the toolbox and Left click the “Art History Brush” command.
Once again, it is very important that you have the brush symbol to the left of the image of the snapshot. Please make sure this box is active (it shows a brush inside the box).

Listed below are the options for the Art History Brush.
| A). We talked about the brush options in a previous tutorial called Colors And Painting Tools tutorial. | |
| B). Once again the mode will be covered in an up and coming tutorial. | |
| C). Opacity tells Photoshop how much you want it to bleed through. For this tutorial, make sure the Opacity is set to 100% (Left click the text box to change the value). | |
| D). This is the section you will need to play around with. These are your artistic styles to choose from. Remember if you do not like the style right after you use it, do a CTRL-“Z”. For this tutorial, let’s pick the “Tight Short” style (Left click the drop down box arrow and Left click the option). | |
| E). This is a kind of an odd option. Basically the Area is a size larger than the brush size that it will sample. For this example, make it around a “20” value (Left click the text box and change the value). | |
| F). We talked about Tolerance before and because it is sampling the areas, we want to turn the Tolerance down to “0” so anything you paint with the brush will be changed. Change the Tolerance by Left clicking the text box and changing the value to “0”. |

Your goal is to paint everything, except the sign. If you use a smaller brush, you will get a more detail artistic effect (It will look much better). For this example, we dragged the mouse to the non-sign area and held down the Left mouse button and dragged the mouse. When we are happy with the changes, we release the Left mouse button. Throughout the process we increased and decreased the brush size. Here is our final image. Play with the styles and you can get some interesting artistic effects. Remember the smaller the brush and area, the better detail it will show!
Photoshop Tip – Make an error? Switch to the History Brush and reveal some of the original sign again.

Conclusion:
Now you know why we taught you the History palette in the last tutorial first. Without that knowledge, most people would be confused on what the History palette is and how to take a snapshot.
We use the History Brush in a lot of our projects here at Photoshop Education. We find it very easy to create an effect and then take a snapshot of that effect and then use the History Brush to restore a portion of that image back to that specific spot of working on our project.
By now you should know how to use the Art History Brush. We have used this in the past to make it appear to be a painting. Remember the important part we recommended is to use a very small brush!
You also learned how to do a Radial Blur within the Filters menu.
Please take a few minutes and answer the 10 question quiz below.

1). What does the History Brush do?
| A). It takes a snapshot of your steps that you have done in the Photoshop program. | |
| B). It paints a history texture to the canvas. | |
| C). It allows you to change the amount of history steps within the program. | |
| D). It allows you to paint and go back to a snapshot for a specific area. |
2). What is the keyboard shortcut to go to the last active Art History or History Brush Tool?
| A). “H”. | |
| B). “Y”. | |
| C). “B”. | |
| D). “I”. |
3). The Radial Blur is located in what menu?
| A). Blurred, Radial Blur. | |
| B). Filter, Radial Blur. | |
| C). Filter, Blur, Radial Blur… | |
| D). Effects, Blur, Radial Blur… |
4). The Art History Brush will display more detail when you?
| A). Decrease the brush size. | |
| B). Increase the brush size. | |
| C). Left click the “Enhance” box in the options bar. | |
| D). Left click the “Detail” box in the options bar. |
5). What type of snapshot can be used with the History Brush?
| A). Only the original snapshot. | |
| B). The last snapshot. | |
| C). Any snapshot. | |
| D). Only channeled snapshots. |
6). On a 2 column toolbox on the right hand side, were can you locate the Art History or History Brush Tools?
| A). Above the Brush Tools. | |
| B). Below the Brush Tools. | |
| C). Above the Clone Stamp Tools. | |
| D). Below the Pen Tools. |
7). What does AHB stand for?
| A). Art History Brush. | |
| B). Artistic History Brush. | |
| C). Angle Healing Brush. | |
| D). Another Healing Brush. |
8). In the Art History Brush options bar, what option tells Photoshop what artistic effect you would like to use?
| A). Artistic. | |
| B). Style. | |
| C). Effect. | |
| D). Painting. |
9). Before using the History Brush Tool, what do you need to do first?
| A). Turn on grids and guidelines. | |
| B). Tell Photoshop how many steps you want to go back in history. | |
| C). Use CTRL-“L” to set the snapshot. | |
| D). Left click on the box to the left of the snapshot to tell Photoshop that is the snapshot you want to use. |
10). In this example, if you make an error with the Art History Brush, what did we recommend that you do?
| A). Close the file and start over again. | |
| B). Switch to the History Brush and reveal the original image again in that area. | |
| C). Use CTRL-“Z” a few times to go back to a few steps in history. | |
| D). Left click the Undo command in the History Palette. |
Answers: 1). D, 2). B, 3). C, 4). A, 5). C, 6). B, 7). A, 8). B, 9). D, 10). B
Scoring:
0 - 5 = Please review the video tutorial and re-read this document either offline (PDF) or online.
6 – 8 = We would recommend that you print this document off and read it at a later time.
9 – 10 = Congratulations you have passed the quiz. Go ahead and view another tutorial on our site.
We hope you enjoyed this detailed tutorial. Please visit us at: http://www.Photoshopeducation.blogspot.com to expand your knowledge within Adobe Photoshop.

Click Picture To Download Video File To View Offline
Download Total Video Player, iTinySoft

Click Picture To Download PDF Tutorial
Download Adobe Reader, Adobe Corporation
Click Picture To Download Supporting Files
(Brushes, Textures, Fonts, Images, Actions, .PSD, Etc.)
Download ZipGenius Standard Edition 6.0.3.1150, Dicono di ZipGenius


good trick very well use thanks.
ReplyDeleteadobe basics
Glad you enjoyed!
ReplyDeleteThis blog shows very important things. It's nice that you describe it.
ReplyDeleteair rifles reviews