Today we are going to show you not only how to use the Hue and Saturation adjustment to enhance your colors, but we will be showing you how to replace/change specific colors. This tutorial will go over all the details such as what is hue, saturation or even the lightness options do in the dialog box. Along the way we will even show you some excellent tips and tricks such as how to only adjust a certain portion of the whole image.
Currently we are using Windows Vista Home Premium 64 Bit and the Photoshop CS4 Extended 64 Bit version.
Knowledge You Need to Know:
If you are unfamiliar with certain areas that are not covered in this tutorial, feel free check out other tutorials on our website. We have many different types of tutorials that can be downloaded (Video, PDF) or viewed online that will train you for free! Once you have the knowledge, feel free to come back and go through this tutorial again.
Preparing For This Tutorial:
You will be using a picture of a yellow flower. If you do not have this image, please scroll down to the “Click Picture To Download Supporting Files” and download the image. Please open the image PE-YFLOWER in the Photoshop Program.
Before We Begin:
Normally we will combine multiple tools, adjustments, or features in one Photoshop tutorial. Due to the fact that we want to really get you familiar with Hue/Saturation adjustment, we will be limiting this tutorial to this one adjustment. Don’t worry, we will be showing some VERY cool features within this tool.
Hue And Saturation:
We just finished the Color Balance tutorial (Boosting And Enhancing Colors), which we showed you that you can change a color. The disadvantage with Color Balance is you can only adjust the shadows, midtones, highlights. What if you wanted to change the color, but only change a specific color in the image? Well that is when you turn to the Hue and Saturation adjustment.
We will be showing you most of the features in the Hue and Saturation adjustment, but there will be a few areas such as the colorize option that we will skip over. We will be doing a tutorial in the future specifically about colorizing a black and white photo.
Also, just a heads up, expect another Photoshop challenge coming very soon. What will the challenge be? Well hmmm, we are talking about Hue and Saturation, so just a guess maybe would be something with Hue and Saturation?
Let’s get on with the tutorial and show you how you can use this tool in Photoshop.
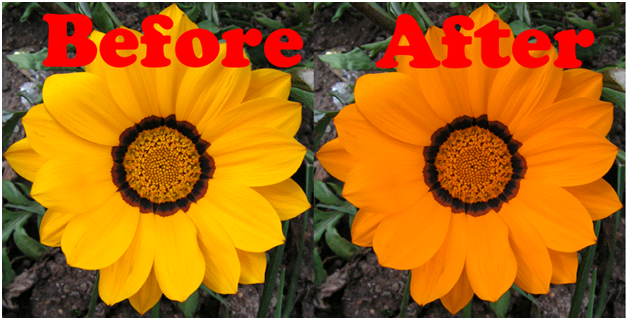
First, make a duplicate copy of the background layer. This will allow us to see the original when we are done with it. Our goal is to take a yellowish flower and make the yellow portion an orange.
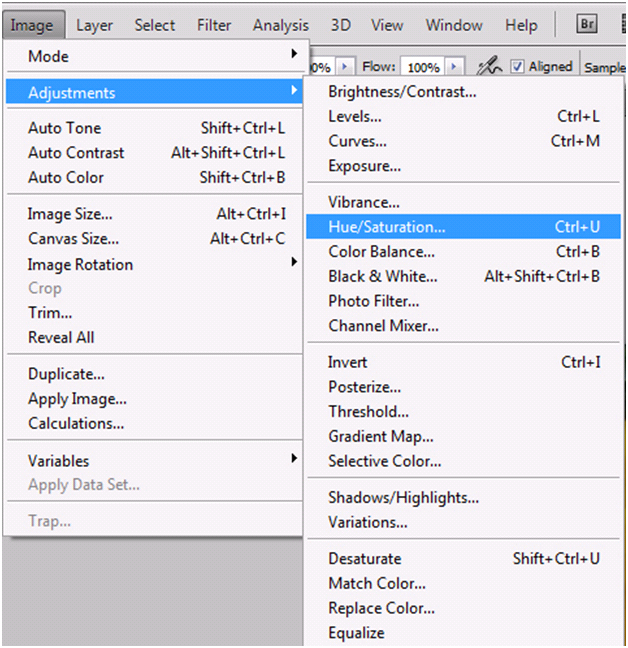
Left click the “Image” menu and move your mouse pointer down to the “Adjustments” menu. From the sub-menu, Left click the “Hue/Saturation…” command. Photoshop Tip – Use CTRL-“U” as a keyboard shortcut.
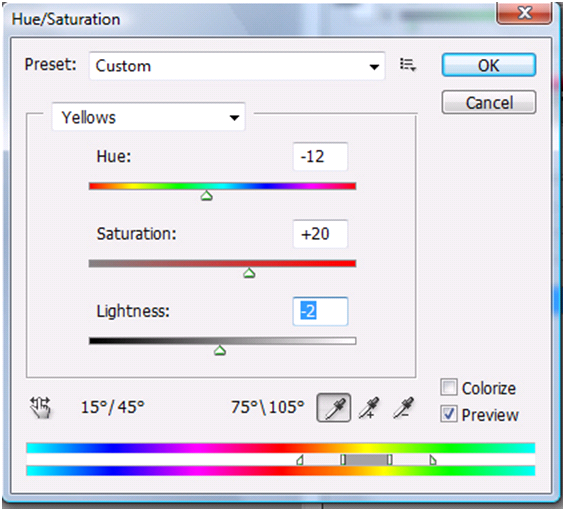
We will be breaking this screen up into multiple screen shots.
| A). Left click the drop down box to select a preset. A preset is a predefined Hue/Saturation setting. Example: Select, “Yellow Boost” to make the yellows look good. | |
| B). In this drop down menu, you are telling Photoshop what colors to select (NOT what colors you want to change it to). If you leave this set to “Master” than you will change all the colors of the image. **It is important to select the correct color only or else the whole image will look bad. What if the color is not in the list? For now, use a color that is similar to the actual color. On this example, Left click the drop down box and Left click the “Yellows” option. | |
| C). Make sure the “Preview” is checked off and that way you can see the changes on the actual images as you adjust the color. | |
| D). Left click the “OK” button to apply the changes or “Cancel” to disregard the changes to the adjustment. |

Here are a few more explanations of the Hue/Saturation dialog box. For all of the slider bars, use the up arrow to make the adjustment. Move your mouse pointer to the up arrow and hold down the Left mouse button and drag the mouse left or right. Release the Left mouse button when you are satisfied with the changes.
Remember, in this example you should have the “Yellows” option set in the drop down box. You are telling Photoshop that you only want to change the yellows.
| A). Hue – Basically is the color. | |
| B). Saturation – We talked about this in previous tutorials and it is how vivid the colors look. Increase the Saturation and you will get a boost to your colors. | |
| C). Lightness – This is how dark or light you want to make the color. | |
| D). For the Hue, Saturation, or Lightness, you have text boxes. You can enter a numeric value instead of using the slider bars. |

To make it a shade of orange, use the following values in the text boxes.
Hue: -12
Saturation: 20
Lightness: –2
Before And After:
Here is the before and after. See how easy that was? See how it only affected the yellows? Notice how the green in the background is still green and not orange. Remember, if you have the selection drop down list set to “Master” it changes ALL colors, not just the selected color.
**Re-open or use the history palette to go back to the original image.
You will find that by selecting a color does a good job, but sometimes it changes similar colors that you do not want changed. Also, maybe you only want some of the yellows changed in this example and leave some untouched. First make a selection around the object (maybe just the center area) and change the color.
Use the Lasso tool and make a selection around the center flower area.

If you make an adjustment now, it would only affect the center portion of the flower. But our goal is to leave the center untouched and only adjust the petals of the flower. Yes, you could make a selection around the petals only, but that would take a long time to get it right. Let’s “Inverse” the image. We talked about the “Inverse” command in the Magical Colors And Selections tutorial and basically it tells Photoshop to reverse the selection. On this example, when you inverse it, it will tell Photoshop to make a selection around everything, EXCEPT the center area.
Left click the “Select” menu and Left click the “Inverse” command.

Now make the exact changes in the Hue/Saturation adjustment.
Hue: -12
Saturation: 20
Lightness: –2
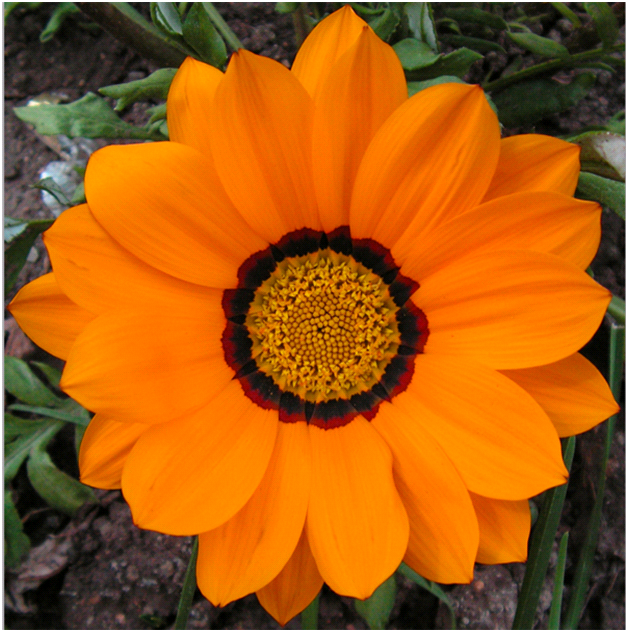
Left click the “OK” button to apply. Now use CTRL-“D” to deselect. Here is our end result. Notice how the flower is orange, but the center is still yellow?
Photoshop Finding The Color:
**Re-Open the image or use the history palette to go back to the original state of the image. Get back into the Hue and Saturation adjustment dialog box. Sometimes it is hard to determine which color to pick from the drop down box. Let Photoshop determine the color for you! This way will allow Photoshop to determine color and it will also allow you to adjust the saturation at the same time.
On the bottom left hand side of the popup box, you will find a finger with a left and right arrow. Left click this box and you will see a square box (Left click again to turn it off) will be added around the button. See below for an example on how you know if it is on. Now, single Left click on a color in the actual image. You will see the “Master” will change to the correct color. On this example: Left click the yellow portion of the image.

If you want to change the saturation of that portion of that image, than hold down the Left mouse button and drag it left or right. Dragging it to the left will desaturate and to the right will add saturation to the image. Release the Left mouse button when you are happy with the saturation level.
Adding More Colors:
Sometimes you want to make the same adjustment to multiple colors. Instead of adjusting each color separately, or causing other color problems with the “Master” option, let’s add multiple colors as a selection using the eyedroppers. In the selection drop down box, Left click “Greens”.
| A). Left click this eyedropper and then Left click in the image to change the starting color. | |
| B). Want to add more colors, Left click this eyedropper and then Left click the color in the image. In this example, Left click the yellow area of the image. | |
| C). Need to remove a color from the selection? Left click this eyedropper and select the color in the image. |
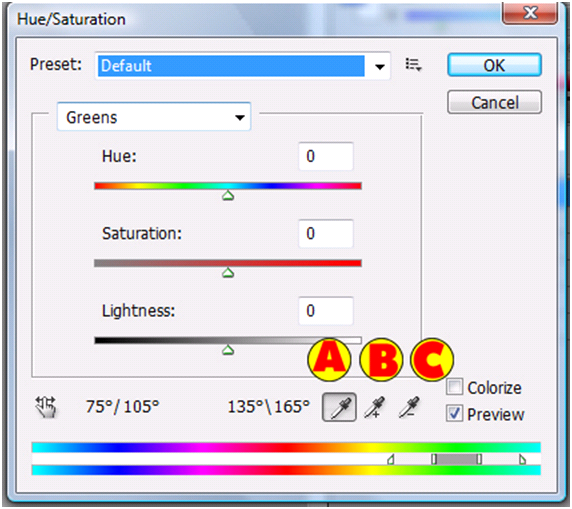
As you add colors to the selection, you will notice that the selection drop down box will add a numeric value after the color word. If you are following along and started with green and then used the eyedropper (center) to select the yellow, then it will show “Yellow2”. This tells you that you are selecting more than 1 color. We made the changes to only yellow and green. We went extreme to show you the changes. See how the green and the yellows are a different color and a different saturation than before?

More Uses For Hue And Saturation:
On this example, we only used the image of the flower. Start thinking about other uses for the Hue and Saturation adjustment tool. Need to add skin tone color to an image because the person looks to pale? What about changing the color of your car or even your eyes. Anything you want to change or enhance a color on, Hue And Saturation is the way to adjust the color.
Conclusion:
After reading this tutorial you should now understand how to use the basic functions of the Hue and Saturation adjustment tool. As you can see, we did not go over a few areas such as the color bar at the bottom of the dialog box and we also did not talk about the colorize option. In a future tutorial, we will dedicate a full tutorial on colorizing your image.
We hope you enjoyed this free detailed tutorial on the Hue and Saturation adjustment in Photoshop CS4. If you want more details, please review the online or offline video tutorial (all tutorials come with online/offline videos, PDF files, supporting files). Please take a few minutes and answer the 10 question quiz below.

1). What is the keyboard shortcut to get into the Hue/Saturation dialog box?
| A). CTRL-“H”. | |
| B). CTRL-“S”. | |
| C). CTRL-“U”. | |
| D). CTRL-“Y”. |
2). What does the Hue do in the Hue and Saturation tool?
| A). It changes the brightness of the image. | |
| B). It changes the saturation of the image. | |
| C). It changes the lightness of the image. | |
| D). It changes the color of the image. |
3). What command did we use to reverse the selection so we could apply the Hue Saturation to only a specific area?
| A). Inverse. | |
| B). Reverse. | |
| C). Flip. | |
| D). Invert. |
4). The center Eyedropper does what in the Hue and Saturation dialog box?
| A). It allows you to select a color from the image. | |
| B). It allows you to add a selection color from the image. | |
| C). It allows you to remove a selection color from the image. | |
| D). It allows you change that specific color. |
5). What does the “Master” do in the Hue and Saturation tool?
| A). It allows you to take control of the image contrast. | |
| B). It allows you to split the color channels into primary colors. | |
| C). It allows you to change all the colors at once. | |
| D). It creates a master scale which allows you to fine tune your color selection. |
6). What does the finger and the left and right arrow do in the Hue and Saturation screen?
| A). It is used only to determine what color a specific pixel is on the screen. | |
| B). It allows you to stretch the colors and pixels. | |
| C). It can only be used to make a selection around the area of the image. | |
| D). It is used to have Photoshop determine the color and to change the Saturation. |
7). The far left Eyedropper does what in the Hue and Saturation dialog box?
| A). It determines what color the pixel is and changes the color selection drop down to the correct color. | |
| B). This allows you to add multiple colors to the color selection dialog box. | |
| C). This allows Photoshop to sample the color and it will allow you to change the saturation. | |
| D). Use this Eyedropper to fill a specific area with a solid color. |
8). When you add multiple color selections, what does the color selection dialog box show?
| A). It shows both colors such as Reds, Greens. | |
| B). It will show the word of the color and add a numeric value to the end of it. | |
| C). You will see the color name with a “+” next to it and if you Left click the “+” it will display all the selected colors. | |
| D). It shows one color, but the text will be bolded. If you Left click the bold text, it will display all the colors used to make the selection. |
9). Name 1 adjustment that is NOT available in the Hue and Saturation tool?
| A). Hue. | |
| B). Saturation. | |
| C). Brightness. | |
| D). Lightness. |
10). How would you adjust one of the petals only and leave the rest as yellow?
| A). Use the eyedropper and select the correct petal. | |
| B). Make a selection around the one petal and then make your adjustment. | |
| C). Use the finger with the left and right arrows and select the correct petal. | |
| D). Select the 1 correct petal and then make sure you Inverse the selection before you apply the Hue and Saturation changes. |
Answers: 1). C, 2). D, 3). A, 4). B, 5). C, 6). D, 7). A, 8). B, 9). C, 10). B
Scoring:
0 - 5 = Please review the video tutorial and re-read this document either offline (PDF) or online.
6 – 8 = We would recommend that you print this document off and read it at a later time.
9 – 10 = Congratulations you have passed the quiz. Go ahead and view another tutorial on our site.
We hope you enjoyed this detailed tutorial. Please visit us at: http://www.Photoshopeducation.blogspot.com to expand your knowledge within Adobe Photoshop.

Click Picture To Download Video File To View Offline
Download Total Video Player, iTinySoft

Click Picture To Download PDF Tutorial
Download Adobe Reader, Adobe Corporation
Click Picture To Download Supporting Files
(Brushes, Textures, Fonts, Images, Actions, .PSD, Etc.)
Download ZipGenius Standard Edition 6.0.3.1150, Dicono di ZipGenius


WOW! Fabulous tutorial. You have a great creativity inside you....
ReplyDeleteWOW! This is really a praiseworthy work.
ReplyDeleteclipping path service
image masking service
is it possible to adjust colour in a pdf document
ReplyDeleteIt's not often that I read such good posts.
ReplyDeleteCheapest Escorts In London
This post is a must-read for anyone interested in this subject
ReplyDeleteVisit Here: Image Masking Service