Over the last few courses, we have shown you how to change the colors of a picture. Here is an excellent tool in Photoshop that will allow you to replace a color. Throughout this course we will show you how you can have Photoshop only change specific colors, which allow you to replace colors for a specific area. We will show you, what to do if you make an error with the Color Replacement tool. At the end of the course we will show you how you can change a specific area of image using text.
Currently we are using Windows Vista Home Premium 64 Bit and the Photoshop CS4 Extended 64 Bit version.
Knowledge You Need to Know:
If you are unfamiliar with certain areas that are not covered in this tutorial, feel free check out the other tutorials on our website. We have many different types of tutorials that can be downloaded (Video, PDF) or viewed online that will train you for free! Once you have the knowledge, feel free to come back and go through this tutorial again.
Preparing For This Tutorial:
You will be using a picture of this clown. If you do not have this image, please scroll down to the image of “Click Picture To Download Supporting Files” and download the image. Please open the image PE-CLOWN in the Photoshop Program. **Duplicate the background layer and hide the background layer. This will allow us to keep a copy of original image!
Color Replacement Tool:
Using the Color Replacement Tool in Photoshop is very easy, but if you do not understand the options of this tool, than you will create problems. By explaining you the options, you will be correctly replacing colors very quickly!
To use this tool, Right click on the brush tool image in the toolbox (4 down on the right hand side in a 2 column toolbox). Left click the “Color Replacement Tool” command from the sub-menu.
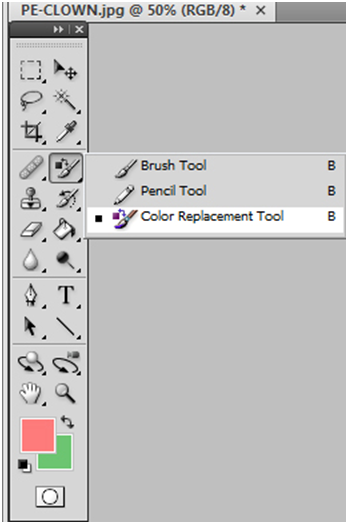
You will notice a menu of options will be displayed at the top of the screen (under the actual menu).
| A). We have talked about the brush size in previous tutorials, but to change the spacing, size, hardness, etc. of the brush, Left click on this icon. | |
| B). Under the “Mode” option, you will find a drop down menu (Left click this box to display the options) with 4 different modes. Left click the mode to use that specific mode. |

Let’s show you what each of the modes do! We selected a yellow color (FCFF00) for the “Foreground Color”. For these examples we will be replacing the color of the left green arm clothing area.
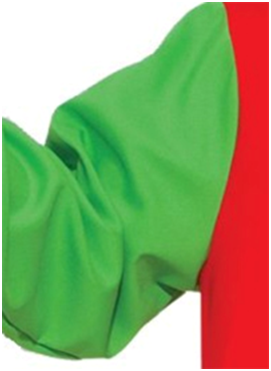
Here are 2 of the modes. Even though both of these examples are similar, notice how the Color mode is lighter.
| A). The Hue mode is the color only. It does not take in account for the lighting of the area. | |
| B). The Color mode takes in account for the color and the light of the area. |

Here are the last 2 modes.
| A). The Saturation mode will either saturate or desaturate the color. If you have chosen a brighter color for a “Foreground Color” than it will saturate the color. On this example we were using a bright yellow, so it saturated the actual color. If we used a darker color it would have desaturated the color. | |
| B). The Luminosity mode makes it act more like a paintbrush than anything. It does this by removing the lighting of that area. |
**For this example, please set the “Mode” to “Color”.
In the options bar, you will see 3 icons. These icons tell Photoshop how to sample the color. For this tutorial, move the mouse pointer to the image. If you have your CAPS-LOCK turned off you will see a circle of the brush size with a “+” in the middle of the circle. When you Left click on an area to color replace, the pixel that is on the “+” in the circle will be sampled. These 3 options allow you to sample differently.
These 3 options are telling Photoshop how to sample the specific color.
| A). If you Left click this option, it will sample continuously. When you use the Color Replacement Tool, it will constantly sample the color as you move the mouse. | |
| B). If you Left click this option, it will sample that color once. This means when you are using the Color Replacement Tool and you HOLD down the Left mouse button and drag, it remembers the first color of the pixel you originally clicked. | |
| C). This button allows you to sample, using the background color (background swatch). Before you use this option, please select the correct background color. |

We are skipping over the “Limits” option for now to show you these 2 additional options.
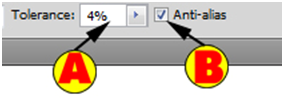
| A). The Tolerance percentage is one of the most important options you can set right. So what is the Tolerance option? When you sample the color, it will change that color to the Foreground Color if that sample color is similar to the pixel color you are about to change. The higher the value for the Tolerance will change a wider range of colors. **For this tutorial, change the Tolerance to 4%. | |
| B). The Anti-alias will smooth the edges as you color replace, so you should ALWAYS want this to be turned on. Left click the checkbox to turn on and off this option. |
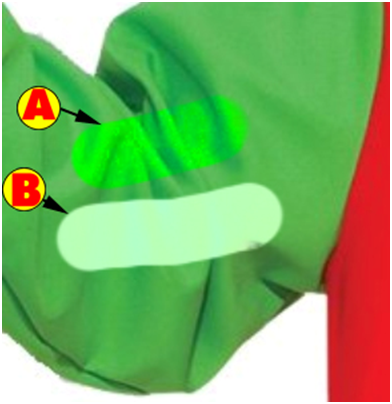
**Let’s show you what it looks like when we turn on the “Once” sample and change the mode to “Color” and have the tolerance value set very low to 4%.
Because the tolerance is set to low, it can’t find the exact color, so the replacement begins to splatter.
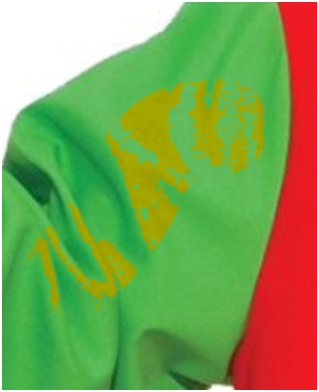
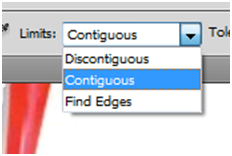
Now that you understand what the Tolerance is, let’s show you what the “Limits” options does. You will have 3 different options for the “Limits”. Left click this drop down box and Left click the limit to use that option.
Remember when we showed you that if you move the Color Replacement Tool to the image, you see the circle and within the circle there is a “+” to sample? These options tell Photoshop within that circle (brush), what areas to change the color.
Discontiguous – It will change the color ONLY if it is next the sampled color (takes in account for the tolerance value). If it is within that circle (brush), but the pixel is not connected to the sample color, it will not change.
Contiguous – This means it does not have to be connected to the sample color and as long as it is within that brush circle, it will change.
Find Edges – Very similar to the Contiguous option, except that it also tries to find the edges of the color.
Now that you know all the settings, let’s show you an example. For these 2 examples, we are setting the mode to color, limits to contiguous, and tolerance to 70%.
| A). This first example the sample was set to “Continuous” (far left button). Notice because it is constantly sampling, it will change the color in different areas. | |
| B). On this example we set the sample to “Once”. Remember that means the first area you Left click the color will be sampled and it will try to match that specific color as you are moving the mouse. Hold down the Left mouse button in the green area and move the mouse pointer to the right hand side (in the red area). You will notice that when it finds a different color such as the red, it will no longer replace the color. |

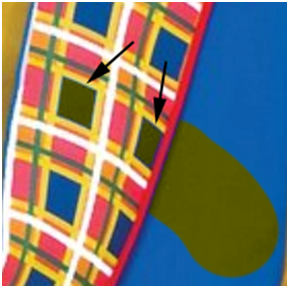
On this example, we are going to be working on the right arm (blue shirt portion). We used the Color for the mode and set the sample to Once and used changed the limit to Contiguous and set the Tolerance to 50%. We painted starting on the largest blue portion of the shirt and dragged the mouse to the left. Notice how the square blue boxes were also color changed, but not the other colors? Pretty cool!
Fixing Errors:
In a previous tutorial (Add Art To Your History Brush course), we explained how to use the History Brush. If you make an error and some of the color is being replaced that should not be replaced, use the History Brush.
Let’s say you went over on the red too far and you did not have your options set correctly. So how would you correct this?

Right click the History Brush Tool image in the toolbox (5 down on the right hand side of a 2 column toolbox) and Left click the History Brush Tool.

On our example, we just removed some of the incorrect color replacement to show you that when you use the History Brush it does restore the original color.

We have shown this trick before, but basically you can selectively use the Color Replacement Tool for text. Type the text on a new layer and than Left click the image of the text in the Layers palette. This will make a selection around the text. Now hide the text layer (image of eye in the Layers palette) and Left click the actual image layer in the Layers palette. Now use the Color Replacement Tool and change the color. Here is a quick example.
Notice how you can still see the shirt below it? Remember we did not change the opacity of the layer, so it truly did change the actual color with the new color.

Conclusion:
By now you should understand how to use the Color Replacement Tool. As we explained, it is easy to use the tool, but getting the options correct is important. We showed you how to only replace a specific color shade. If you make an error, we explained how to use the History Brush to revert back to the original in that specific area.

1). The Color Replacement Tool is located with what other tool in the toolbox?
| A). Crop. | |
| B). Clone Stamp. | |
| C). Pencil Tool. | |
| D). Wet Brush. |
2). What is one way to fix an area that you accidently changed the color in?
| A). Use the Undo Brush. | |
| B). Use the History Brush. | |
| C). Use undo command in the options of the Color Replacement Tool. | |
| D). Repaint the color again and it will revert back to the original color. |
3). To saturate a color with the Color Replacement Tool, you select the mode “Saturation” and what else?
| A). Change the background color to a bright color. | |
| B). Change the background color to a darker color. | |
| C). Change the foreground color to a bright color. | |
| D). Change the foreground color to a darker color. |
4). If you set the “Tolerance” value to low in the Color Replacement Tool, what happens when you try to replace the color?
| A). It tries to match the exact sampled color, so it causes it to splatter and not replace all the colors that are similar. | |
| B). If the value is too low, it will replace the color even if it is very different. | |
| C). It will replace the color with a black color. | |
| D). It will erase the existing color. |
5). If you have very different colored sections, what setting would you set to limit the color replacement to a specific color?
| A). Set the sample to “Continuous”. | |
| B). Set the sample to “Once”. | |
| C). Set the sample to “Find Edges”. | |
| D). Set the sample to “Edges”. |
6). When it samples the color, what location within the brush circle does it actually sample?
| A). The center “.” is the sample area. | |
| B). The center “-“ is the sample area. | |
| C). The center “+” is the sample area. | |
| D). The center “*” is the sample area. |
7). The 3 Limits options in the Color Replacement Tool are?
| A). Contiguous, Discontiguous, Edges. | |
| B). Continuous, Discontinuous, Find Edges. | |
| C). Contiguous, Discontiguous, Find Edges. | |
| D). Once, Continuous, Background Swatch. |
8). What will be sampled if you set the sample of the Color Replacement Tool to “Background Swatch”.
| A). The background color. | |
| B). The foreground color. | |
| C). The last sampled color. | |
| D). A gray scale color. |
9). The “Hue” mode in the Color Replacement Tool does what?
| A). It replaces the color with the foreground color and takes in account for the light of the area. | |
| B). It replaces the color with the background color and takes in account for the light of the area. | |
| C). It replaces the color with the foreground color only. | |
| D). It replaces the color with the background color only. |
10). The Contiguous option in the limits section of the Color Replacement Tool does what?
| A). It looks at the brush circle and replaces any colored pixels in the tolerance level. | |
| B). It looks at the brush circle and replaces only colors that are connected to the sample pixel. | |
| C). It will extend beyond the brush circle and fill in large sections of the image with the new color. | |
| D). This allows you to stop when you get to a new color area. |
Answers: 1). C, 2). B, 3). C, 4). A, 5). B, 6). C, 7). C, 8). A, 9). C, 10). A
Scoring:
0 - 5 = Please review the video tutorial and re-read this document either offline (PDF) or online.
6 – 8 = We would recommend that you print this document off and read it at a later time.
9 – 10 = Congratulations you have passed the quiz. Go ahead and view another tutorial on our site.
We hope you enjoyed this detailed tutorial. Please visit us at: http://www.Photoshopeducation.blogspot.com to expand your knowledge within Adobe Photoshop.

Click Picture To Download Video File To View Offline
Download Total Video Player, iTinySoft

Click Picture To Download PDF Tutorial
Download Adobe Reader, Adobe Corporation
Click Picture To Download Supporting Files
(Brushes, Textures, Fonts, Images, Actions, .PSD, Etc.)
Download ZipGenius Standard Edition 6.0.3.1150, Dicono di ZipGenius


really useful guide
ReplyDeletei found a fantastic Website for really cool Photoshop Tips & Tutorials
http://www.tutorials99.com
where all tutorials are Professional and Higher Page Rank
Try not spam the same site. Next time you do, the comments will removed. Thanks.
ReplyDeleteI am very glad that I got to this site Brunette ladies
ReplyDelete