Wouldn’t it be nice to be able to select a specific or a range of colors and replace it with another color? Well you can do that in the Photoshop “Replace Color” adjustment. We will show you how to replace a color for the whole image and even show you how to replace only a portion of the colors in a picture. Along the way, we will show you how you can save and load your settings!
Currently we are using Windows Vista Home Premium 64 Bit and the Photoshop CS4 Extended 64 Bit version.
Knowledge You Need to Know:
If you are unfamiliar with certain areas that are not covered in this tutorial, feel free check out the other tutorials on our website. We have many different types of tutorials that can be downloaded (Video, PDF) or viewed online that will train you for free! Once you have the knowledge, feel free to come back and go through this tutorial again.
Preparing For This Tutorial:
You will be using a picture of this lake and trees. If you do not have this image, please scroll down to the image of “Click Picture To Download Supporting Files” and download the image. Please open the image PE-TARGET in the Photoshop Program.
Background Of Replacing Colors:
Our goal is to change the water and the sky color in this picture. This can get complex if have trees like the ones in the image. Instead of complex, let’s show you how to replace a color using Photoshop.
Replacing The Whole Image Color:
Even though you will usually only work in an area that is selected, let’s show you how you can adjust the whole image first. Our goal is to make MOST of the lake water turn a green/blue color.
Left click the “Image” menu and move the mouse pointer to the “Adjustments” menu. From the sub-menu, Left click the “Replace Color…” command.

We will be breaking this dialog box up into multiple screenshots.
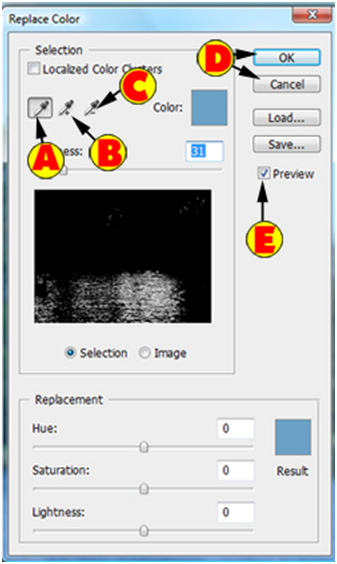
| A). Left click the Eyedropper to select it and Left click on the actual image of the color you want to select. | |
| B). Left click the Eyedropper + to add to the color selection and then Left click on the actual image of the color you want to select. | |
| C). Left click the Eyedropper – to remove a color selection and then Left click on the actual image of the color you want to remove from the selection. | |
| D). Left click the “OK” button to apply the changes or “Cancel” to disregard the changes. | |
| E). Make sure there is a check in the checkbox for the “Preview” option. |
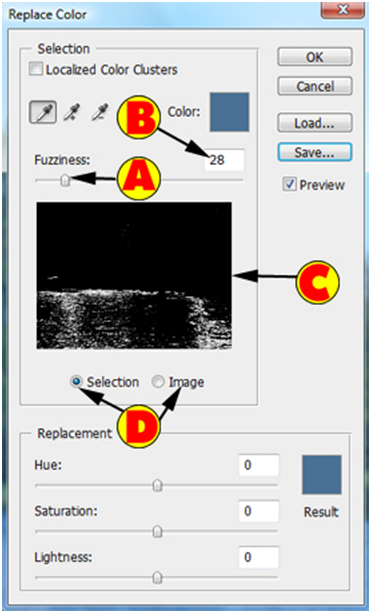
Here are a few more options for the Replace Color dialog box.
| A). Move the mouse pointer to the up carrot and HOLD down the Left mouse button to drag the slider left or right. Release the Left mouse button when you are happy with the changes. The “Fuzziness” is how close to the selected color in shade it will select. | |
| B). You can also enter a numeric value. For this tutorial, enter 28. | |
| C). This will display by default the selection it has made. The white areas are what have being selected. | |
| D). Left click the “Image” radio box to see the actual image. |
Photoshop Tip – If you want to toggle between the selection and the image, use the CTRL key on the keyboard.
For this course, Left click the Eyedropper (far left icon) and Left click on the blue water towards the center of the water. Now use the Eyedropper + and Left click another portion of the water. The selection preview should have most of the water selected now (see below).

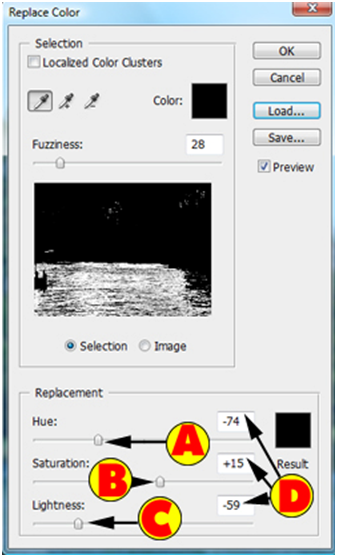
Here are a few more options in the “Replace Color” dialog box. For the up arrow slider bars, move the mouse pointer to the up carrot and HOLD down the Left mouse button and move the mouse left or right to adjust. Release the Left mouse button.
| A). The Hue is the color. | |
| B). The Saturation is how vivid or dull the color will be. | |
| C). The Lightness will darken or lighten the color. | |
| D). You can also enter the numeric values. For this tutorial, please use -74 for the Hue, +15 for the Saturation and -59 for the Lightness. |
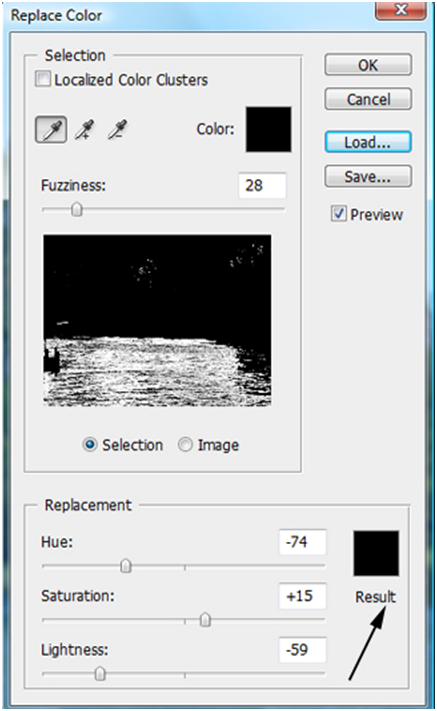
You can also manipulate the replacement color by Left clicking the “Result” colored box. This will open up a color dialog box. Select your color and apply the changes.
**For this tutorial, Left click the “OK” button to apply the changes.
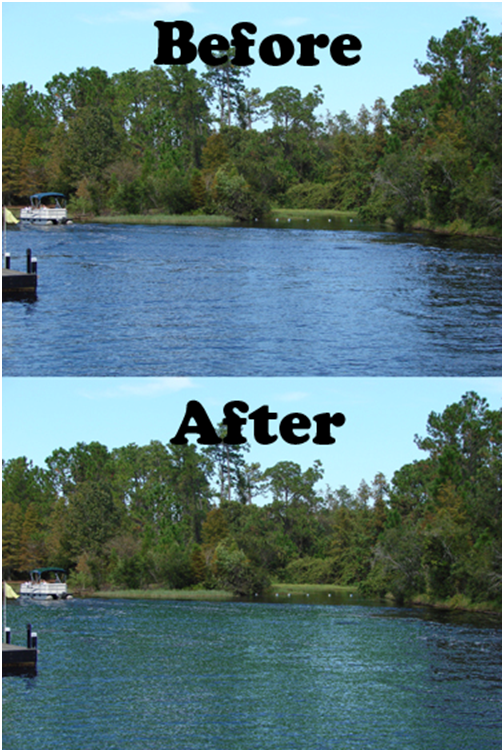
Remember our goal was to make most of the water more greenish color. Here is the before and after comparison.
Saving And Loading Settings:
Sometimes you will want to reuse the settings for another image. Photoshop CS4 allows you to save and load the settings. For this example, get back into the “Replace Color…” dialog box. This time, play with the settings yourself and before you Left click the “OK” button, Left click the “Save” button.
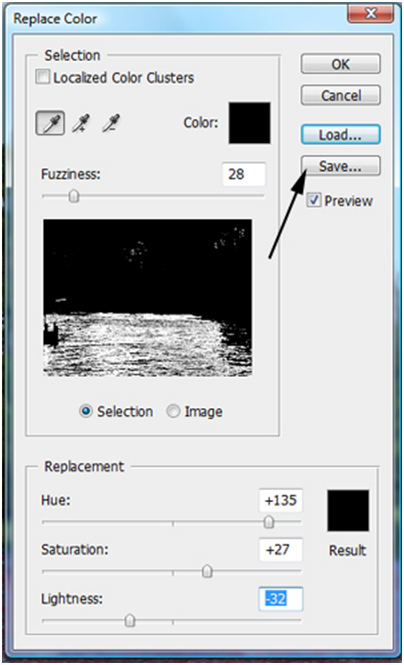
You will than see the standard dialog box to save a file. You can change the directory/folder and proceed with saving the .AXT file. All Replace Color files end with .AXT.
| A). In the “File Name” field enter a file name. | |
| B). Left click the “Save” button to store the settings or Left click the “Cancel” button to disregard your changes. |
To load your settings, Left click the “Load” button.

Now locate the correct folder and either Double Left click on the filename to open the settings or enter the file name (A) and Left click the load button (B) to load the settings.
Replacing Only A Portion Of The Color:
For most projects, you will be replacing only a small portion of the color or you may want to selectively change certain areas of the colors.
If you look at the trees in the image, notice the sky is in between the branches. Normally this would cause problems with selecting the sky. If you want to change only the blue sky, than make a rough selection first around the sky area (including the sky in between the branches). By making a selection first, you are telling Photoshop to only change for that specific area. Here is our rough selection. We used the Lasso tool to make the selection.

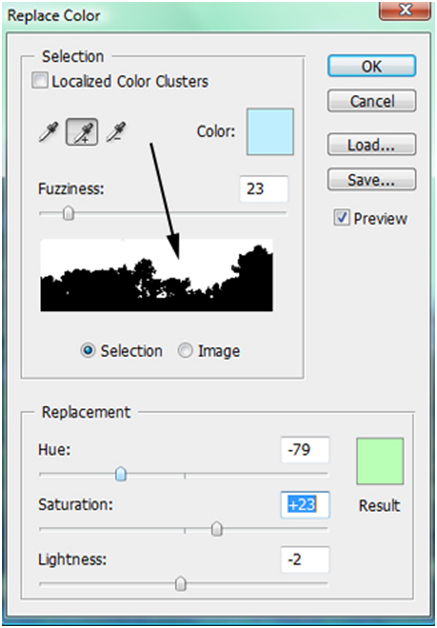
Now replace the color by going into the “Image” menu and moving the mouse pointer to the “Adjustments” menu. From the sub-menu, Left click on “Replace Color..” Use the Eyedropper and Left click on the sky. Now use the Eyedropper + and Left click on another portion of the sky. Notice that Photoshop is only selecting the sky portion for the blue colors. This is because you have a selection around only the area you want to change. Below is our selection (notice how the sky is all white) and we used -79 for Hue, +23 for Saturation and -2 for Lightness.
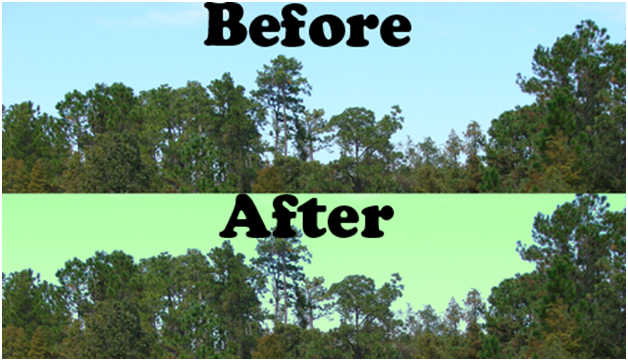
Left click the “OK” button to apply the changes. Here is our before and after images of the sky. Look at in between the branches and notice that it even replaced colors of the sky are in those areas. If you wanted to be perfect, you could turn the fuzziness down and make sure you do not select the clouds (leave those as white).
Tips & Tricks:
Remember, you are not limited to sky or water, etc. Most of the time we are placing colors for all types of objects, such as shirts, pants, indoor painted walls, or even tables. The smaller the selection area, the better the replace will work.
Mix and match tools to get the right color. Over the last few tutorials we have shown you how to replace a color, match a color and even colorize a black and white image. Usually to get a good color, we will begin by turning the saturation all the way up. Then we will use the Hue to get the correct color. We will then make the final tweaks to the Saturation and Lightness.
If you get heavily involved in replacing colors, we recommend that you create a sub-folder for all of your .AXT files.
It is important to understand how to replace or even match colors in Photoshop. Most projects you will need to match or replace at least 1 color.
Conclusion:
By now you should understand how to replace a color for the whole image and replace the color for a specific area of the image. We explained the different settings in the Replace Color adjustment and showed you how to save/load your settings. Remember, .AXT file extensions are for Replace Color settings in Photoshop.

1). What is the file extension for Replace Color?
| A). “.XAT”. | |
| B). “.AXT”. | |
| C). “.ATX”. | |
| D). “.ARC”. |
2). What menu is the “Replace Color..” located in?
| A). Adjustment. | |
| B). Colors. | |
| C). Correction. | |
| D). Adjustments. |
3). When you are looking at the “Selection” preview in the Replace Color dialog box, what does the black mean?
| A). It means it will change that area to black. | |
| B). It means only that area will be replaced with a different color. | |
| C). It means that area will not be replaced with a different color. | |
| D). It means that you have your “Mode” set to black and white. |
4). What is the keyboard shortcut to toggle between the “Selection” and “Image” preview in the Replace Color dialog box?
| A). CTRL. | |
| B). “I”. | |
| C). “C”. | |
| D). “E”. |
5). The “Fuzziness” does what in the Replace Color dialog box?
| A). It makes the edges blurred. | |
| B). It creates a layer mask which will allow you to edit the selection. | |
| C). It allows you to select a wider range for that color. | |
| D). It creates a blur over the whole image. |
6). If you only wanted to replace a certain color in a certain area, what would you do before you get into the Replace Color dialog box?
| A). Create a layer mask to allow you to selectively edit the colors. | |
| B). Make a selection around the area. | |
| C). Create a hidden layer with the correct color setting. | |
| D). You would need to use the “Match Color” option first and then use the “Replace Color” adjustment. |
7). The easiest way to save your settings in the Replace Color dialog box is?
| A). Left click the “Save” button in the Replace Color dialog box and save the file. | |
| B). Manually write down the settings and use that when you get into Replace Color adjustment dialog box. | |
| C). Left click the “Edit” menu and Left click “Save Settings” command. | |
| D). Create a template document and save it as a template file. |
8). Besides the slider bars, what is one other way to adjust the replacement color in the Replace Color dialog box?
| A). Sample the color using the Eyedropper tool. | |
| B). Left click the “Result” colored box and select your color. | |
| C). Left click the “Replacement” colored box and select your color. | |
| D). Create another file and copy the settings from that file to the Replace Color dialog box. |
9). Name the 3 Eyedroppers in the Replace Color dialog box.
| A). Eyedropper Correction. Eyedropper Display, Eyedropper Change. | |
| B). Eyedropper, Eyedropper Selection, Eyedropper Deletion. | |
| C). Eyedropper Correction, Eyedropper +, Eyedropper -. | |
| D). Eyedropper, Eyedropper +, Eyedropper -. |
10). You make changes to the replacement settings in the Replace Color dialog box, but you see no changes. What is one reason why you would not see the changes?
| A). CTRL. | |
| B). The selection is not layered. | |
| C). The “Fuzziness” is turned up to 200. | |
| D). You have not “Saved” the settings. |
Answers: 1). A, 2). D, 3). C, 4). A, 5). C, 6). B, 7). A, 8). B, 9). D, 10). A
Scoring:
0 - 5 = Please review the video tutorial and re-read this document either offline (PDF) or online.
6 – 8 = We would recommend that you print this document off and read it at a later time.
9 – 10 = Congratulations you have passed the quiz. Go ahead and view another tutorial on our site.
We hope you enjoyed this detailed tutorial. Please visit us at: http://www.Photoshopeducation.blogspot.com to expand your knowledge within Adobe Photoshop.

Click Picture To Download Video File To View Offline
Download Total Video Player, iTinySoft

Click Picture To Download PDF Tutorial
Download Adobe Reader, Adobe Corporation
Click Picture To Download Supporting Files
(Brushes, Textures, Fonts, Images, Actions, .PSD, Etc.)
Download ZipGenius Standard Edition 6.0.3.1150, Dicono di ZipGenius


Hi there, just became aware of your blog through Google, and found that it is truly informative. I’m going to watch out for brussels. I’ll be grateful if you continue this in future. Lots of people will be benefited from your writing. Cheers!
ReplyDeleteLimbsaver Pad Rem700/710/870 Syn
Photoshop Detailed Tutorial Training Site >>>>> Download Now
Delete>>>>> Download Full
Photoshop Detailed Tutorial Training Site >>>>> Download LINK
>>>>> Download Now
Photoshop Detailed Tutorial Training Site >>>>> Download Full
>>>>> Download LINK 2b
Thank you for the tutorial. This will help an amateur designer like me a lot!
ReplyDeleteYou can read such valuable texts uncommonly.
ReplyDeleteSabrina
This post is very helpful to me. sexy girls in London
ReplyDeletePhotoshop Detailed Tutorial Training Site >>>>> Download Now
ReplyDelete>>>>> Download Full
Photoshop Detailed Tutorial Training Site >>>>> Download LINK
>>>>> Download Now
Photoshop Detailed Tutorial Training Site >>>>> Download Full
>>>>> Download LINK 9f