Have you ever looked at 2 different images and wanted to match the coloring from either the whole image or a specific part of the image? Photoshop offers an excellent adjustment called “Match Color”. With this adjustment it allows you to match from a source image and from a specific part of that image. Throughout this course we will give you tips and tricks on how to organize and tile the windows, plus how to swap the tabs of the windows. You can take a dull and boring picture and add vibrant colors from the source image.
Currently we are using Windows Vista Home Premium 64 Bit and the Photoshop CS4 Extended 64 Bit version.
Knowledge You Need to Know:
If you are unfamiliar with certain areas that are not covered in this tutorial, feel free check out the other tutorials on our website. We have many different types of tutorials that can be downloaded (Video, PDF) or viewed online that will train you for free! Once you have the knowledge, feel free to come back and go through this tutorial again.
Preparing For This Tutorial:
You will be using pictures of these 2 lake images. If you do not have these images, please scroll down to the image of “Click Picture To Download Supporting Files” and download the zipped file. You will need to unzip the files before you can open it in Photoshop. Please open these images PE-SOURCE and PE-TARGET in the Photoshop Program.
Matching Color (Full Image):
When we are using the “Match Color” in Photoshop, you can either match a portion of the image or the whole image. It is very easy to match the full image, so that is what we will start with for this tutorial.
Once you have unzipped the file, open the PE-TARGET and PE-SOURCE in Photoshop. Even though this is not a required step, we recommend that you are showing both of the pictures at once on the screen.
Because on this example, you could of opened the 2 files in a different order than we did, let’s show you a trick in Photoshop. On our example the PE-TARGET tab is on the left hand side and the PE-SOURCE tab is on the right hand side. We need to flip these tabs around so that the PE-SOURCE is on the left hand side.
| A). Left click the PE-SOURCE tab and HOLD down the Left mouse button. | |
| B). Drag your mouse to the Left tab and release the Left mouse button for (A) once you see that the tabs switch. |

Your end result for the tabs should look like this now.
The easiest way to view 2 images at once is to “Tile” the windows. To do this, Left click the “Window” menu. Move the mouse pointer down to “Arrange”. From the sub-menu Left click on the “Tile” command.
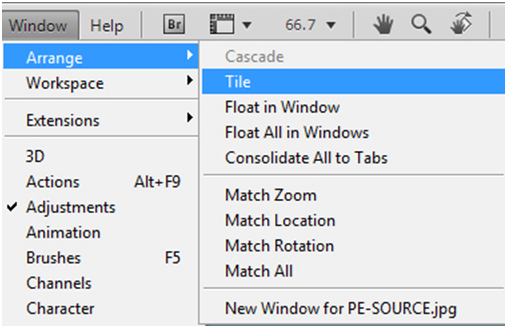
You will now see 2 images on the same screen. PE-SOURCE will be displayed on the left hand side and PE-TARGET on the right hand side. Photoshop Tip – Do you no longer need to Tile the Windows? Just drag the file tab name to the other window! On this example, we would HOLD down the PE-TARGET and drag it to the left window and release the Left mouse button.

Now let’s begin the Match Color process. You need to tell Photoshop which image you will be changing (the target). Left click the tab of the target which is located on the right hand side of the split screen and the file is called PE-TARGET. Once it is selected, you are good to go.

Left click the “Image” menu and move the mouse pointer down to “Adjustments” and from the sub-menu Left click the “Match Color…” command.

We will be breaking this dialog box up into a few different detailed screenshots.
| A). If you Left click the Source drop down box, you will want to select the file that you want to match the colors from. Left click this drop down box and Left click the “PE-SOURCE” for this example. | |
| B). You are not limited to only the full image, but you could tell Photoshop that you ONLY want to match the color from a specific layer of that image. Once the Source (A), is selected, you can Left click this drop down box and Left click the specific layer. | |
| C). Make sure the “Preview” box is checked, so you can see the changes as they happen. | |
| D). Left click the “OK” button to apply the changes or Left click the “Cancel” button to disregard the changes. |

Here are some more options in this dialog box. For any of the slider bars, move the mouse to the up carrot and HOLD down the Left mouse button and drag the mouse left or right and release the Left mouse button to make the changes.
| A). Luminance is basically the brightness. | |
| B). This is basically the saturation of the color. Move the slider bar to the right to make your colors more vivid. | |
| C). The fade option allows you to reduce the amount of color match from the source (original). | |
| D). You can also enter a numeric value in these boxes by Left clicking the box and entering a value. For this example, set the Luminance to 90, Color Intensity to 200 and Fade to 30. | |
| E). Usually you will leave this unchecked, but the Neutralize will cause the target to be changed to a neutral color. |

Left click the “OK” button to apply the changes. Let’s look at the comparison of before and after.
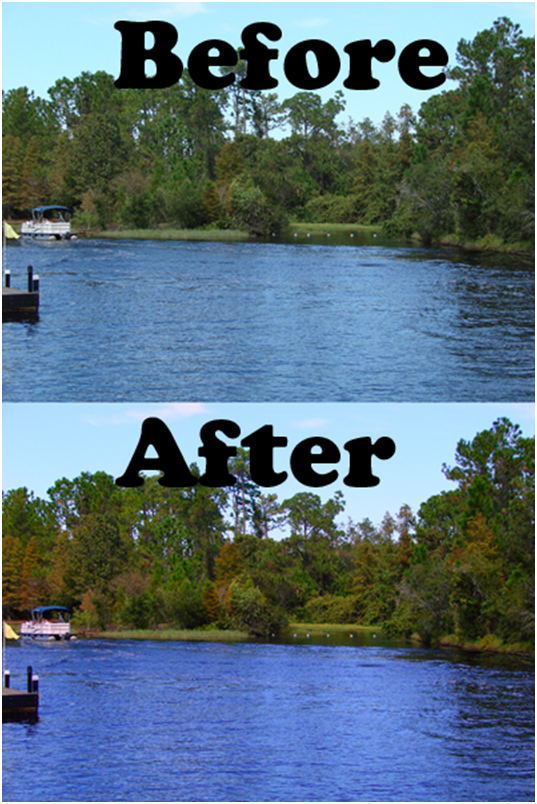
Selective Color Matching:
Now that you know how to Color Match the whole image, let’s show you how you can match a specific color (area) and apply that color match to a selected target area. When you need to only adjust a specific area (skin, hair, shirt, pants, etc.) this is the technique you will use. We know you have followed along with our other tutorials, so we are only going to make a quick simple selection. Our goal is to change the color of a portion of the water (not all of the water) in the target photo.
**Please either close and re-open the PE-TARGET file or use the History palette and go to the “Open” step.
Make a selection around a portion of the water from the PE-SOURCE file. 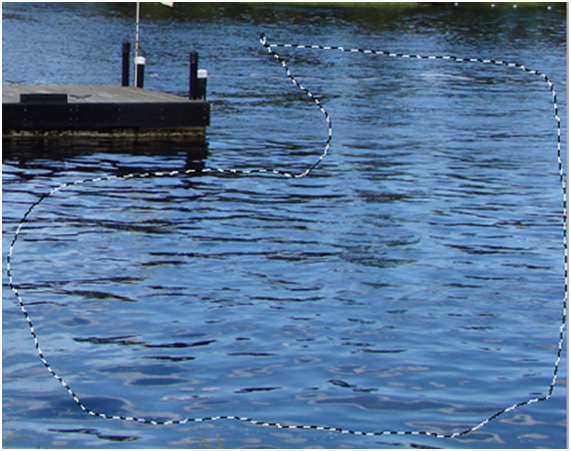
Use CTRL-“C” to copy and CTRL-“V” to paste. Now rename the layer in the Layers palette to something you will remember. For our example, we renamed it “Water”. 
Left click the PE-TARGET tab and make a selection around the water that you would like to change. For our example, we made a simple square selection using the Marquee Selection Tool.
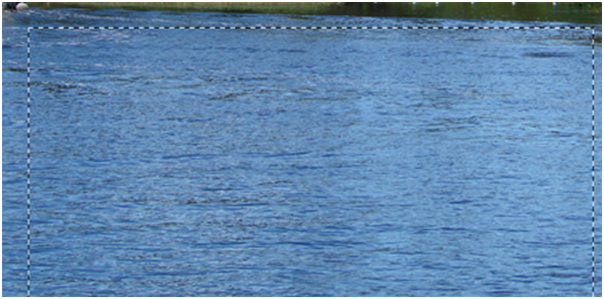
Go into the “Image”, “Adjustments”, and “Match Color…” command.
| A). It knows that this is a selection when this box is checked. | |
| B). Once again, select the PE-SOURCE file in the drop down box. | |
| C). This time we want to tell it to only use the “Water” layer. | |
| D). You will notice in the mini-preview, the small portion it will match the color from. |

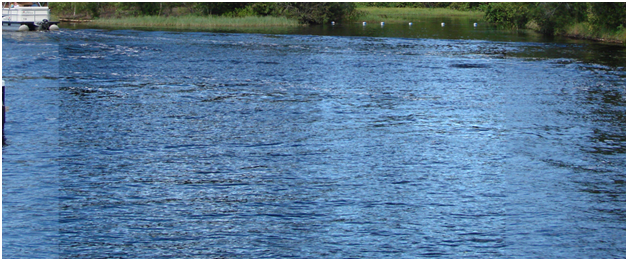
Leave the settings as normal, and Left click the “OK” button. You can see from the image below it used the layer that you created from the PE-SOURCE to match the color from and because we had the selection around the PE-TARGET area for the water only, it changed that specific area.
You can see below the seam from the old water color to the matched water color.
Additional Tips And Tricks:
Experiment with the settings! Remember you do not need to use a similar image to colorize. Example, you could easily have taken a very different picture (no water, no trees) and matched the color.
Per image you can do as many areas (different selections). Just apply the changes and then match the color of a different section. Sometimes if you are looking for an artistic style color, try the “Neutralize” option in the Match Color dialog box.
Remember you do NOT have to have the images side by side for this to work, but it does make it easier to see the changes.
You are not limited to the amount of source files that you use. It is very common for us to use a specific area of multiple source files. Once you’re done with one area, than move onto the next source file.
Conclusion:
You have now learned how to match the color for the whole image and selected areas. We showed you the tip to flip the image tab window. We also showed you how you can tile the images, to display both images on the screen at the same time. Within the Match Color dialog box, we showed you all the different values and explained what each slider bar does.

1). How do you switch the window tabs around?
| A). Double Left click the source and Right click to move. | |
| B). From the “Edit” menu, select “Move” and a dialog box will show your opened windows. | |
| C). Hold down the Left mouse button and drag it to the other side of the other window tab. | |
| D). Use the “Magic Wand” to move the window tab to the other side of the other window tab. |
2). The Luminance value in the Match Color does what?
| A). It fades the original image into the target image better. | |
| B). It neutralizes the colors. | |
| C). It creates a glow around only the edges of the image. | |
| D). It is basically your brightness of the image. |
3). What sub-menu is the “Tile” command in?
| A). Window. | |
| B). Arrange. | |
| C). Palette. | |
| D). Adjustment. |
4). Before you get into the Match Color, what window tab should you Left click on?
| A). Target. | |
| B). Source. | |
| C). Match. | |
| D). Color. |
5). In the Match Color dialog box, what field do you populate with the source file name?
| A). Original. | |
| B). 1. | |
| C). Source. | |
| D). Start. |
6). What sub-menu is the “Match Color…” command in?
| A). Image. | |
| B). Adjustment. | |
| C). Color. | |
| D). Adjustments. |
7). What is one way to select a portion from the source image and to create a layer?
| A). In the Layers palette you can change it to a curves adjustment and only select a portion of the image. | |
| B). Use any of the selection tools. | |
| C). Use any of the selection tools and copy and paste it into a new layer. | |
| D). Create an adjustment layer and move your selection to a different image file. |
8). The Color Intensity in the Color Match dialog box is similar to what?
| A). Brightness. | |
| B). Saturation. | |
| C). Color Correction. | |
| D). Color Image Size. |
9). The Neutralize option in the Color Match dialog box does what?
| A). When changing the color in the target, it uses a neutral color throughout the image. | |
| B). When changing the color in the source, it uses a neutral color throughout the image. | |
| C). It is used to create a Sepia tone effect. | |
| D). It is used to create a Black and White effect. |
10). Besides using the slider bars in the Color Match dialog box, what is one other way to change the values of the 3 options?
| A). Right click on the gray area of the dialog box and select “Settings” to change the values. | |
| B). Left click the checkbox to change the settings. | |
| C). Left click the textbox to change the settings. | |
| D). Double click the Menu bar and select the “Settings” option. |
Answers: 1). C, 2). D, 3). B, 4). A, 5). C, 6). D, 7). C, 8). B, 9). A, 10). C
Scoring:
0 - 5 = Please review the video tutorial and re-read this document either offline (PDF) or online.
6 – 8 = We would recommend that you print this document off and read it at a later time.
9 – 10 = Congratulations you have passed the quiz. Go ahead and view another tutorial on our site.
We hope you enjoyed this detailed tutorial. Please visit us at: http://www.Photoshopeducation.blogspot.com to expand your knowledge within Adobe Photoshop.

Click Picture To Download Video File To View Offline
Download Total Video Player, iTinySoft

Click Picture To Download PDF Tutorial
Download Adobe Reader, Adobe Corporation
Click Picture To Download Supporting Files
(Brushes, Textures, Fonts, Images, Actions, .PSD, Etc.)
Download ZipGenius Standard Edition 6.0.3.1150, Dicono di ZipGenius


No comments:
Post a Comment