Summary:
This tutorial not only shows you the features of the Paint Bucket tool within the Photoshop program, but it also shows you how to use the Gradient tool. We will even show you how to create custom Gradients! You may be thinking that you do not need to know how to use these tools, but you will be using these tools once we get into shadows. While proceeding through this extensive screenshot tutorial, we will also give you tips and tricks.
Currently we are using Windows Vista Home Premium 64 Bit and the Photoshop CS4 Extended 64 Bit version.
Knowledge You Need to Know:
If you are unfamiliar with certain areas that are not covered in this tutorial, feel free check out other tutorials on our website. We have many different types of tutorials that can be downloaded (Video, PDF) or viewed online that will train you for free! Once you have the knowledge, feel free to come back and go through this tutorial again.
Preparing For This Tutorial:
You will be using the Sky image which we have used in past tutorials. If you do not have this image, please scroll down to the “Click Picture To Download Supporting Files” and download the image. Please open the image DSC03562 in the Photoshop Program.
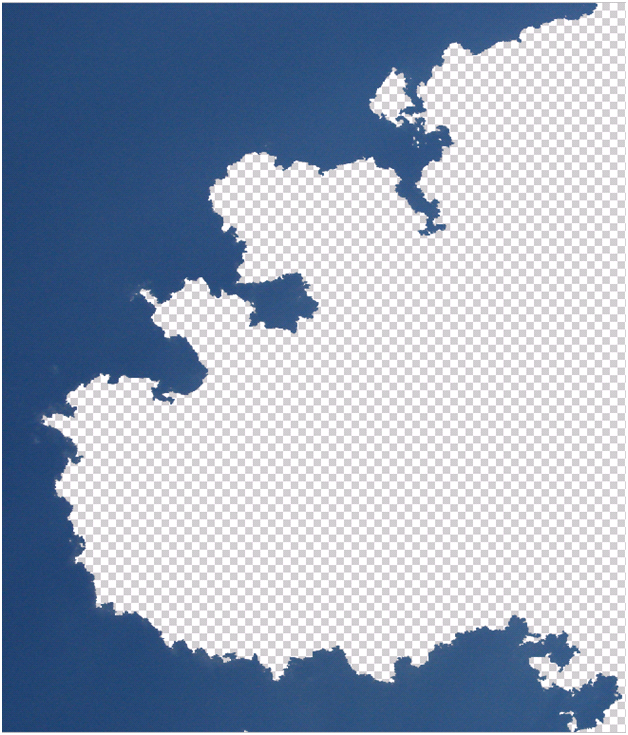
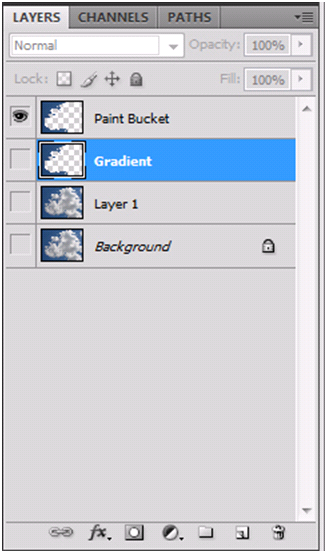
Before we begin, what we would like you to do is create a duplicate layer (CTRL-“J”) and hide the background layer. Next use the Magic Wand (if you are unfamiliar with this tool, please refer to the Magical Colors And Selections tutorial) and use a tolerance of 30 and select the blue sky to the left hand side. It should select most of the blue sky on the left side of the image. While it is selected, do a CTRL-“J” to duplicate the selected area. Hide Layer 1 and finally duplicate the Layer 2 one more time. To keep things straight, rename the top layer to “Paint Bucket” and the next layer to “Gradient”.
Your canvas should be similar to the image below.
You layer palette should look like the image below. You might be wondering, why did we have you do this? We had you do this for a few reasons: 1). It gives you good practice with the Magic Wand tool and renaming Layers. 2). This will allow us to show you quickly the Paint Bucket and Gradient Tool without doing additional steps.
Paint Bucket Tool:
The Paint Bucket Tool allows you to fill in a whole image or a selected area with a solid color. The options are very similar to the Magic Wand, but if you forgot the options of the Magic Wand Tool, no problem because we will go through everything again. On the top layer, use the Magic Wand and select your blue area again.
Towards the center of the toolbox and to the right of the Eraser tool on a 2 column toolbox, you will find the Gradient/Paint Bucket image. Right click this image and Left click the “Paint Bucket Tool”.

The Paint Bucket Tool always uses your foreground color to make the fill. Back in the Colors And Painting Tools tutorial we showed you that you can enter a numeric value in the color picker, which will allow you to use a specific color. On this example, change the foreground color to: 5f6efd.
In the Paint Bucket options bar you will notice a lot of, well options.
| A). If you Left click this drop down, you tell Photoshop that you do NOT want to fill it with the foreground color, but to fill it with a Pattern. We discussed Patterns in the Patterns tutorial. On this example, please leave this option set to “Foreground”. | |
| B). If you did select the “Pattern” in option A). it will allow you to change the pattern in this box. | |
| C). We explained before that a “Mode” is a preprogrammed feature in Photoshop and we will be discussing all modes in the future. For now leave it as “Normal”. | |
| D). Opacity tells Photoshop if you want the layer below to bleed through or not. Left click this percentage box or Left click the right arrow to change the percentage. On this example, please leave it at 100%. | |
| E). Tolerance refers to how carefully the tool must match the color of an area in order to identify which pixels to fill. Because you already made the selection, you can crank this up to 50 or higher. | |
| F). Anti-Alias allows it to smooth the edges. Leave this checked for this example. | |
| G). Contiguous – If checked, this tells Photoshop to fill only contiguous pixels. Leave this checked for this example. | |
| H). We do not want it to expand across all layers, so make sure the “All Layers” is turned off. |

Now comes the easy part. When you move your mouse over to the canvas, you will notice the pointer changes to a Paint Bucket. Single Left click inside the selection to change the color. You will find many needs for the Paint Bucket, such as using it to mask a specific area (remember layer masking, if not check out Masking And Transform Information or More Masks Please tutorial). The image below is our end result.

Gradient Tool:
**Hide the Paint Bucket Layer (top layer) and unhide the Gradient (below top layer). Now make sure the Gradient layer is selected and use the Magic Wand to select the blue area. If you do not make a selection, the Gradient will span across the whole canvas!
So what is a Gradient? It is a gradual transition between one or more colors.
The Gradient Tool is very easy to use, but creating custom gradients can be confusing. That is why we went the extra step and made sure there are a lot of screenshots in this section of the tutorial.
Right click the same icon on the toolbox and Left click the “Gradient Tool” option. Photoshop Tip – The keyboard shortcut is “G”.

There are a lot of options for the Gradients. Let’s go through them.
| A). The Gradient picker shows you what the gradient will look like (left side is the first color and the right side is the last color). In a section below, we will show you if you Left click inside this box, it will allow you to change the gradient. For now leave it as the foreground/background color. | |
| B). In the next section below we will go over the predefined styles. | |
| C). The mode as we explained in previous tutorials are pre-programmed features. We will be explaining all the modes in a future tutorial. For now, please leave the mode as “Normal”. | |
| D). Opacity defines how see through the gradient is. 100% is not at all and 0% will mean you can’t even see the gradient. For this tutorial, leave the opacity set to 100%. | |
| E). Reverse allows you to flip the starting and ending colors. | |
| F). Dither makes the gradient effect smoother. To add some technical speak, it tries to reduce the color banding. For this tutorial, leave the Dither checked. | |
| G). The Transparent option turns transparency on so if you want parts of your gradient to be transparent, you will need this option on. |

Even though the actual images in the options bar show you the effect, we wanted to go over the detail from option B) from above.
| A). Linear gradient – The gradient follows a line. | |
| B). Radial gradient – The gradient radiates from a defined point. | |
| C). Angle gradient – The gradient is based on a defined angle. | |
| D). Reflected gradient – The gradient is reflected based on your stroke. | |
| E). Diamond gradient – The gradient is a diamond effect. |

Make sure the Gradient layer is selected and you have the blue area selected by using the Magic Wand. Remember if you do not make a selection, the Gradient will span across the whole canvas (not just the selected area).
So how do you use the gradient tool? First, select which gradient type you want to use (diamond, angle, linear, etc.). Now move your mouse were you want to start the gradient (this will be the color that is on the left hand side in the gradient options bar). Now hold down your Left mouse button and drag it in a direction. Release the Left mouse button when you are happy with the length and direction of the gradient. Based on the length and the direction, it will create your gradient differently. If you want to experiment, use the CTRL-“Z” to undo. Photoshop Tip – To draw a straight line; hold down the “Shift” key when holding down the Left mouse button.
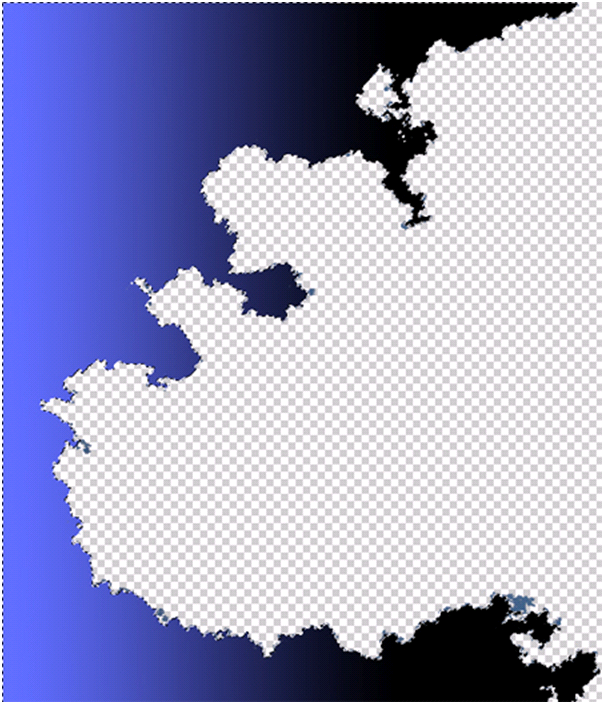
Here is our test gradient that we used. As you can see we used the linear gradient style. Our foreground color was the blue we used in the previous section of the tutorial and our background color was black. As we stated the foreground color is first and the background color is second (we did NOT use the reverse option) and that is why it is light blue on the left hand side and black on the right hand side. Photoshop Tip – Use another gradient or a different style on top of the current gradient and it will dramatically change the colors.
Custom Gradients:
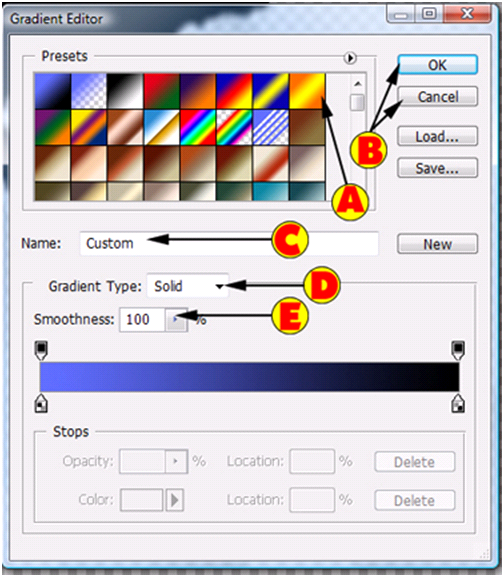
If you want to create your own Gradient or use a preset gradient, Left click on the Gradient picker box. Once you click on the Gradient picker box, you will see a new dialog box will be displayed. Let’s make sure we are looking at the presets the same way. A). Left click this right arrow and B). Left click “Small Thumbnail”.

Because there is a lot to go over, we will be breaking this dialog box up into sections. Let’s first explain the top section.
| A), To use the preset, Left click the preset. | |
| B). If you want use the Gradient, Left click the “OK” button and if you want to make changes, Left click the “Cancel” button. | |
| C). If you are creating a new Gradient, Left click this text box and change the name. | |
| D). You can create a Gradient with “Noise”, by Left clicking the down arrow. For now, leave it as “Solid”. | |
| E). Without “Smoothness:”, the Gradient looks bad. Leave this at 100%. |
Now let’s change the gradient.
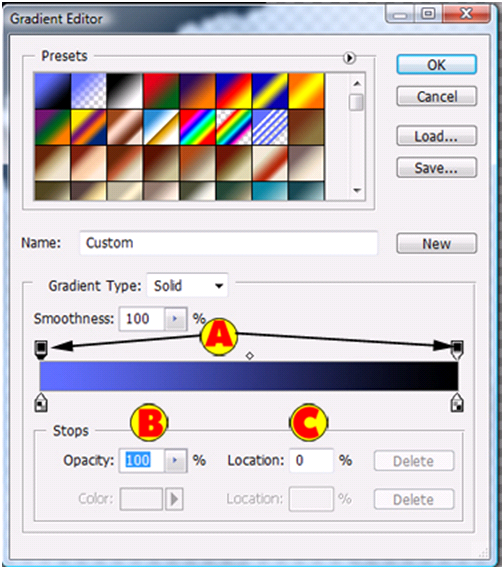
| A). The black pointers are called “Opacity Stoppers”, because it allows you to change the opacity of the color. Remember your foreground color is on the left hand side and the background color is on the right hand side. Left click the Left hand opacity stopper. | |
| B). Once you Left click one of the Opacity Stoppers, it tells Photoshop that you want to change that specific stopper opacity. On this example: change the opacity to 50%. | |
| C). You either can move the mouse to the stopper and hold down the Left mouse button and drag it to the right or you can enter a percentage number in the “Location:” field. |
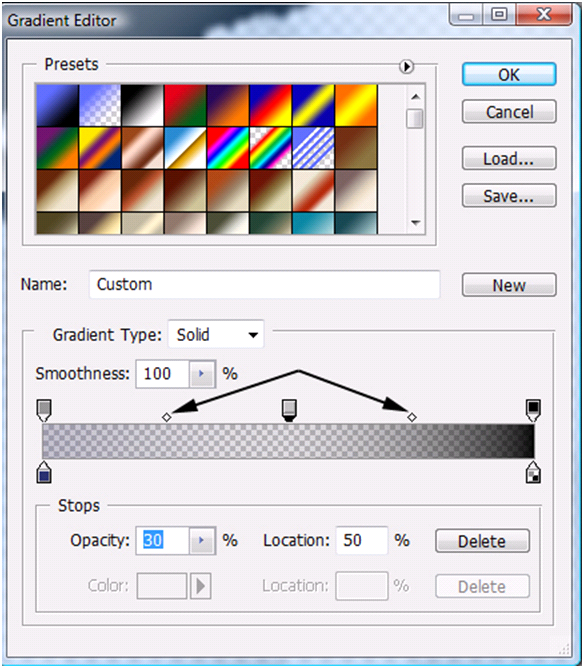
You can add your own opacity stoppers by Left clicking above the location. It will create a new opacity stopper. On this example, create a new Opacity stopper in the middle (Left click in the middle of the bar and above the bar). Change the opacity to 30%. See how it starts off at 50% and then goes to 30% in the middle and then ends very dark at 100%? Photoshop Tip – To Delete an added stopper, Left click the stopper and then Left click the “Delete” button located in the bottom section of the dialog box.

The bottom arrows are called “Color Stoppers”, because they allow you to change the color.
| A). These are the “Color Stoppers”. On this example, single Left click the left stopper. | |
| B). The color allows you to change the color. Left click this box and Left click “Use Color”. Now move your mouse over to a darker blue in the image. The pointer will change to the Eyedropper (Colors And Painting Tools tutorial). Left click the color in the image. | |
| C). Once again you can change the location (see above for more details). |

Just like the “Opacity Stoppers” you can add a “Color Stopper” by Left clicking below the color bar. Now you might be wondering what are the little diamonds in between the stoppers? If you Left click either an opacity/color stopper, you will notice at least one diamond. If you move your mouse over to these and hold down the Left mouse button and drag it left or right, it allows you to alter the gradient slightly. Release the Left mouse button when you are satisfied with the adjustment.
Conclusion:
You may notice that we did not show you how to load or save a gradient. That will fall under an up and coming tutorial (more than likely the next tutorial). We felt that we have thrown a lot of information at you at once and we wanted to give you some time to absorb this knowledge.
By completing this tutorial, you should have gotten a refresher course on the Magic Wand and you now know how to use/create custom gradients. We also showed you the use of the Paint Bucket Tool. You may be thinking that you will never use the gradient/paint bucket tool, but when we get into creating shadows and other areas, you will need to know these tools.
Please take a few minutes and answer the 10 question quiz below.

1). Within the custom Gradient dialog box, what is the top stoppers called?
| A). Opacity Stoppers. | |
| B). Color Stoppers. | |
| C). Pointed Stoppers. | |
| D). Positional Stoppers. |
2). What is the keyboard shortcut to the Gradient/Paint Bucket Tools?
| A). “P”. | |
| B). “B”. | |
| C). “G”. | |
| D). “T”. |
3). How do you use the Paint Bucket to fill the area with a Pattern?
| A). Select the Paint Bucket, and Right click the layer in the palette and select “Pattern”. | |
| B). Hold down the “P” key while using the Paint Bucket. | |
| C). Left click the Foreground drop down box in the options bar and then Left click “Use Patterns”. | |
| D). Left click the Foreground drop down box in the options bar and then Left click “Pattern”. |
4). How do you easily flip the color around so that the gradient begins with the background color first?
| A). Left click the Gradient Picker editor and then select the color. | |
| B). Within the Gradient Picker editor, use the “X” key to flip the colors. | |
| C). In the options bar, Left click “Reverse”. | |
| D). In the options bar, Left click “Flip Colors”. |
5). The bottom stoppers do what in the Gradient editor dialog box?
| A). They allow you to change the opacity. | |
| B). They allow you to reverse the colors. | |
| C). They allow you to define the percentage of colors used in the Gradient. | |
| D). They allow you to define the colors. |
6). There are 2 “Gradient Types” which are?
| A). Solid and Noise. | |
| B). Solid and Sectional. | |
| C). Blurred and Solid. | |
| D). Colored and Noise. |
7). How do you delete an added stopper in the Gradient editor dialog box?
| A). Drag the stopper to the layers palette. | |
| B). Select the Preset and Left click the “Delete” button. | |
| C). Left click the stopper and Left click the “Delete” button. | |
| D). Drag the stopper to the far right hand side of the screen to delete the stopper. |
8). How do you display the presets as small thumbnails in the Gradient editor dialog box?
| A). Left click on the right arrow next to the presets and Left click the “Small Thumbnail” command. | |
| B). Left click on the down arrow next to the presets and Left click the “Small Thumbnail” command. | |
| C). Within the editor, Left click the image (icon) that looks like a thumb. | |
| D). Left click on the down arrow next to the presets and Left click the “Small” command. |
9). Why should you make a selection before you use the Gradient Tool?
| A). With a selection the Gradient Tool will span across the whole canvas. | |
| B). With a selection the Gradient Tool will only span across the selected area only. | |
| C). A selection tells Photoshop to blend the background color with the current layer. | |
| D). A selection tells Photoshop to blend the foreground color with the current layer. |
10). The “Tolerance” in the Paint Bucket options bar does what?
| A). The Tolerance allows you change the shade of the solid color. | |
| B). The Tolerance will tell the Adobe Photoshop program how strong of a color to fill. | |
| C). The Tolerance is used in conjunction with Layer masking. | |
| D). The Tolerance refers to how carefully the tool must match the color of an area before it fills. |
Answers: 1). A, 2). C, 3). D, 4). C, 5). D, 6). A, 7). C, 8). A, 9). B, 10). D
Scoring:
0 - 5 = Please review the video tutorial and re-read this document either offline (PDF) or online.
6 – 8 = We would recommend that you print this document off and read it at a later time.
9 – 10 = Congratulations you have passed the quiz. Go ahead and view another tutorial on our site.
We hope you enjoyed this detailed tutorial. Please visit us at: http://www.Photoshopeducation.blogspot.com to expand your knowledge within Adobe Photoshop.

Click Picture To Download Video File To View Offline
Download Total Video Player, iTinySoft

Click Picture To Download PDF Tutorial
Download Adobe Reader, Adobe Corporation
Click Picture To Download Supporting Files
(Brushes, Textures, Fonts, Images, Actions, .PSD, Etc.)
Download ZipGenius Standard Edition 6.0.3.1150, Dicono di ZipGenius


This is great tutorial.. However in my Photoshop Cs ver.8.0 I don't have Gradient Editor. Your 11th picture which has A-E items shows it, but I can't find C,D,E items in my Photoshop! Whenever I make new gradient style, it just asks for the name and no dialog for setting change! Where do I find this editor?
ReplyDeleteYou have to click on the gradient up in the options bar to open the editor
ReplyDeleteIt is extremely helpful for me. Thank you for taking the time to make this tutorial on gradient editing. I feel strongly about it and love learning more on this topic. If possible, as you gain expertise, would you mind updating your blog with more information.clipping path service
ReplyDelete