So you learned History in school? Well that is not going to help you with the History palette options within the Photoshop program. We will soon be discussing the History Brush and the Art History Brush and we wanted you to get a great understanding of how to take snapshots, delete, add, etc. in the History palette. In this tutorial, we will even show you how to change the preferences so you can support more than 20 history steps. Along the way, we will show you tips and tricks within this palette.
Currently we are using Windows Vista Home Premium 64 Bit and the Photoshop CS4 Extended 64 Bit version.
Knowledge You Need to Know:
If you are unfamiliar with certain areas that are not covered in this tutorial, feel free check out other tutorials on our website. We have many different types of tutorials that can be downloaded (Video, PDF) or viewed online that will train you for free! Once you have the knowledge, feel free to come back and go through this tutorial again.
Preparing For This Tutorial:
You will be using the Sky image which we have used in past tutorials. If you do not have this image, please scroll down to the “Click Picture To Download Supporting Files” and download the image. Please open the image DSC03562 in the Photoshop program and duplicate the background layer and hide the background layer.
History Palette:
So far we have shown you a few palettes such as the Navigator (Zoom And Panning tutorial) and even the Layers palette (refer to the Learning Layers With Ease or More Layers tutorials) and now it is time to add on to your knowledge with the History palette. This is one of the most important palettes you can have on your screen at a given time. Why? Pretty much anything that you do in Photoshop is recorded in the History palette. Remember CTR-“Z”? Yep, that is the undo command, but the undo command can only go back 1 step. What if you wanted to go back 10 steps? Well that is when the history palette is used.
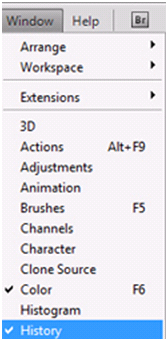
Within the “Window” menu, you will find the “History” option. If there is NOT a check next to the word “History”, than single Left click the “History” option to display the History Palette.

Your palette may be smaller in size or may be grouped with other palettes, but it should look similar to the screen shot below. Remember we told you on page 1 of this tutorial to duplicate the background? That is why you see “Layer Via Copy” in the history.
Even though there are a lot of options (we know it does not look like it, but there are a fair amount of options we need to go over), so let’s start with the first 3.
| A). You will notice Photoshop breaks it up into 2 sections. The top section is the snapshots. When you open a file it automatically takes a snapshot of the original file. Just remember this is the snapshot area. 2). The history step information area. | |
| B). If you want to go back to specific location, single Left click the history step. You will notice it will show the history step highlighted and you will notice a right pointer. | |
| C). This gives you a description of the step. |

Changing Total Amount of History:
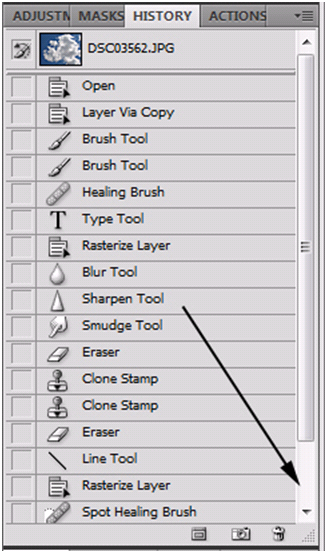
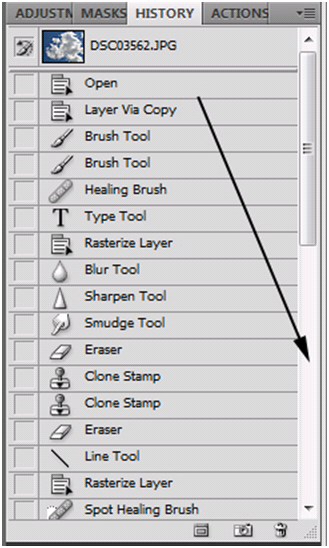
By default, Photoshop will store the last 20 steps in the History palette. You can increase this number by following the instructions below. Please note, as you increase the history size, it will take away more resources from your system. If you have a slower computer, we recommend that you keep the size to the last 20. Before we begin, let’s show you what our history palette looks like right now. On this example we used different tools, 20 different times. **Notice that you can scroll up or down. On this example there are 3 additional steps in this window to make a total of 20.

So how do you change this setting so it can support more history? The setting is in the preferences menu. As we proceed with tutorials in the future, we will be explaining more areas of the preferences. We will also be showing you a different way to get to the preferences. Today, use keyboard shortcut of CTRL-“K”. Once used, you should see the screen below and you will be on the “General” menu. On the left hand side is the menu, single Left click the “Performance” menu.

On this example, we doubled the history size by changing it to 40.
| A). Left click inside this text box to change the numeric value or Left click the right arrow and use the slider to change the value. | |
| B). Left click the “OK” button when you are satisfied with the changes. Left click the “Cancel” button if you do not want to save your changes. |

We have added know 20 more steps to the history palette. As you can see, we have to scroll down much further in history palette. Now we have a total of 40 steps we can go back in history with.

History Palette Options:
Here are a few more options of the History Palette.
| A). This button creates a new document which is based off of the history steps. | |
| B). This takes a snap shot of the History steps (will be showing you more detail below). | |
| C). This is the trashcan option and it gets rid of history steps. |

History Palette Snapshots:
Let’s say you do not want to keep a log of the history beyond the default of 20. What if you wanted to go back to a specific step and you know it is going to be beyond the 20? Take a snapshot of the history at certain stages of the project. Before we get going, let’s show you what our canvas looks like and what the History palette shows.
History Palette:

Current Canvas:

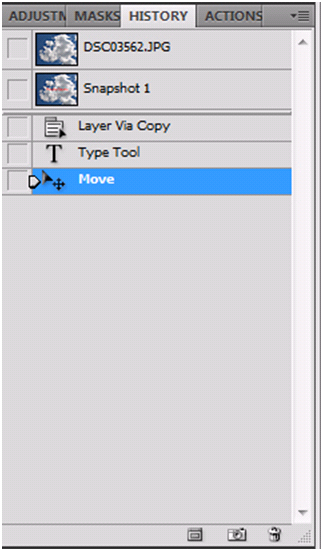
Now single Left click the Snapshot icon in the middle of the icons at the bottom of the palette (refer to the History Palette Options section in this document for more information). You will see the snapshot portion of the palette will now have a Snapshot 1.

Deleting History Steps:
If you delete a step it will cause steps to be removed that happened later in the project. You can use CTRL-“Z” to undo the last step. We want you to use the trashcan on the Type Tool.
| A). Single Left click the Type Tool step in the History Palette. | |
| B). Now that it is selected, HOLD down the Left mouse button and drag it to the trashcan. Release the Left mouse button when you are over the top of the trashcan. |
Photoshop Tip – You can also Right click on the history step and Left click on “Delete” to delete the history step. The advantage to this way of deleting is that it prompts you with a dialog box to confirm deletion.

You should now be left with only the “Layer Via Copy” in the history palette. Don’t worry, not everything is lost. Remember when you took a snapshot of the history palette a few pages ago? Left click on the Snapshot 1 snapshot. See how your text comes back? Pretty cool!
Renaming Snapshots:
Ok, maybe the name for “Snapshot 1” is not the most descriptive. DOUBLE Left click the name of the snapshot. You know can edit the snapshot name.

Deleting Snapshots:
Remember how you deleted the History step? Well, it is exactly the same process, except you drag the Snapshot to the trashcan.
Conclusion:
Before we proceed with tutorials, we needed you to understand the History Palette. In one of the next tutorials, we will be discussing the History Brush and Art History Brush. Without the knowledge that you know now with the History Palette, it would become very confusing showing you these 2 new tools.
The main purpose of the History Palette is to jump to certain steps. Remember you can jump to that step by Left clicking that step. We also showed you how to change the default 20 for the history size. You can see the advantages of taking a snapshot and renaming that snapshot. We also showed you that you can delete either a step or even a snapshot using the trashcan.
We hope you enjoyed this tutorial and please take a minute and answer the 10 question quiz below.

1). What is the keyboard shortcut to get to the preferences menu?
| A). CTRL-“P”. | |
| B). CTRL-“E”. | |
| C). CTRL-“K”. | |
| D). CTRL-“T”. |
2). Name one way you can delete a history step?
| A). Right click the trashcan and Left click the history step. | |
| B). Right click the step and Left click “Delete Step” command. | |
| C). Drag the history step to the trashcan. | |
| D). Right click the step and Left click the “Delete Now” command. |
3). How many history steps by default does Photoshop store?
| A). 20. | |
| B). 40. | |
| C). 50. | |
| D). 10. |
4). How do you rename a Snapshot in the History Palette?
| A). Left click on the snapshot and then Left click on “Rename”. | |
| B). Double Left click the name of the snapshot. | |
| C). Drag the snapshot to the “Rename” button. | |
| D). Snapshots can’t be renamed. |
5). You just deleted a history step, how do you get that history step back?
| A). The item will be grayed out and just Left click on it to restore the history step. | |
| B). Double Left click the trashcan and select “Restore”. | |
| C). Double Left click the trashcan and select “Restore All”. | |
| D). Use CTRL-“Z”. |
6). Within the preferences menu, what sub-menu will you find the option to change the amount of history steps it stores?
| A). General. | |
| B). History. | |
| C). Performance. | |
| D). Logs. |
7). The Snapshot icon is located in what location in the History Palette?
| A). Far left side. | |
| B). Middle. | |
| C). Far right side. | |
| D). Second row on the right hand side. |
8). What is one reason why you should not increase the amount of History steps in the preferences menu?
| A). If you have a slower computer it is not recommended. | |
| B). It will clog up your History Palette with too much information. | |
| C). As you increase the size, the text size of the steps will become smaller in the History Palette. | |
| D). There is a known bug that if you increase it to large that certain steps such as “Move” will be lost. |
9). How do you tell Photoshop that you want to use a stored snapshot?
| A). Left click on the snapshot and Left click the “View Now”. | |
| B). Left click on the snapshot. | |
| C). Right click the snapshot and Left click the “View Now” command. | |
| D). Drag the snapshot to the “View Now” button. |
10). The far Left button in the History Palette does what?
| A). Takes a Snapshot of the History steps. | |
| B). Deletes the current Snapshot. | |
| C). Deletes the current History step. | |
| D). Creates a new document based off of the History steps. |
Answers: 1). C, 2). C, 3). D, 4). B, 5). D, 6). C, 7). B, 8). A, 9). B, 10). D
Scoring:
0 - 5 = Please review the video tutorial and re-read this document either offline (PDF) or online.
6 – 8 = We would recommend that you print this document off and read it at a later time.
9 – 10 = Congratulations you have passed the quiz. Go ahead and view another tutorial on our site.
We hope you enjoyed this detailed tutorial. Please visit us at: http://www.Photoshopeducation.blogspot.com to expand your knowledge within Adobe Photoshop.

Click Picture To Download Video File To View Offline
Download Total Video Player, iTinySoft

Click Picture To Download PDF Tutorial
Download Adobe Reader, Adobe Corporation
Click Picture To Download Supporting Files
(Brushes, Textures, Fonts, Images, Actions, .PSD, Etc.)
Download ZipGenius Standard Edition 6.0.3.1150, Dicono di ZipGenius


If you want to learn about Graphics Design, open-tutor.com is the best platform for you. It provides online graphic design, Photoshop Tutorial, Adobe Photoshop and Illustrator Tutorials for beat career building. Open-tutor.com also offer latest update of Jobs Circular in Bangladesh. Visit open-tutor.com for more details and updates.
ReplyDeletePhotoshop Detailed Tutorial Training Site >>>>> Download Now
ReplyDelete>>>>> Download Full
Photoshop Detailed Tutorial Training Site >>>>> Download LINK
>>>>> Download Now
Photoshop Detailed Tutorial Training Site >>>>> Download Full
>>>>> Download LINK 9K