Adjustment Layers are created to allow you to make the correct adjustments (curves, levels, etc.) to an image without actually applying the changes permanently. Through this course we will show you how you add, delete, or change adjustment layers. We will also walk you through how you can use the layer mask with adjustment layers. Finally, we will give you important tips and tricks which will allow you to make your photos look like they were professionally taken.
Currently we are using Windows Vista Home Premium 64 Bit and the Photoshop CS4 Extended 64 Bit version.
Knowledge You Need to Know:
If you are unfamiliar with certain areas that are not covered in this tutorial, feel free check out other tutorials on our website. We have many different types of tutorials that can be downloaded (Video, PDF) or viewed online that will train you for free! Once you have the knowledge, feel free to come back and go through this tutorial again.
Preparing For This Tutorial:
You will be using a picture of ducks. If you do not have this image, please scroll down to the image of “Click Picture To Download Supporting Files” and download the image. Please open the image PE-DUCKS in the Photoshop Program.
Why Adjustment Layer Tutorial Now:
We have received a fair amount of emails (we responded to all emails) asking us, why we have not shown the adjustment layer option yet or why we are showing most of the permanent adjustments without showing you what an adjustment layer is? We debated before we got into the regular adjustments if we should show you adjustment layers first and we felt it would be better to show you how to use the tools first and then show you the adjustment layer. Instead of learning 2 subjects at the same time, we felt it was better for you to understand the actual adjustment first. Now that we have shown you most of the adjustments, we felt it was a good time to show you what an adjustment layer is and how to use it.
Adjustment Layers:
One of the disadvantages of a regular adjustment in Photoshop is once you adjust it and apply the changes, the changes are permanent. Ok, maybe not permanent because you could do a CTRL-“Z” to undo the last step, but what if you made an adjustment on step 1 and you realize that adjustment is incorrect and you are on step 100? There are only 2 options you can do if you find yourself in this mess. 1). Try to take the current adjusted image and make adjustments to get the results you are looking for (this usually does not work well) or 2). Go back to step one using the history palette and make your adjustment and then repeat the next 99 steps.
An adjustment layer is a layer above the actual image layer in the layers palette. It allows you to make adjustments to the layers below (not the layers above the adjustment) and even after applying the changes, you can still make adjustments (Photoshop remembers the settings you used). The other advantage of adjustment layers is that it comes with a layer mask. Remember when we showed you a layer mask back in the Masking And Transform Information or the More Masks Please tutorials? Remember all the advantages to a layer mask? Well an adjustment layer allows you to make adjustments and gives you the flexibility of a layer mask. It is kind of like you can have your cake and eat too.
All the adjustment in the adjustments menu (curves, brightness/contrast, etc.) can be added as an adjustment layer.
Because you already know how to do most of these adjustments, you will find this adjustment layer tutorial very easy to understand.
| A). The ½ black and ½ white circle is the adjustment layer. Left click this icon in the layers palette. | |
| B). Left click on the adjustment. On this example, Left click on the “Curves…” command. |

Each adjustment will have the same functionality as the regular adjustment. The menu, icons, etc. may be located in a different place in the dialog box! We want to show you that it retains your adjustment settings and you can always fine tweak your settings later.
| A). For this example, Left click the Preset drop down box and Left click the “Medium Contrast (RGB)”. | |
| B). Just to prove that your adjustment is not lost, Left click the “X” in the top right hand corner. This will close this window (palette) down. |
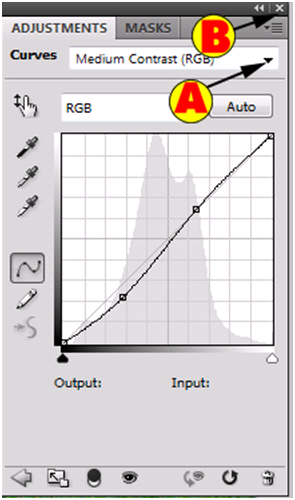
You will notice it creates a new layer in the Layers palette.
| A). This will display a name for the layer. It will display the name of the adjustment such as Curves and than a numeric value starting with 1. You can modify the name by DOUBLE Left clicking the text. **On this example, change the adjustment layer name to “Curves Ducks”. | |
| B). This is the mask portion of the layer. We will be discussing the basics of masking (check out the Masking And Transform Information or the More Masks Please tutorial about masking) shortly. | |
| C). This will show you an image of the type of an adjustment. The chart with a line curved is the Curves adjustment. |
**For now, DOUBLE Left click the name and change it to “Curves Ducks”.

As you can see we changed the layer text to something that we will remember in the future. On a large project, you will have many adjustment layers and it is a good habit to change the name of the adjustment layer. This way if we had another curve adjustment layer, we would know exactly what it was adjusting by viewing the text.
Now DOUBLE Left click the image of the chart and the curved line.

As you can see, it remembered your settings. You can make adjustments without permanently making the adjustment.
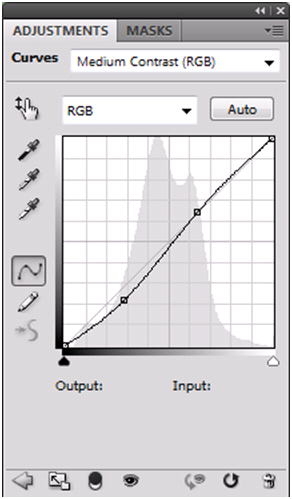
Adjustment Layer Options:
On the bottom of the adjustment dialog box, you will notice some new options.
| A). Left arrow takes you to the adjustment list (other adjustments). | |
| B). Left click this icon to increase the size of the palette (expanded view). | |
| C). Left click this icon to tell Photoshop to ONLY adjust 1 layer below. | |
| D). Left click the eye to toggle the adjustment layer on or off. | |
| E). Hold down the Left mouse button to see what the image looked like before you re-adjusted the image. Release the Left mouse button to show you the current adjustment. | |
| F)). Left click this to reset the adjustment defaults (If you Left click it now, it will revert back to the original washed out image). | |
| G). For this example, Left click the trash can to delete the adjustment layer. |

If you are following along with the tutorial, we just had you delete the adjustment layer. You will than get the following dialog box. For this tutorial only, Left click the “No” button. Left click the “Yes” button to delete the adjustment layer or “No” to cancel the deletion of the adjustment layer.

Other Ways To Delete:
There are always a few ways to do the same thing in Photoshop. Here are 2 more ways to delete the adjustment. On this example DO NOT follow the instructions to delete the adjustment layer, because we need to keep this adjustment layer later in this tutorial.
| A). Left click the adjustment layer. Once it is highlighted, hold down the Left mouse button and drag it to the trashcan (B). | |
| B). Drag any layer to the trashcan and it will remove that layer. |
**It will NOT warn you of the deletion! Photoshop Tip – If you make an error and remove the adjustment by accident, than use CTRL-“Z” to undo.
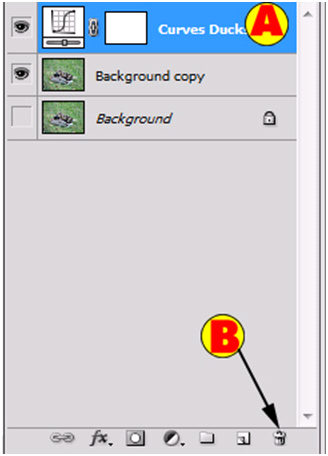
The other way to delete the adjustment layer is to Right click on the text of the adjustment in the layers palette (A). Left click “Delete Layer” (B) in the menu. Then Photoshop will ask you a confirmation of deletion question.

Masking With Adjustment Layers:
Back in the Masking And Transform Information or the More Masks Please tutorials we talked about masking, so we are not going to spend a great deal of time explaining adjustment layer masking. In the layers palette, Left click the layer mask box (white box in the center of the layer line). You will notice a square box will be put around the layer mask. This tells Photoshop that you do not want to edit the adjustment, but you want to mask the layer.

In a lot of the projects, you will find that you will need to mask certain areas. Maybe you thought the grass in this image looked good and you did not want to adjust the grass. In previous tutorials, we explained that you can make a selection around an area only and make the adjustment for that specific area. But here is an easier way to fix only a portion of the image.
First you will make your changes to the whole image. On this example, we will remove the adjustment for the grass only (the ducks will remain adjusted).
Next, if you remember from the layer masking tutorial, we used a black color to hide and white to unhide. Change your tool to the paintbrush and make sure you have your foreground color set to black. Photoshop Tip – Use the “D” to reset your foreground/background colors and use “X” to flip your foreground and background colors.
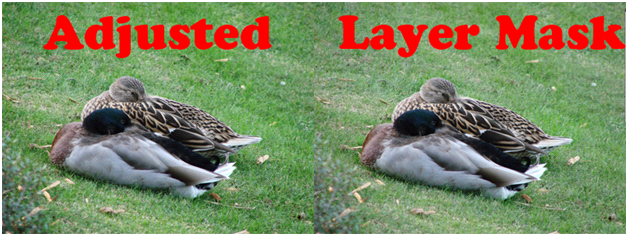
Now use the paintbrush and while changing the hardness and size, paint black outside the duck area (grass only). The image below shows when the whole image was adjusted compared to when we added a layer mask and removed the adjustment for the green grass. Notice how the grass once again looks washed out, but the ducks still look enhanced.
Adjustment Palette:
Back in the The Work Area tutorial we talked about palettes. When you are using an adjustment layer, you are working inside the adjustment palette. Most images will need an adjustment, so it is wise to keep the adjustment palette located on your screen at all times.
Remember towards the beginning of this tutorial, we had you Left click the “X” in the window? When you Left clicked the “X”, it told Photoshop that you wanted to close that palette. When you create a new adjustment layer, it automatically opens the adjustment palette. What if you wanted to open the adjustment palette without creating an adjustment layer?
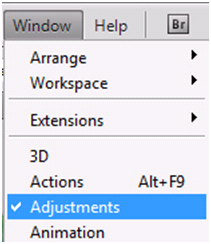
Left click the “Window” menu. If you see a check next to the “Adjustments” command, than that tells you the palette is already visible. If it does NOT have a check next to the word “Adjustments”, Left click this command to activate this palette.
To dock (if your palette is floating) the adjustment palette, move your mouse pointer to the adjustment palette (A) and HOLD down the Left mouse button and drag your mouse to the darker gray area (B). Now release the Left mouse button.

Remember you can have as many windows (palettes) as you would like. Here is how we have our palettes setup.

Adjustment List:
If you have no adjustment layers, than this palette will display the adjustment list. You can also get to this adjustment list within any adjustment layer by Left clicking the Left Arrow icon (bottom left of the screen). For more information, please read the Adjustment Layer Options section of this tutorial. So what does each icon (image) mean in the adjustment list?
Top Row (Left To Right): 1). Brightness/Contrast, 2). Levels, 3). Curves, 4). Exposure
Middle Row (Left To Right): 1). Vibrance, 2). Hue/Saturation, 3). Color Balance, 4). Black and White, 5). Photo Filter, 6). Channel Mixer
Bottom Row (Left To Right): 1). Invert, 2). Posterize, 3). Threshold, 4). Gradient Map, 5). Selective Color
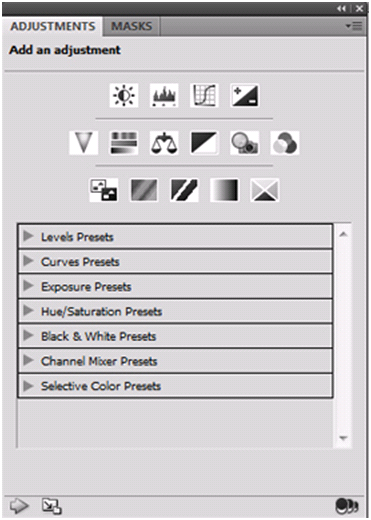
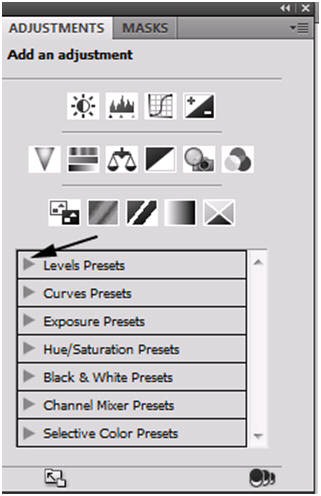
One advantage to the adjustment list is that you can run all the presets from this screen without actually opening the specific adjustment. Left click the right arrow and Left click the preset from the list.
Adjustment Layer Tips And Tricks:
We wanted to take a moment and give you some important tips and tricks for the adjustment layer.
Learn to stack adjustment layers. Have you ever noticed a certain adjustment tool does a better job with a specific area, but another tool can fix other areas of the image? Just stack your adjustments. To make an image look perfect, it is very common that we have at least a few adjustment layers for a specific image.
Become familiar with the option(C) of the adjustment layer options section of this document. This allows you to tell Photoshop to adjust only the layer below the adjustment layer. If you are working with multiple images, than the exact same adjustments will not work for each image. Change the settings for them with a different adjustment layer. Make sure the option is turned on to ONLY adjust the layer below.
Remember, if you want to adjust the whole image, make sure the adjustment layer is on the top of the layers palette and that the option (C) of the adjustment layer options section of this document is turned off.
Conclusion:
As you can see, the adjustment layer is an excellent feature in Photoshop. It not only allows you to make or refine your adjustments, but it also allows you to use the layer mask. The only reason why we use the actual adjustment instead of an adjustment layer is if we only want to make 1 quick adjustment to an image. When you are working with an actual project (multiple layers, multiple adjustments, etc.), you will always want to use an adjustment layer.
Through this course, we showed you how you can use the layer mask feature of the adjustment layer and how to rename the adjustment layer. You now know how to dock the adjustment layer palette and multiple ways to delete an adjustment layer. We even showed you what each icon means in the adjustment list screen.
It is important for you to begin using adjustment layers now! You need to get into a habit of using an adjustment layer. They are easy to use and it gives you a lot of flexibility with the adjustment.
We hope you enjoyed this detailed Photoshop course about the adjustment layers and feel free to take a few minutes and answer the 10 question quiz below.

1). Select the incorrect statement about adjustment layers?
| A). All adjustments that can be done in the adjustment menu can be done on an adjustment layer. | |
| B). You can adjust any layer (above the adjustment layer or below the adjustment layer) with one adjustment layer. | |
| C). You can change the adjustment layer name. | |
| D). The layer mask of the adjustment layer is the white box in the middle of the adjustment layer in the layers palette. |
2). Name one way to delete an adjustment layer.
| A). Left click the layer and drag the layer to the “Delete” button. | |
| B). Left click the “X” in the adjustment layer to delete the adjustment layer. | |
| C). Left click the adjustment layer in the layers palette and drag it to the trashcan. | |
| D). Right click the adjustment layer palette and Left click the “Delete Adjustment Layers Only” command. |
3). The easiest way to create an adjustment layer in the layers palette is to select the adjustment from which icon?
| A). The icon is the one that looks like a multi-layered folder. | |
| B). The icon is the one that looks like a chain. | |
| C). The icon has the letters “F/X”. | |
| D). The icon is the one that looks like a ½ dark and ½ white circle. |
4). In the adjustment list, the icon that has a diagonal line (white triangle on the top and black triangle at the bottom) with a “+” and “-“ in the image does what?
| A). Exposure. | |
| B). Brightness/Contrast. | |
| C). Photo Filter. | |
| D). Levels. |
5). What is one difference of deleting the adjustment layer by dragging the layer to the trashcan versus the other ways we showed you how to delete an adjustment layer.
| A). It removes the adjustment, but does not remove the layer mask. | |
| B). The adjustment remains, but removes the layer mask. | |
| C). This will remove the adjustment from all layers except for the one directly below the adjustment layer. | |
| D). It does not give you a confirmation to delete the adjustment layer. |
6). The image of the “Eye” in the adjustment layer palette does what?
| A). It takes you to the adjustment list menu. | |
| B). It hides the adjustment layer. | |
| C). It creates a new adjustment layer style. | |
| D). It creates a comparison chart between non-adjusted and adjusted. |
7). If you do not want to add a new adjustment layer and your adjustment layer palette is not displayed, what menu do you go into to select the adjustment palette?
| A). Adjustment. | |
| B). Palette. | |
| C). Window. | |
| D). Edit. |
8). How do you change the text name of the adjustment layer?
| A). Double Left click the name in the layers palette to rename the layer. | |
| B). Right click the text and Left click the “Rename Adjustment Layers Text”. | |
| C). Left click the layer and then Left click the “Rename Layer” button. | |
| D). Left click the “Image” menu and then Left click the “Adjustment” menu and then Left click the “Rename Adjustment Layer” command. |
9). If you want to completely hide the adjustment using the layer mask in the adjustment layer, what color would you select for the paintbrush?
| A). White. | |
| B). Black. | |
| C). Brown. | |
| D). Gray. |
10). What button do you Left click in any adjustment layer adjustment to get to the adjustment list?
| A). The double circle button. | |
| B). The folder button. | |
| C). The right arrow. | |
| D). The left arrow. |
Answers: 1). B, 2). C, 3). D, 4). A, 5). D, 6). B, 7). C, 8). A, 9). B, 10). D
Scoring:
0 - 5 = Please review the video tutorial and re-read this document either offline (PDF) or online.
6 – 8 = We would recommend that you print this document off and read it at a later time.
9 – 10 = Congratulations you have passed the quiz. Go ahead and view another tutorial on our site.
We hope you enjoyed this detailed tutorial. Please visit us at: http://www.Photoshopeducation.blogspot.com to expand your knowledge within Adobe Photoshop.

Click Picture To Download Video File To View Offline
Download Total Video Player, iTinySoft

Click Picture To Download PDF Tutorial
Download Adobe Reader, Adobe Corporation
Click Picture To Download Supporting Files
(Brushes, Textures, Fonts, Images, Actions, .PSD, Etc.)
Download ZipGenius Standard Edition 6.0.3.1150, Dicono di ZipGenius


Good tutorial. The instruction shared through this tutorial is very useful and the tutorial is simple and well explained. Keep posting and thanks for sharing such a useful tutorial.
ReplyDeleteThis is very detailed, thanks so much. It helped me trying to come up with medical illustration for the free medical check up we are to conduct for indigent people. Thanks to you and to www.showboatentertainment.com
ReplyDeleteWe are very glad that you all enjoyed this tutorial. Remember we made this site to help you!
ReplyDelete