In this tutorial we will be showing you how to use the Extract Filter in Photoshop. There are many ways to remove the background from the image, but we find that the Extract Filter does a good to excellent job with extraction. We will be showing you how to highlight the edges of the object and to fill that specific area that you would like to protect from being extracted. Along the way, we will give you tips and tricks how to remove the background for tough foreground objects.
Currently we are using Windows Vista Home Premium 64 Bit and the Photoshop CS4 Extended 64 Bit version.
Knowledge You Need to Know:
If you
are unfamiliar with certain areas that are not covered in this tutorial, feel free check out other tutorials on our website. We have many different types of tutorials that can be downloaded (Video, PDF) or viewed online that will train you for free! Once you have the knowledge, feel free to come back and go through this tutorial again.
Preparing For This Tutorial:
You will be using a picture of this Disney Sign. If you do not have this image, please scroll down to the image of “Click Picture To Download Supporting Files” and download the image. Please open the image PE-EXTRACT in the Photoshop program and duplicate the background layer.
Many Different Ways To Remove A Background:
There are many different techniques to remove a background from an image, but for most users they will start by using the Extract Filter in Photoshop. For easy to intermediate removals, you will find that this filter does an excellent job. For tough areas (hair, fur, etc.), the Extract Filter only does a good job (unless you take your time). We always start with this filter and then use other techniques (if needed) to remove the rest of the background.
So after we use the Extract Filter, what other tools do we use to clean up the background? We use a wide variety of Photoshop tools, but all the tools we use have been discussed in previous tutorials. Please refer to the Selecting Image Content or the Magical Colors And Selections tutorials. Remember, we also showed you how to create and use a layer mask (refer to Masking And Transform Information or the More Masks Please). In the Eraser Tools course we showed you one tool called the Background Eraser, which does a great job at removing the background.
Most of the time, you will not even have to use any of these extra tools or techniques to remove your background image, because the Extract Filter does a great job.
Extract Filter:
So what is the Extract Filter? The main purpose of this filter is to remove the background of the image quickly and easily. There are only 3 basic steps to remove the background with the Extract Filter. 1). Highlight the edges of the object, 2). Fill the area inside the highlighted area, and 3). Apply the changes with the “OK” button. That is the basic steps, but it is important for you to understand how to use the other tools, settings in the Extract Filter dialog box to get a clean extraction.
To use the Extract Filter, Left click the “Filter” menu and Left click the “Extract…” command.

Once you get into the Extract filter screen, you will notice a few tools and options located on the left hand side. Please note, some of the tools will be grayed out and we will be covering those later in this document.
| A). Left click the marker tool to highlight the edges of your object. Move the mouse to the image D), and hold down the Left mouse button to begin using. | |
| B). To use the magnifying glass, Left click the magnifying glass image and move the mouse pointer over to D). and Left click to zoom in. Photoshop Tip – A much easier way to zoom in and out is to use CTRL-“-“ to zoom out and CTRL-“+” to zoom in. | |
| C). Once you Left click the hand tool, you can move your mouse pointer to the image D), and HOLD down the Left mouse button and drag the mouse. Release the Left mouse button when you are happy with the position of the image. | |
| D). This area shows your image. |

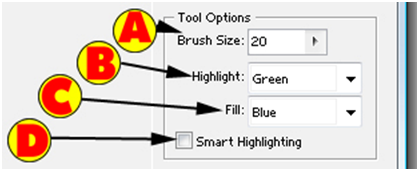
On the right hand side, you will find some tool options.
| A). Left click the Brush Size text box and enter the value of the size of the brush. You can also Left click the Right arrow of this setting and use the slider to select the brush size. Photoshop Tip – It is much easier to increase or decrease the size of the brush with the keyboard shortcuts of “[“ (decrease) or “]” (increase). | |
| B). You will be first going around the edges of the area that you want to keep. The highlight color is the color that will be displayed when you are drawing the edges. | |
| C). The Fill color is when you are done selecting the edges of the object, you will then fill the area that you want to keep. On this example, if we filled the object, it would display blue. | |
| D). If you have tough edges to trace, you can use the Smart Highlighting. |
Your goal is to highlight, ½ the object you want to keep and ½ you want to discard. You are telling Photoshop what is the edge of the object. The smaller the brush, the better results you get. With “Smart Highlighting” on (Left click the check box), Photoshop will use the smallest brush size.

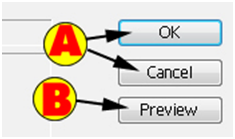
On the top right hand side of the screen, you will see the following 3 buttons (some may be grayed out at this time).
| A). When you are done extracting the image, you can Left click on the “OK” button to apply the changes or Left click the “Cancel” button to disregard your changes. | |
| B). To see a preview of the extraction, Left click the “Preview” button. |

For this tutorial, your goal is to trace (highlight) around the sign. Use the marker tool (top left of the Extract toolbox. Your goal is to try to get ½ of the highlight outside the edge and ½ the highlight inside the object. Remember the smaller brush size you use, the better results you will get with the background removal. On the image below, the highlight size is a little too big, but it will work for this tutorial.
Use the marker tool and HOLD down the Left mouse to highlight the edges. Release the Left mouse button for each section (usually we do small sections like the highlight below).

Proceed all the way around the sign. Your final image should look similar to the picture below. Don’t worry if you make any mistakes. The next section of this document we will show you how you can clean it up, before extracting.

Once you begin using the marker tool, you will notice 2 options in the toolbox will no longer be grayed out.
| A). Once you have gone all the way around the edges, you can use the Fill Bucket. Left click the Fill Bucket and move your mouse pointer inside the area and Left click the image. | |
| B). Do you notice areas that have too much highlight? Use the eraser to remove some highlights from the edging. |

For this tutorial, use the Fill Bucket and fill in the area that you want to protect.

If you are following along, your image should look similar to the picture below.
Left click the “Preview” Button when you are satisfied with the fill and the highlights. You will notice that Photoshop will remove the background that is outside the highlight areas. You will also notice that there will be 2 more options in the toolbox that are no longer grayed out.
| A). You can either Left click this tool to use it or use the keyboard shortcut of “C”. Once you have activated the cleanup tool, it will allow you to erase areas that it did NOT remove. Photoshop Tip – Usually these are areas that need to be zoomed in and cleaned up with using a smaller brush size. | |
| B). Sometimes you lose the edging of the object. Left click this Edge Touchup tool or use the keyboard shortcut of “T” to activate the tool. Now move your mouse pointer to the edge area that seems faded. HOLD down the Left mouse button and drag the mouse pointer over that edging. Release the Left mouse button when you are happy with the improved edging. |
For this tutorial, use the cleanup tool to remove image areas that you would like removed. You may find that it had trouble at the base of the sign.

You should have an image that looks cleaned up around the edges now.

Sometimes Photoshop fades the edges of the object when removing the background. It also may add artifacts to the edges. For this tutorial, now go around the edges with the Touchup Tool. As you can see below, it darkened the edges and cleaned up the artifacts.

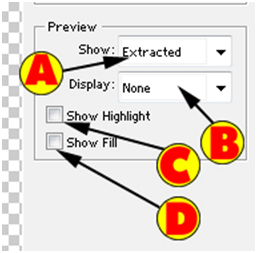
Once you used the “Preview” button, it will allow you than to make changes to the “Preview” settings.
| A). The Show option allows you to see the Original or the Extracted version. | |
| B). Normally it will display the cutout background as a transparent (gray checkerboard background). You can Left click the drop down box and change the background color. | |
| C). Sometimes you realize that you want to adjust the Highlights. Left click the “Show Highlight” box. You will then be able to make the corrections. | |
| D). After you make the changes for C), you will need to activate this option to use the Fill Bucket again. Left click the “Show Fill” box and re-fill your area. |

If you are following allowing with the tutorial, Left click the “OK” button to apply the extraction.
Tips And Tricks:
As we stated, the Extract Filter does a great job at removing the background, but there are some objects such as hair, fur, etc. that it may have problems removing. Here are a few tips and tricks to better improve the removal of the background.
For any background removal, always begin with the Extract Filter. For easy edging, use a normal size brush. If the edges are very complex, your best bet is to work with a zoomed image and use the smallest brush size that will work for you. Try turning on the “Smart Highlighting” option. Once you Left click on the “Preview” button, first start with the “Cleanup” tool. Now use the Touchup tool to darken the edges.
It is usually better to highlight too much of the outside of the edge instead of the inside edge. You can always remove excess edging.
If you make an error in the Extract Filter, use CTRL-“Z” to undo your changes.
If you can’t get it perfect in the Extract Filter, first apply the Extract Filter by Left clicking the “OK” button and then use the other tools to remove the rest of the background. For these types of fixes, check out the tutorials we recommended at the start of this tutorial.
Conclusion:
You will find that there are a lot of tools to remove the background from the image, but we find that the Extract Filter does a great job. We always start with this tool and do the final minor fixes with the other tools. By now you should know how to use the Extract Filter in Photoshop. We also showed you that even if Photoshop has problems removing the background, you can always use the Cleanup/Touchup tools to correct most of the problems.
Are there better tools in Photoshop to remove the background? Extract filter does a great job at removing the background and as a beginner or intermediate Photoshop user, we recommend that you stick with the Extract Filter. There are other techniques that do a better job at removing very tough background areas, but they would be considered to advanced for our site. In the future we will be going over more ways to remove the background.
We also gave you some tips and tricks to improve the process of removing the background.
We hope you enjoyed this course about the Extract Filter and we highly recommend that you take a few minutes and answer the 10 question quiz below.

1). What sub-menu of the Filter menu is the Extract Filter located in?
| A). Other. | |
| B). Extraction. | |
| C). Removal. | |
| D). There is no sub-menu for the Extract Filter. |
2). After you have selected your brush size in the Extract Filter, what is usually the next step?
| A). Use the Fill tool to highlight the edges of the object. | |
| B). Use the Marker tool to highlight the edges of the object. | |
| C). Use the Eraser tool to remove the edges of the object. | |
| D). Inside the Extract dialog box, select “Layer Mask” and begin removing the edges of the object. |
3). What is your goal when you are highlighting the edges of the object in the Extract Filter?
| A). Highlight only the inside of the edges of the object that you want to keep. | |
| B). Highlight only the outside of the edges of the object that you want to remove. | |
| C). Highlight only the lightened edging of the image. | |
| D). Highlight ½ of the edge area you want to keep and ½ of the edge area that you want to remove. |
4). What does the Smart Highlighting option do in the Extract Filter?
| A). When activated it tries to use the smallest brush size to select the edges. | |
| B). When activated, Photoshop will auto zoom the area that you are working in. | |
| C). When activated it tells Photoshop to add a Layer Mask to the extraction. | |
| D). When activated it tells Photoshop to auto select the edges of the object. When turned on you will see markings around the edges. |
5). We recommended as a tip in this tutorial to use what keyboard shortcuts to zoom in and out of the image?
| A). “[“ to zoom out and “]” to zoom in. | |
| B). “-“ to zoom out and “+” to zoom in. | |
| C). CTRL-“-“ to zoom out and CTRL-“+” to zoom in. | |
| D). CTRL-“[“ to zoom out and CTRL-“]” to zoom in. |
6). What tool in the Extract Filter would you use if you lose the edging or it is faded?
| A). Cleanup Tool. | |
| B). Touchup Tool. | |
| C). Correction Tool. | |
| D). Edging Tool. |
7). What is a quick way of undoing your changes if you make an error in the Extract Filter screen?
| A). Use CTRL-“Z”. | |
| B). Left click the “Undo” option in the Extract Filter. | |
| C). The easiest way is to apply the changes and then add a “Correction” Filter. | |
| D). There is no easy way to undo your changes. |
8). What setting in the Extract Filter would you set to display a different background color other than the transparent checkerboard?
| A). In the Display section, use the drop down field for the Display setting. | |
| B). In the Preview section, use the drop down field for the Display setting. | |
| C). In the Preview section, use the drop down field for the Background setting. | |
| D). In the Display section, use the drop down field for the Background setting. |
9). What is the keyboard shortcut in the Extract Filter to use the “Touchup” tool?
| A). ALT - “C”. | |
| B). ALT – “T”. | |
| C). “C”. | |
| D). “T”. |
10). The Hand tool in the Extract Filter does what?
| A). It allows you to stretch the preview. | |
| B). It allows you highlight the edges. | |
| C). It allows you to move the preview image. | |
| D). It allows you to touchup the edges. |
Answers: 1). D, 2). B, 3). D, 4). A, 5). C, 6). B, 7). A, 8). B, 9). D, 10). C
Scoring:
0 - 5 = Please review the video tutorial and re-read this document either offline (PDF) or online.
6 – 8 = We would recommend that you print this document off and read it at a later time.
9 – 10 = Congratulations you have passed the quiz. Go ahead and view another tutorial on our site.
We hope you enjoyed this detailed tutorial. Please visit us at: http://www.Photoshopeducation.blogspot.com to expand your knowledge within Adobe Photoshop.

Click Picture To Download Video File To View Offline
Download Total Video Player, iTinySoft

Click Picture To Download PDF Tutorial
Download Adobe Reader, Adobe Corporation
Click Picture To Download Supporting Files
(Brushes, Textures, Fonts, Images, Actions, .PSD, Etc.)
Download ZipGenius Standard Edition 6.0.3.1150, Dicono di ZipGenius


Perhaps its already mentioned here, CS4 users will need to either copy & paste the extract filter from previous PS versions or you download it from adobe.com
ReplyDeleteEnjoy the website alot, I post it on my handouts for students
This is great tutorial, thanks:).
ReplyDeleteHmm, the extract filter is always in mine. Now the pattern maker (I believe) you need to download. Glad you folks liked.
ReplyDeleteThis is a thoughtful and comprehensive piece. Thank you for such valuable perspectives on the good subject.
ReplyDeletewebsite design
I am glad that people share their experiences with us.
ReplyDeletePaula
Thank you for sharing this article. The things you shared are really great. However, I usually remove the background using an online tool. It's faster and easier. I think you should give this tool a try because it's really helpful. It's "https://removal.ai".
ReplyDelete