There are many different types of shadows, but the most common shadow is the cast shadow. It is a shadow that is created by something blocking the light source. In this tutorial, we will show you how to create cast shadows in Photoshop. If you are trying to merge more than 1 image together, you will usually need to fake the cast shadow. Along the way we will give you tips and tricks on how to determine what strength and size for the new shadow.
Currently we are using Windows Vista Home Premium 64 Bit and the Photoshop CS4 Extended 64 Bit version.
Knowledge You Need to Know:
If you are unfamiliar with certain areas that are not covered in this tutorial, feel free check out the other tutorials on our website. We have many different types of tutorials that can be downloaded (Video, PDF) or viewed online that will train you for free! Once you have the knowledge, feel free to come back and go through this tutorial again.
Preparing For This Tutorial:
You will be using a picture of this baseball player (we took this photo in 2007 at a Detroit Tigers baseball game). If you do not have this image, please scroll down to the image of “Click Picture To Download Supporting Files” and download the image. Please open the image PE-PLAYER in the Photoshop Program.
Shadow Discussion:
The technique that we will be showing you can be used for 90-95% of all projects. We will be showing you a basic shadow that will fool most people. So what about the other 5-10% of the projects?
So what do you do if you have a complex shadow? First what is a complex shadow? It is a shadow that changes based on the object it is being blocked by and the surface it is being displayed on. Example: Let’s say you wanted to take a 10 foot tall glass mug and put it on a grassy hill. What makes it tough is when you are dealing with glass, you will get a different type of shadow and when you are working with grass that is uneven and it is slanted on a hill, you will need to create a different type of shadow. When we get to more advanced courses, we will come back and show you how to do a complex shadow.
Don’t worry, this cast shadow will look believable.
Fake Shadow:
Have you ever looked at a picture and it looked fake? Well one of the most common problems that causes it to look fake is the shadows. For more information on how to spot a fake, read the following article that we wrote called Beginner Guide to Spotting a Fake.
Most of the time the problem is that the new object is missing a shadow or the shadow is going in the wrong direction. For most images, it is important to get the shadow at least looking good or very good or else the viewer of your image will scream “FAKE”.
Shadow Information:
If you read other sites, you may be confused on diffused reflection, direct reflection, diffuse light, or direct light, etc. If you learned this information, great, but our goal in this tutorial is to give you a basic understanding of a shadow.
When will you need to add shadows? If you are taking an object or anything from 1 image and adding it to a second image. Usually the object you are copy from will need a shadow.
So how do you determine the shadow direction and the strength? The easiest and best way is to look at the image that will be your background (image you are copy into). You will usually find a few shadows and that will show you the direction and strength of the shadow. What if you can’t cheat off of another shadow in the image? Look for lighter areas of the image. Example, you see a person standing and you notice no shadows, but you see the right side of body or face is brighter. This means the light source is coming from the right hand side. For this example you would look at how strong the light source is and create a new shadow towards the left hand side. The stronger the light source, the stronger the shadow should be.
Here are few more observations. Are you indoors when reading this tutorial? If so put your hand flat over a surface such as a table (as long it is not glass or metal and you have a light on, you are fine). Now move your hand that is flat up and down (away and towards the surface of the table). Notice how your shadow size, and strength changes. Usually indoors, your light source will be straight above you. This means if you have your hand flat above the surface, the shadow will be right below your hand.
Also, notice when you move it closer to the table that the shadow becomes darker. Finally, if you tilt you hand back and on an angle (fingers on an angle in the air), look at the shadow. You will notice that finger tips (farthest away from the flat surface) will be blurred a bit more compared to the base of your hand.
So for a general rule (on certain shadows this is not always correct), the strength of the shadow will be weaker when the object is farther away from the surface. Also when it is farther away, it will blur more around the edges of the shadow.
So what if you do not see a shadow in the image and you can’t tell where the light source is coming from? We will use a light source as if it was coming from front to back and create a faint shadow. Example: you have a person standing pointing a little to the right side with no visible shadow or there is no obvious light source. Usually we will create a shadow that goes towards the back of the person and to the left hand side and make the shadow very light colored.
If you do not know the light source, then create the shadow and then add the following step to make it look realistic. If you add a perfect shadow to an object that does not show the light source, you need to go back to the actual object and lighten up a certain area. Example: You have a person standing with no light source, but you put a strong shadow to the back left of the person, then you need to make sure that you lighten the blocking light object on at least the right side of the of the object. If we have time in the future, we will show you easily how you can lighten up certain areas of an object.
Creating shadows in Photoshop is easy, but the tough part is determining the angle and the strength of the shadow it should be. Don’t worry; most images will have existing shadows that you can cheat off of.
Cast Shadow Creation:
There are many different ways to create a shadow in Photoshop, but the basics is to duplicate the layer, somehow change it to all black and then use the Free Transform tool and then blur the edges and fade certain parts out of the shadow. Listed below is a method that we have been using for many years now and the end result looks good.
Once you open the image in Photoshop, you will have 2 layers, 1). Player and 2). Background. Left click the Player layer in the Layers Palette and use CTRL-“J” to duplicate the layer. Our goal is to make the duplicate layer all black. One way to make this all black is by going into Hue and Saturation (CTRL-“U”) and moving the lightness slider bar all the way to the left. For more information about the Hue/Saturation adjustment, please review the Hue And Saturation Adjustment tutorial. Left click the “OK” button.

You should see your layer change to a black shadow.

You should rename that layer in the Layers palette to “Shadow” and drag this layer below the “Player” layer. Once moved, make sure you Left click the “Shadow” layer. Renaming the layer is not required, but it is important to get you into using good habits. When you begin to work with 50+ layers, you need to make sure everything is labeled correctly in the Layers palette.
Here is how our Layers palette currently looks.
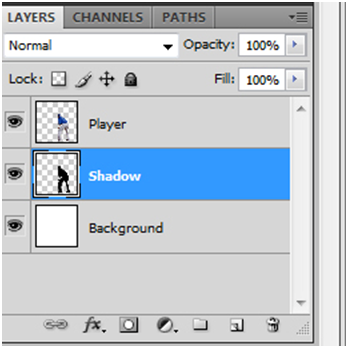
Now we already talked about the transformation tools in Transforming Objects tutorial and we just discussed the Free Transform tool in the Transforming The Warp Tool tool. Let’s use CTRL-“T” to get into the free transform tools.
So without any visible shadows in this example, how do we know what angle and strength to create the cast shadow? Look at the helmet and the angle of the baseball player. See the strong light on the back of the helmet? Now use the “Distort” option to flatten the shadow towards the ground. Here is our quick shadow. Once distorted, Left click the Check to apply the changes. For some images, you may need to use the other Free Transform tools such as Skew or Perspective. Don’t worry if it is not exactly perfect. We can always re-adjust it later.
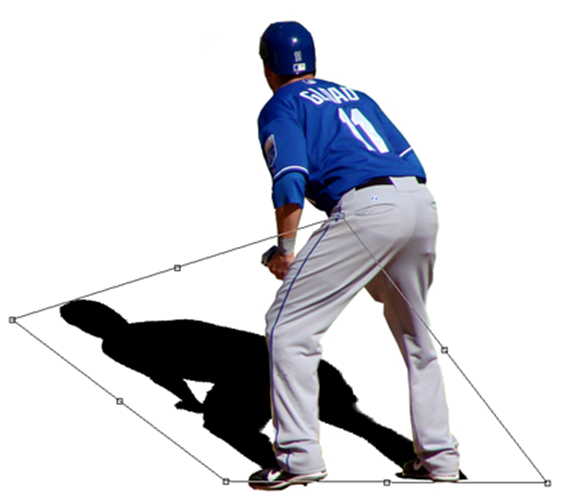
Now CTRL-Left click the image in the Layers palette for the Shadow Layer. This will make a selection around the layer. If you forget to do this step, you will apply the Gradient to the whole image. By selecting only the shadow, we will be applying it only to the Shadow Layer.
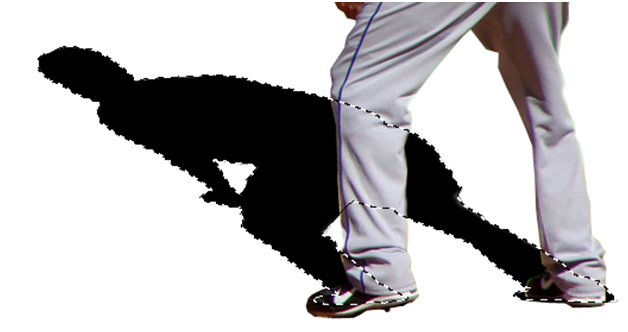
You next step is to change the foreground color to a light gray. We used #C7C2C2. For the background color, change it to a darker color, but not black. We used #282828. Depending on how strong the light source is, you will need to adjust the foreground and background color. If you can cheat off of another shadow in the picture, selecting the correct darkness will be easy. Photoshop Tip – It better to use a little darker then you think you will need. You can always change the opacity to reduce the strength later.
Now change to the Gradient tool and make sure the preset is set to foreground to background color. The reason we are using the Gradient Tool is to change it from all black to a shade of black or gray. In the Gradient toolbar, make sure it is set to Linear Gradient (far left option). Also for this example only, change the opacity to 75% in the Gradient toolbar. For your image, please play around with the opacity.
Now drag from the bottom up towards the head of the shadow.

Now use CTRL-“D” to Deselect. Your image should look similar to the one below.
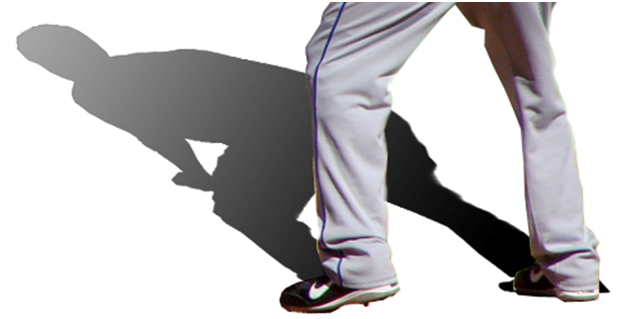
This next area is where other tutorials may be a bit different than ours. Some people will apply a Gaussian blur to the whole shadow at this stage. We actually prefer to manually blur it. By manually blurring it, it allows us flexibility on the blur.
Remember the edges of a shadow are usually blurred, but you will find the farther way areas of the blocking object will be blurred even more. On this example the head of the shadow needs to be very blurred, while the leg area needs to be lightly blurred.
On this example, we change to the Blur tool (for more information about the Blur tool, please refer to the Smudge, Sharpen, Blur Tools course)in the toolbox and on this example, we use a 15x master diameter (size) brush with the hardness turned down to 0%. We set the strength to 25% (located to the right of the mode in the toolbar of the Blur tool). To make it easy to follow along with this tutorial, we would like you to blur the edge of the shadow, only for the area that is in between the actual players legs image. See area below.
In a real world, we would blur this at different strengths even more, but for this tutorial we break it up into 4 different sections.
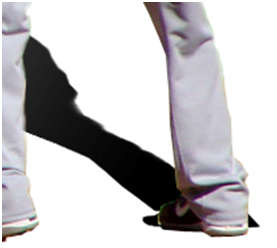
You will notice it is now blurred very little. Remember, if you feel that it should be blurred more, than go over it again. If you have another shadow in the image, we recommend that you look at that shadow to determine how much it is blurred in specific areas. You can always reduce or increase the strength. Remember to keep the strength low for this first part.

Now turn up the blur strength to 50% and blur only the edging of this area of the shadow.

You should have something like this now. Remember, if you feel more blur is needed in that area, go over the edges again!
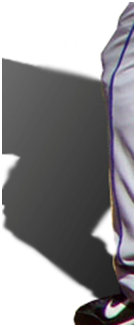
Now turn your blur up to 80% and go over the following edges of the shadow. This is roughly up to the neck of the shadow.

Your results should look similar to the image below. If you only need a bit more blurred, you can always lower the strength for the second pass.

Now for the last area, change the blur to 100% strength.

Here is what our image looks like right now.

Before we do our final tweaks, let’s lower the opacity of the Shadow layer in the Layers palette to 73%. For your shadow, try cheating off of the other shadows and lower the opacity so it matches the strength of the other shadows. Play with opacity!

Looks better, but there is a little bit more blurring that should be around the edges.

You can manually do this next step or use a Filter. The reason we do not mind using a Filter at this stage is that we already applied different strengths to the edges and we can bump up the total edging blur at once with a Filter.
Remember this step is optional. Either your image will look very good or you will need to do some tweaks with either the Blur tool (minor fixes) or a Filter to blur the total edging.
From the “Filter” menu, move the mouse cursor down to the “Blur” option. A sub-menu will be displayed. From the sub-menu Left click the “Gaussian Blur…” command.

You will then see a Gaussian Blur dialog box. You will want to play with the strength, but usually you will keep the radius pixels between 1.0 – 4.0. For this example, change it to 1.5 and Left click the “OK” button to apply the changes.

Final Tweaks:
Your picture should look like the one below. Now it is time for the final tweaks. Do you need to blur it more using the Blur tool? Is it blurred to much in certain areas? Then use the Sharpen tool. Does it look better with a lower opacity?

Look at the shadow, is it positioned or angled correctly? This is the time to make that correction. For this example, let’s leave it the same (we could correct it a bit more, but this is just for this tutorial). You will notice that there is part of the black shadow around the shoe of the right foot. Let’s create a Layer Mask and remove that portion. Please refer to the Masking And Transform Information or More Masks Please tutorial for more information.
Here is what our layers look like. When you are done, let’s apply the mask.

Your end result should be a good looking shadow. For this tutorial, we forgot to remove the darker area on the right shoe on the left hand side. Ooops!
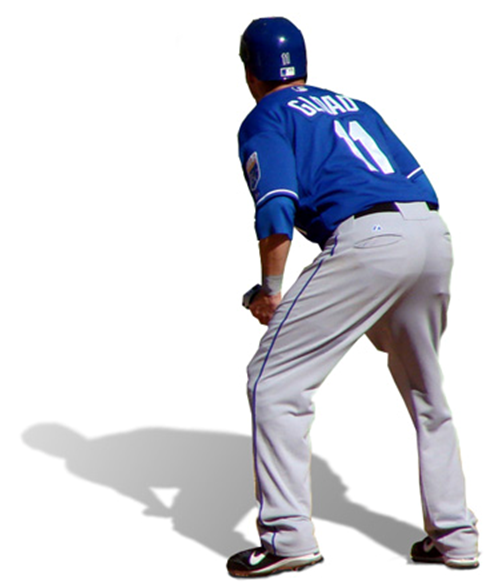
More Of A Real World Example:
Most of the time you are not going to be putting a shadow on a white background, so let’s look at a more real world example. We call this the overgrown baseball player going to the Football field (Ford Field). Photoshop Tip – Do you want to make the shadow a bit darker, try using a “Multiply” blending mode.
To make this look perfect, you will need to add a small shadow under the shoes. This would be a drop shadow. There are many ways to accomplish this, but the easiest way is to either draw the darkness in under the shoe or to use the Burn tool. Without this small shadow under the shoes, it will make it look like the object is floating above the surface. 
Conclusion:
By reading this tutorial you should have learned how to determine the angle and strength a shadow should be. Remember the easiest way is to cheat off of another shadow in the image. Use that other shadow as a template for creating a new cast shadow.
Play with the distort option. Sometimes a small adjustment in this step will make the shadow look a lot better. When blurring the edges we will usually go around the edges once and gradually increase the strength, but once it is almost complete we re-evaluate how the shadow looks and usually add additional blur to certain areas. Also, before we do the Layer Mask, we will make the final adjustments with the Free Transform tool.
If you can’t solve the strength of the shadow with the opacity or blending modes, try either the Dodge tool to lighten an area or the Burn tool to darken an area.
Take your time with shadows. It is import step into creating a masterpiece.

1). At what location is USUALLY lighter within a shadow?
| A). The shadow is usually the lightest shade in the middle of the shadow. | |
| B). The shadow is usually the lightest shade right next to the blocking object. | |
| C). The shadow is usually the lightest shade when it is the farthest away from the blocking object. | |
| D). The shadow is usually the lightest shade on the left hand side of the shadow. |
2). What tool did we have you use to change the layer to all black?
| A). Brightness/Contrast. | |
| B). Hue and Saturation. | |
| C). Curves. | |
| D). Color Balance. |
3). Name the transform tool that will usually work to flatten the shadow on to the surface?
| A). Skew. | |
| B). Perspective. | |
| C). Rotate. | |
| D). Distort. |
4). Why did we apply the Gradient across the shadow?
| A). To allow us to add a nice texture. | |
| B). To allow us to change the shade of black. | |
| C). To allow us to blur the edging. | |
| D). To allow us to flatten the shadow to the surface. |
5). When we blurred the edges manually, we started with a strength that was very low, but what part of the shadow did we begin with?
| A). The shadow edges that is the closest to the light source blocking object. | |
| B). The shadow edges that is the farthest away from the light source blocking object. | |
| C). The shadow edges that are in the middle of the shadow. | |
| D). The lightest area of the shadow. |
6). What slider bar would you change in the Hue and Saturation adjustment to make the image all black?
| A). Hue. | |
| B). Color. | |
| C). Darkness. | |
| D). Lightness. |
7). What is the easiest way to determine the strength and angle the shadow should be?
| A). The easiest way is to look at the other shadow angles and strength in the rest of the image. | |
| B). The easiest way is to look at the darkness of objects in the rest of the image. | |
| C). The easiest way is to look at the lightness of objects in the rest of the image. | |
| D). There is no easy way to determine the strength and the angle the shadow should be. |
8). When manually blurring the edges of the shadow if the blur is to light (strength is to low) after we used the tool, what did we recommend that you can do to blur it little bit more?
| A). Use the Sharpen tool and remove some of the edging of the shadow. | |
| B). Use the Blur tool again, but adjust the strength to 100%. | |
| C). Use the Blur tool again, but adjust the strength to 0%. | |
| D). Use the Blur tool again, and adjust the strength appropriately. |
9). We recommend what strength (Radius Pixels) in the optional step for the Gaussian Blur?
| A). 0-5.0. | |
| B). 1.0-5.0. | |
| C). 1.0-4.0. | |
| D). 2.5-4.5. |
10). We recommended at the end of the shadow creation that if you needed to darken the whole shadow to use what blending mode?
| A). Overlay. | |
| B). Vivid Light. | |
| C). Hue/Saturation. | |
| D). Multiply. |
Answers: 1). C, 2). B, 3). D, 4). B, 5). A, 6). D, 7). A, 8). D, 9). C, 10). D
Scoring:
0 - 5 = Please review the video tutorial and re-read this document either offline (PDF) or online.
6 – 8 = We would recommend that you print this document off and read it at a later time.
9 – 10 = Congratulations you have passed the quiz. Go ahead and view another tutorial on our site.
We hope you enjoyed this detailed tutorial. Please visit us at: http://www.Photoshopeducation.blogspot.com to expand your knowledge within Adobe Photoshop.

Click Picture To Download Video File To View Offline
Download Total Video Player, iTinySoft

Click Picture To Download PDF Tutorial
Download Adobe Reader, Adobe Corporation
Click Picture To Download Supporting Files
(Brushes, Textures, Fonts, Images, Actions, .PSD, Etc.)
Download ZipGenius Standard Edition 6.0.3.1150, Dicono di ZipGenius


Your posts do not need to have sophisticated vocabulary.
ReplyDeleteNora