Overview:
In this Photoshop challenge, we decided to make a bit harder. Some challenges will be very easy and some will be a little bit harder. The trick here is remembering what knowledge you have learned from the previous tutorials.
Remember, these challenges are not works of art and they are created only to help you use the information you have learned in prior courses.
If you are stumped, scroll down to the Challenge Area, Hints, or Answer section. You will first find some hints to help you complete certain areas of the project. If you still can’t figure out how to duplicate the image, feel free to watch the answer video (either watch it online or download the file).
Challenge Completion Time:
Successfully completing this challenge will take 10 minutes or 15 minutes if you want take the time and be careful around the frame.
Challenge Details:
| 1). You will need to download the supporting files which is a picture of a sky and rock. Please click on the “Download Supporting Files” link below. | |
| 2). We used an “Arial” font to create the text. |
That is all the information you need to complete this challenge. There are a few ways to recreate this image, so we hope it is not to tough to duplicate. Remember it does NOT have to look exactly like the example picture. As long as you understand and can duplicate the basics, then you can consider this a success.
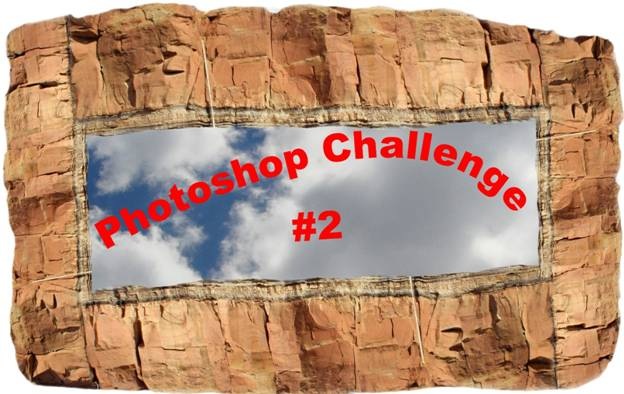
Ok, here is the final image.
HINTS/ANSWERS ALERT
Please do NOT proceed with this document, unless you would like to find out the answer. We have broken this section up into 3 different areas (Challenge Areas, Hints, Answer).
Challenge Area:
| 1). Look at the frame closely. What do you see? You should notice that each side of the frame is actually the same image. | |
| 2). Look at the original rock side, do you see the location of the frame? Now determine how you can cutout or mask (mask is a lot easier) that area. | |
| 3). Remember when you are working on a transparent background, and you save an image, it automatically fills in the white background. This means the white that is around the image does not need to be painted in and you can always save the photo and it will convert the transparent to white. | |
| 4). You noticed we flipped the top to make the sides and bottom, do you remember how we flipped an image or rotated an image? |
Hints:
Ok, we guess the challenge area above did not help you, so let’s show you some important areas of the challenge.
| 1). Remember we talked about Layer masking in the Masking And Transform Information and the More Masks Please tutorials. That should help you with how we removed the excess of the image. | |
| 2). In the 7th course we talked about text and how to type on a path. That is how you can create an arched look for the text. Please review the Text Features tutorial for more information. | |
| 3). We had to resize, rotate the frame. This can be accomplished by the size and rotate command and you can read up on that information in the Transforming Objects tutorial. | |
| 4).To get the sky sitting behind the frame, we used layers. Check out these 2 great tutorials which talk about the layers. Learning Layers With Ease or More Layers. |
Answer Video:
Ok, the challenge area and the hints did not help. That is ok, because we created the answer video below for you.

Click Picture To Download Video File To View Offline
Download Total Video Player, iTinySoft
Click Picture To Download Supporting Files
(Brushes, Textures, Fonts, Images, Actions, .PSD, Etc.)
Download ZipGenius Standard Edition 6.0.3.1150, Dicono di ZipGenius


No comments:
Post a Comment