Summary:
In this tutorial we will be showing you how to use the Red Eye tool, Clone and Pattern Stamp tools. You will find the Red Eye tool is very easy to use and the Clone Stamp tool to be very useful. We will also be discussing the Pattern Stamp tool which can be used to fill a portion of the image with a Pattern. Along the way we will be giving you tips and tricks such as the “Impressionist” option for the Pattern Stamp tool will give it an artistic effect (blurs certain areas). For fun, we will also be adding a 3rd eye to a woman.
Currently we are using Windows Vista Home Premium 64 Bit and the Photoshop CS4 Extended 64 Bit version.
Knowledge You Need to Know:
If you are unfamiliar with certain areas that are not covered in this tutorial, feel free check out other tutorials on our website. We have many different types of tutorials that can be downloaded (Video, PDF) or viewed online that will train you for free! Once you have the knowledge, feel free to come back and go through this tutorial again.
Preparing For This Tutorial:
We figured we used a picture of a man in the last tutorial, so let’s use a picture of a woman in this course. If you scroll down to the “Click Picture To Download Supporting Files” and Left click on the image you will be able to download the PE-WOMAN file. Please open this image and duplicate the background layer and hide the background layer.
Red Eye Tool:
The last tutorial we discussed how to fix skin flaws with the Healing, Spot Healing Brush and even the Patch Tool. Now it is time to fix the eyes. Red eyes in pictures are caused by the flash reflecting from the retina in the person’s eye. It does not matter if it is filmed camera or a digital camera, red eye will happen. Within the Adobe Photoshop CS4 program, it is very easy to fix this problem. On a 2 column toolbox on the left hand side (4 down from the top) you will find the Red Eye Tool. Right click this image and Left click the “Red Eye Tool”.

You will now see the options bar located at the top of the screen.
| A). Pupil Size is well the pupil size. Most of the time 50% size will be perfect. Left click the right arrow to display the slider bar to change the value or Left click inside the text box and change the value. | |
| B). Darken Amount is how dark do you want the pupil to change. For different people, this amount will change. You will have to experiment with this percentage by Left clicking the right arrow and changing the slider or by Left clicking in the text box to change the value. |

Now move the mouse over to the center of the pupil (white dot). You will see when you move the Red Eye Tool onto the canvas a + will be displayed. Using the + pointer, make sure your on the center of the white dot (center of the pupil). Now single Left click. Repeat the steps for the second eye.

As you can see (no pun intended) the Red Eye Tool is quick and easy and does a great job.

Pattern Stamp Tool:
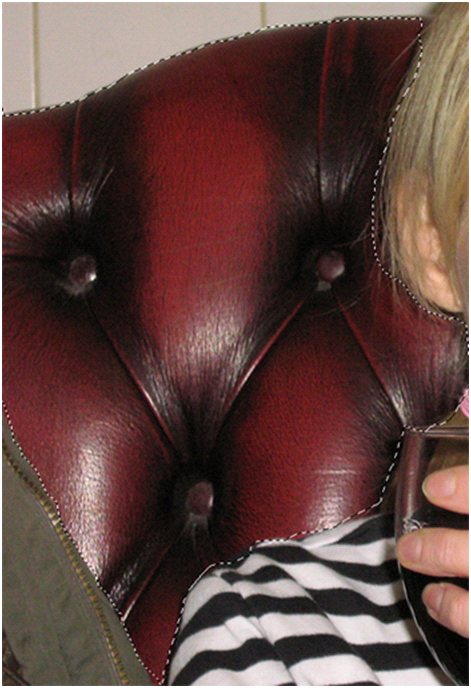
We have talked about Patterns in the Patterns tutorial, but now we can use them to add a Pattern to the couch that the woman is sitting on. On this example, use any selection tool (refer to Selecting Image Content or Magical Colors And Selections tutorials) and make a quick selection (does not need to be perfect for this example) of the couch on the left hand side.

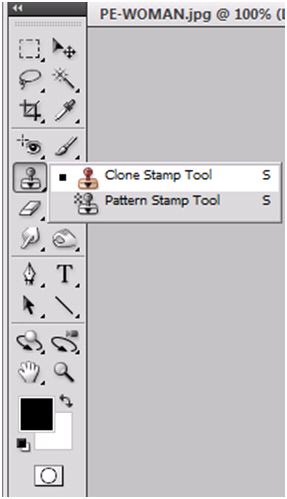
Right below the Red Eye Tool in the toolbox, you will find the stamp tools. Right click this image and Left click the “Pattern Stamp Tool”. Photoshop Tip – Use the keyboard shortcut of “S” to get to the last active stamp tool.

Here are the options for the Pattern Stamp Tool.
| A). We have talked about the Brush Tool back in the Colors And Painting Tools tutorial. On this tutorial, make sure the brush size is very large (2000+). | |
| B). We will be discussing modes in a future tutorial. For now all you need to know is that is a pre-programmed feature of Photoshop. | |
| C). The Opacity option tells Photoshop how much to bleed through to the other layers. For this example, Left click the text box or Left click the right arrow and use the slider to change the value to 15%. We did this so you could still see the texture of the couch and some of the pattern. | |
| D). The Flow allows you to set the flow rate of the brush (strength). For this tutorial, make sure that it is set to 50%. Left click the text box or Left click the right arrow and use the slider bar to change the value. | |
| E). By turning on this option, it will give you an airbrush effect. For this tutorial, please make sure that it is turned off. It will put a gray box around it if it is turned on. | |
| F). Left click this down arrow to change your pattern. For this example, Left click the down arrow and select the tie-die pattern. | |
| G). Aligned when on, will align the pattern perfectly. It does this by using the same offset per stroke. On this example, make sure that the Aligned checkbox is turned off. | |
| H). Impressionist. This is a cool feature in Adobe Photoshop CS4. With this option turned on, it will convert the pattern into more of a painting (artistic) effect (blurs edges, etc.). For this tutorial, make sure that this checkbox is unchecked. |

Move your mouse inside of the selection and single Left click. If you find the pattern to light, you can use it again to darken it up (we recommend that you start with a lower flow and a lower opacity). Single Left click it again. The below image is when we used the Pattern Stamp tool once. Photoshop Tip – You can mix and match settings. Example, first use the Pattern Stamp tool as instructed, but then turn on the “Impressionist” option and single Left click the area again.

Clone Stamp Tool:
**Use CTRL-“D” to deselect. Think of the Clone Stamp Tool as a copy tool. It can be used similar to the Healing Brush, but the difference between the Healing Brush and the Clone Stamp Tool is that Healing Brush samples areas to make it blend better where the Clone Stamp Tool is just a copy of that area. There are many uses to the Clone Stamp Tool such as filling in areas of an image that you want to hide or even removing date stamps from a photograph. You will find that most projects that you are working on, you will need to use this tool. Our goal in this tutorial is to remove the hair clip.
To use the tool, Right click the toolbox image and Left click the “Clone Stamp Tool”.

The options are very similar to the Pattern options. Please refer that section of the document for more information. Make sure the Flow & Opacity is set to 100% and the “Aligned” is turned on (checked) and finally the brush size is around 40-50 for this example. Our goal is to remove this hair clip.
Short strokes and small sections are going to be the key to removing this hairclip. Just like the Healing Brush tool, you will need to find an area that you want to clone over the clip. Our recommendation on this example is to follow the hair strains down. You should have a brush size around 40. Once you found the area, hold down the ALT key and single Left click the starting area. Release the ALT key. Now move the mouse to the hair clip and hold down the Left mouse button and drag it in the direction of the arrows in the example below. You will notice a second pointer will be displayed. This second pointer shows you the area that it is currently cloning. Once you are happy, release the Left mouse button. Photoshop Tip – Remember after you clone a certain area, you can always change the starting cloning location. In this example, once we got done with the hair, we set the starting clone area to the skin area.

Even though it is not perfect, here is our example of removing the hair clip. To make it perfect, we would use a smaller cloning brush and fix certain areas of the hair (blend the area that is a bit darker hair on the bottom) and we would fix the skin area to make it lighter by using the Healing Brush Tool.

Cloning From Different Layers:
A lot of even intermediate users do not know that you can Clone from different layers, so we felt that it is important to show you how to clone from a separate layer. If you followed our instructions from page 1, you should have duplicated the background layer and hidden the background layer. If you did not duplicate the background layer, just re-open the original image and follow the instructions. We need to create a new layer to add a 3rd eye. Create a blank Layer. Do not remember how to create a blank layer? Please refer to the Learning Layers With Ease or the More Layers tutorial. We renamed our blank layer to the “Third Eye”. We hide the middle layer. Here is how our layer palette looks.

Left click the Background Layer in the Layers Palette. Use the Clone Stamp Tool and on this example we used a brush size of 150. Now move your mouse pointer over to the center of the pupil on the Left eye. Remember what you do next? Yep, hold down the ALT key on the keyboard and single Left click (release ALT key). Now Left click the “Third Eye” Layer to select it and move your mouse to the forehead area above the nose and single Left click. Ok it looks good, but now you want to use the transform tools which we discussed in the Transforming Objects tutorial to rotate and to clean up the edges, use the Layer Masking tool (refer to Masking And Transform Information or the More Masks Please tutorials). If you kept it on the same layer, you would not be able to rotate or layer mask! Photoshop Tip – It is always better to work on a different layer!

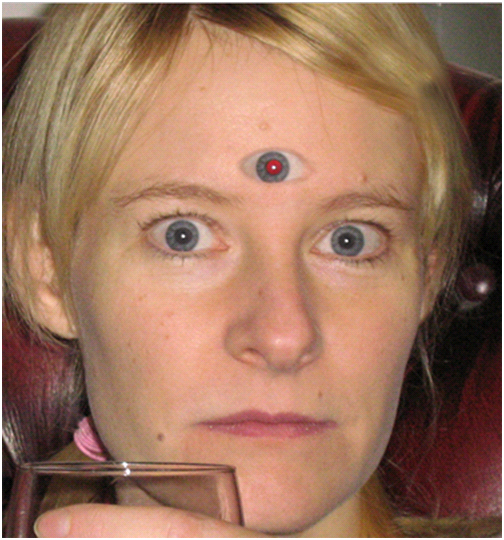
Here is our example after we cleaned up the edges with Layer Mask and rotated the eye to make it straight.

The last step of creating the 3rd Eye lady is to unhide the middle layer. Here is our end result for the 3rd eye lady.

Conclusion:
You have just learned how to use the Red Eye Tool to remove the red eye from images. You have also learned how to use the Pattern Stamp Tool and Cloning Stamp Tool.
You will find many uses for the Cloning Stamp tool such as if you have an object that can’t be cropped out, than clone something in the area. Example: A few years ago my wife and I got our picture taken at Disney World. In the background to the right hand side was a Disney sign and on the left hand side, right behind us was a trash can. Behind the trash can was a glass block window. End result, we cloned the glass block window all the way to the ground to hide the trash can.
We also showed you how you can clone from one layer to another layer.
Please take a minute and answer the multiple choice quiz below. We hope you enjoyed this tutorial and have a wonderful day!

1). How do you use the Red Eye tool?
| A). Select the Red Eye tool and Left click on the eye lashes. | |
| B). Select the Red Eye tool and Right click on the eye lashes and then select “Red Eye Reduction” from the menu. | |
| C). Select the Red Eye tool and Left click on the center of the pupil. | |
| D). Select the Red Eye tool and Right click on the pupil and then select “Red Eye Reduction” from the menu. |
2). The Clone Stamp Tool is used for?
| A). To copy specific sections of the image to another area. | |
| B). To copy the whole image to another layer. | |
| C). To copy the whole image to another file. | |
| D). To copy only black pixels to a specific area of the image to another area. |
3). In the Pattern Stamp tool, what does the “Impressionist” option do?
| A). It makes an impression of the stamp and will darken the stamp. | |
| B). It creates an artistic effect which blurs some of the edges. | |
| C). It causes the Pattern to flip from top to bottom. | |
| D). It causes the Pattern to flip from left to right. |
4). What is the keyboard shortcut to use either the Pattern Stamp tool or the Clone Stamp Tool?
| A). “C”. | |
| B). “P”. | |
| C). “S”. | |
| D). “T”. |
5). What does the Opacity option in the Pattern Stamp Tool do?
| A). It tells Photoshop to darken a specific area. | |
| B). It is only used with a pen tablet and tells Photoshop how much you want that tool to bleed through to that layer. | |
| C). It tells Photoshop the diameter of the Pattern. | |
| D). It tells Photoshop how much you want that tool to bleed through to that layer. |
6). What key do you use to tell Photoshop the starting cloning area?
| A). “Shift”. | |
| B). “CTRL”. | |
| C). Space Bar. | |
| D). “ALT”. |
7). What causes red eyes in pictures?
| A). It is because the flash is reflecting from the retina in the person’s eye. | |
| B). It is caused by only digital cameras. | |
| C). It is caused when a person goes from a dark area into the bright light. | |
| D). It is caused by how the retina handles a sunny day. |
8). In the Patterns option bar, what does the “Align” option do?
| A). It will align to similar pixels. | |
| B). It will align to lines in the image. | |
| C). It keeps the pattern from bending. | |
| D). When turned on, it uses the same offset per stroke. |
9). What did we recommend when using the Clone Stamp tool?
| A). Always start off with a large brush. | |
| B). As you use this tool, remember you can change the starting location. | |
| C). Always use the “Mirror” option. | |
| D). Always use a starting cloning area that is right next (within a pixel range) to the area you want to paste the clone. |
10). We recommended that you start with what Pupil percentage for the Red Eye Tool?
| A). 75%. | |
| B). 100%. | |
| C). 50%. | |
| D). 25%. |
Answers: 1). C, 2). A, 3). B, 4). C, 5). D, 6). D, 7). A, 8). D, 9). B, 10). C
Scoring:
0 - 5 = Please review the video tutorial and re-read this document either offline (PDF) or online.
6 – 8 = We would recommend that you print this document off and read it at a later time.
9 – 10 = Congratulations you have passed the quiz. Go ahead and view another tutorial on our site.
We hope you enjoyed this detailed tutorial. Please visit us at: http://www.Photoshopeducation.blogspot.com to expand your knowledge within Adobe Photoshop.

Click Picture To Download Video File To View Offline
Download Total Video Player, iTinySoft

Click Picture To Download PDF Tutorial
Download Adobe Reader, Adobe Corporation
Click Picture To Download Supporting Files
(Brushes, Textures, Fonts, Images, Actions, .PSD, Etc.)
Download ZipGenius Standard Edition 6.0.3.1150, Dicono di ZipGenius


Glad you enjoyed!
ReplyDeletePhotoshop Detailed Tutorial Training Site >>>>> Download Now
ReplyDelete>>>>> Download Full
Photoshop Detailed Tutorial Training Site >>>>> Download LINK
>>>>> Download Now
Photoshop Detailed Tutorial Training Site >>>>> Download Full
>>>>> Download LINK Ew